Amazon WorkSpaces - Sign In

Amazon WorkSpaces: Efficiently Create and Work with WorkSpaces

Amazon WorkSpaces


Amazon WorkSpaces is a completely managed desktop computing service which grants customers the ability to offer cloud-based desktops to end-users.

With this service, end users will get the ability to access resources, apps and documents with the devices that they choose like Kindle Fire, Android Tables, iPad or laptops.

It was launched for the sake of meeting the increasing customer demand for Cloud based DaaS.


How Does Amazon WorkSpaces Work?

Every WorkSpace is a persistent Windows Server 2008 R2 instance which resembles Windows 7, hosted on AWS cloud.

Desktops get streamed to the users through PCoIP and backed up data is going to get taken on by default each 12 hours.

Its Requirements for the users:

Internet connection having TCP and UDP open ports.

Downloading a free Amazon WorkSpaces client app for device.


How to Create Amazon Workspaces?

  1. Start by creating and configuring the VPC. (To learn about VPC Data Transfer Pricing, check out our available article.)
  2. Create an AD Directory with the steps below.
  • Go to Amazon WorkSpace Console using the following link: https://console.aws.amazon.com/workspaces/
  • Choose Directories, and click on Setup Directory from the navigation panel.
  • You will get a new page opened. Click on the Create Simple AD button, and start entering the needed details.
    Amazon WorkSpaces - Choose Directory Type

    Amazon WorkSpaces – Choose Directory Type


  • For the section of VPC, type in the required VPC details and click on Next Step.
    Amazon WorkSpaces - Create Simple AD

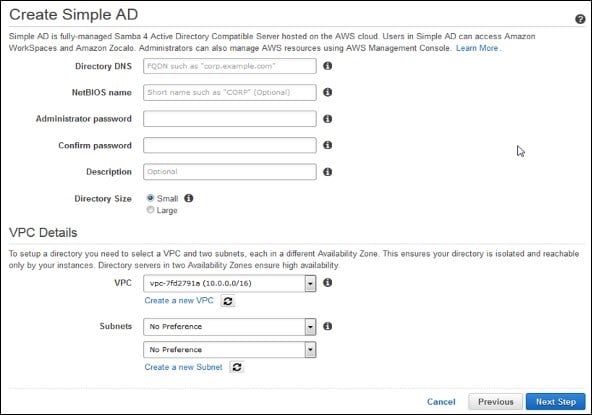
    Amazon WorkSpaces – Create Simple AD


  • The Review page is going to be displayed for you to go over your selected information. In case there is something wrong, perform the required changes. When everything is correct, click on the button Create Simple AD.

    Amazon WorkSpaces - Review

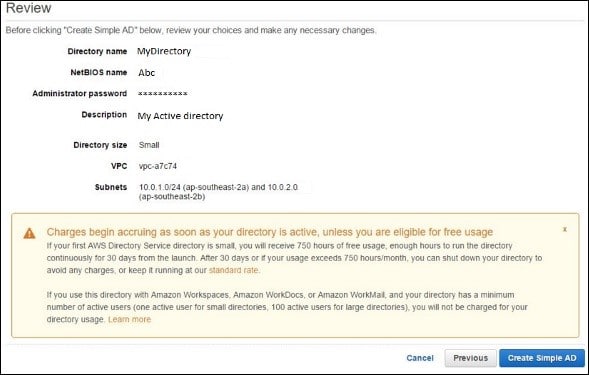
    Amazon WorkSpaces – Review

  1. Start creating a WorkSpace with the below steps.
  • Open the Amazon WorkSpace Console using the following link: https://console.aws.amazon.com/workspaces/
  • Click on Workspaces then launch WorkSpaces option from the navigation panel.
    Amazon WorkSpaces - Launch WorkSpaces

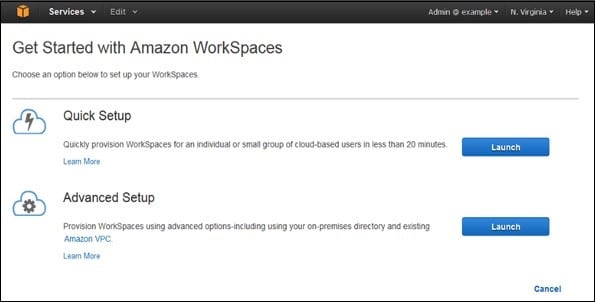
    Amazon WorkSpaces – Launch WorkSpaces


  • Choose the cloud directory. Select enable/disable WorkDocs for all users found in this directory. Once done, click on Yes, Next.
  • You will get a new page displayed. Enter the new user’s details, then click on the Create Users button. As soon as the user gets added to the WorkSpace list, click on Next.
    Amazon WorkSpaces - Create users

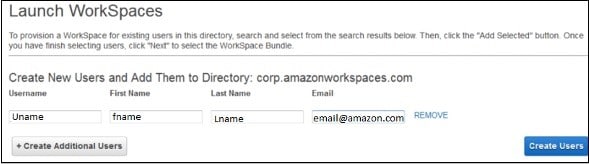
    Amazon WorkSpaces – Create users


  • Type in the needed number of bundles inside the value field of WorkSpaces Bundles page, and click on Next.
  • You will find a review page displayed in front of you. Go over the supplied details, then perform any needed changes. Click on Launch WorkSpaces.

You will get a message for the sake of confirming the account, and you will then be able to start using WorkSpaces.

  1. Start testing your WorkSpaces by going over the below steps.

First you will need to download and install the Amazon WorkSpaces client app from this link: https://clients.amazonworkspaces.com/.

  • Start running the app. As a first time, you must type in the registration code which you will get by email. Then, click on Register.
  • Now, it’s time for connecting to the WorkSpace through typing in the user name and password for the user. Click on Sign In.
  • At this point, you will see WorkSpace desktop. Head to the following link http://aws.amazon.com/workspaces/on web browser. Navigate and make sure that the page is capable of being viewed.
  • You will get a message stating the following “Congratulations! Your Amazon WorkSpaces cloud directory has been created, and your first WorkSpace is working correctly and has Internet access”.


What are the Features of Amazon WorkSpaces?

Check-Up for Network Health

By using this feature, you can verify whether your network and Internet connections are working perfectly well, check whether WorkSpaces along with their associated registration services are accessible, and check whether the port 4172 is open for UDP and TCP access.


Auto Resume Session

This feature provides the client with the ability to resume a disconnected session because of whatever reason in network connectivity within a period of 20 minutes. Users are capable of disabling this feature whenever they want in group policy section.


Console Search

Using this feature, Administrators are capable of searching for WorkSpaces through their directory, bundle type or user name.


Client Reconnect

Using this feature, users can access their WorkSpace with no need to fill in their credentials each time they disconnect. An access token is saved in a secure store and remains valid for a period of 12 hours to authenticate the correct user. Users may simply click the Reconnect button shown on the app for gaining access. This feature may be disabled at any time.


What are the Benefits of Amazon WorkSpaces?

  • Selectable apps and devices
  • Ease of set up
  • Cost-effectiveness

Aurora Serverless Pricing Calculator

WordPress Lightsail Instance - Dashboard

How to Launch a WordPress Lightsail Instance

WordPress Lightsail instance

Follow the below steps to learn how to launch a WordPress Lightsail Instance in just a couple of minutes:

  1. First, you will need to start creating an Amazon Lightsail Account.

It will be free tier eligible.

Sign-up for AWS

Otherwise, if you already have an account, simply Sign-in.

  1. Second, you will need to start creating a WordPress Lightsail instance using Lightsail.

Go over the below steps for getting your WordPress instance set and run it on Lightsail.

a. Login to Lightsail console.

b. From the Instances tab located on the Lightsail home page, select the option Create instance.

c. Select which AWS Region and Availability Zone you’d like to choose for your instance.

d. Select an instance image.

  • Select Linux/Unix to be the platform.
  • Select WordPress to be the blueprint.

e. Select your needed instance plan.

Each plan you choose will have a cheap, known cost, machine configuration and data transfer allowance. You are capable of trying out the $3.50 USD Lightsail plan with no charge for a whole 1 month and up to 750 hours. AWS will give you 1 free month.

f. Fill in a specific name for your selected instance.

Follow the below resource name guidelines:

  • Unique within every Region in your Lightsail account.
  • Includes 2 to 255 characters.
  • Begins and ends with an alphanumeric number or character.
  • It may have alphanumeric numbers, characters, periods, underscores and dashes.

g. Click on the option Create instance.

  1. Third, you will need to connect to your instance using SSH and then receive your WordPress website’s password.

You will find the default password for signing into the administration dashboard of your WordPress website to be stored on your instance.

Go over the below steps for connecting to your instance with the browser-based SSH client in the Lightsail console. After that, go get your required password for the administration dashboard.

a. On the Instances tab of the Lightsail home page, click on the SSH quick-connect icon for your WordPress Lightsail Instance.

WordPress Lightsail Instance - Instances Tab

WordPress Lightsail Instance – Instances Tab

b. As soon as you get the browser-based SSH client window opened, you will need to fill in the below command for the sake of retrieving your default application’s password:

cat $HOME/bitnami_application_password

c. Save and keep in mind the password shown to you on the screen. You are going to need it soon to sign into your WordPress website’s administration dashboard.

WordPress Lightsail Instance - Password

WordPress Lightsail Instance – Password


  1. Fourth, you will need to sign into the administration dashboard of your WordPress website.

After you obtain the password for your WordPress website’s administration dashboard, you will be able to finally sign in.

From the administration dashboard, you are capable of doing the following and much more:

– Changing your user password

– Install plugins

– Changing your website’s theme


Go over the below steps for the sake of signing in to your WordPress website’s administration dashboard:


a. From a browser, head to the following link:

http://PublicIpAddress/wp-login.php

When you see the address, change PublicIpAddress and enter instead your WordPress instance’s public IP address. You will be able to obtain your instance’s public IP address by heading to the Lightsail console as displayed in the below image:

WordPress Lightsail Instance - Running Instance

WordPress Lightsail Instance – Running Instance


b. Log In to your instance.

  • For the section of Username or Email Address box, type in “user”.
  • For the section of the Password box, type in the default password that you previously got in this tutorial.
  • Click on Log in.
WordPress Lightsail Instance - WordPress Login

WordPress Lightsail Instance – WordPress Login

You will find yourself signed in to your WordPress website’s administration dashboard. Here you will be capable of performing administrative actions.

  1. Fifth, you will need to start creating a Lightsail static IP address and then get it attached to your WordPress Lightsail instance.

Your WordPress instance’s Default public IP is going to change when stopping and starting your instance.

The instance’s attached static IP address is going to stay the same regardless of when you stop and start this instance.

Go over the below steps for creating a static IP address and then attaching it to your WordPress Lightsail instance:

a. From the Instances tab of the Lightsail home page, select your running WordPress instance.

WordPress Lightsail Instance - Instances Tab

WordPress Lightsail Instance – Instances Tab


b. Click on the Networking tab, and select the option of Create static IP.

WordPress Lightsail Instance - Create Static IP

WordPress Lightsail Instance – Create Static IP


c. The 2 options of static IP location and the attached instance will be pre-chosen according to which instance you have selected previously in this tutorial.

WordPress Lightsail Instance - Attach to Instance

WordPress Lightsail Instance – Attach to Instance


d. Enter a name for your static IP, and click on Create.

WordPress Lightsail Instance - Static IP Name

WordPress Lightsail Instance – Static IP Name

  1. Sixth, you will need to start creating a Lightsail DNS zone and then mapping a domain to your WordPress Lighstail instance.

No, begin transferring the management of your domain’s DNS records to Lightsail. By doing so, you will be able to effectively perform the mapping of a domain to your WordPress instance, as well as manage additional resources of your website through the Lightsail console.

Go over the below steps for creating a Lightsail DNS zone and then mapping a domain to your WordPress instance.

a. Go to the Networking tab of the Lightsail home page, and click on Create DNS zone.

WordPress Lightsail Instance - Networking Tab

WordPress Lightsail Instance – Networking Tab

b. Fill in your domain, and click on Create DNS zone.

WordPress Lightsail Instance - Create DNS Zone

WordPress Lightsail Instance – Create DNS Zone

c. Save the name server address which is shown on the page.

Those name server addresses are to be added to your domain name’s registrar for the sake of transferring the management of the DNS records of your domain to Lightsail.


d. Upon transferring the management of your domain’s DNS records to Lightsail, you will need to start adding an A record for the sake of pointing the apex of your domain to your WordPress Lightsail instance, just as show below:

Those name server addresses are added to your domain name’s registrar for the sake of transferring the management of your domain’s DNS records to Lightsail.

WordPress Lightsail Instance - DNS Record

WordPress Lightsail Instance – DNS Record

  1. In section of DNS zone for your domain, click on Add record.
  2. For Subdomain box, type in an @ symbol for the sake of mapping your domain’s apex, like: “example.com”, to your instance. This added @ symbol will symbolize that you are about to add an apex record, and it’s not added as a subdomain.
  3. For the Maps to box, select the static IP which was attached to the WordPress instance in the previous step of this tutorial.
  4. Click on the save icon.

Give it a couple of minutes till the change propagates across the internet’s DNS before your domain begins routing traffic to your WordPress Lightsail instance.

If you’d like to learn more about LightSail and what it offers, check out our provided article for more information about LightSail.

AWS Load Balancer Pricing

Amazon S3 File - Review File Upload

How to work with Amazon S3 File: Store and Retrieve

Amazon S3 File


Follow this step-by-step tutorial for learning how to store your Amazon S3 file on the cloud using Amazon S3.

Amazon S3 represents a service which allows you to start storing your data, which are named objects, at a massive scale.

Go over this tutorial for creating an Amazon S3 bucket, then uploading an Amazon S3 file, and retrieving this file along with deleting it when its no longer needed.

You can follow this tutorial while staying within the AWS Free Tier.

You will need to have an Account to be able to store your files with AWS

Creating a Free Account will only take a couple of Minutes

The AWS Free Tier comes with the following features and advantages:

5GB of storage

2,000 Put Requests using Amazon S3

20,000 Get Requests


First Step: Entering Amazon S3 Console

To go to the AWS Management Console, you will need to click on this link https://console.aws.amazon.com/console/home. It is going to open in a new browser window, to keep you following this step-by-step guide.

As soon as the screen loads, you will have to fill in your user name and password for the sake of getting started. After that, you will need to type S3 into the search bar, then choosing S3 for opening the S3 console.

Amazon S3 File - Search for S3

Amazon S3 File – Search for S3


Second Step: Creating S3 Bucket

For this step, you are going to start creating an Amazon S3 bucket. A bucket is the container you store your files in.

  1. From the S3 dashboard, select the option Create Bucket.

In case you are attempting to create a bucket for the first time, you are going to view a screen which resembles the below shown screenshot.

In case you previously created an S3 bucket, you will find a list of all your created buckets shown on your S3 dashboard.

Amazon S3 File - Create a Bucket

Amazon S3 File – Create a Bucket

  1. Type in a bucket name. A bucket name needs to be as unique as possible across every single existing bucket name in your Amazon S3. You will find that here are also a couple of other restrictions on how you name your S3 buckets as well. Now, choose a specific region for your bucket to get created in.

Once complete, click on the option Next.

  1. There are a lot of useful options for you to benefit from your S3 bucket such as the following:

– Versioning

– Server Access Logging

– Tags

– Object-level Logging

– Default Encryption

You will not need to get any of them enabled while following our tutorial. If you’d like to learn how to create a bucket with object lock enabled, follow this Locking an S3 Object Guide.

Click on the button Next.

  1. You are capable as well of setting your permission settings for the S3 bucket. You can choose who gets to be granted the required permissions for your bucket. However, we are going to leave the default values as they are for this tutorial and click on Next.
  2. Go over all of your configuration settings, then click on Create bucket.

Third Step: Uploading an Amazon S3 File

For this step of the tutorial, we are going to upload a chosen file to your newly created Amazon S3 bucket.

  1. You can find and locate your new bucket from the S3 console. Select the name of your bucket in order to gain access to this bucket.
Amazon S3 File - Select Bucket

Amazon S3 File – Select Bucket

2. After going inside to your bucket’s home page, click on the option Upload from under the Overview Tab.

Amazon S3 File - Upload File

Amazon S3 File – Upload File

3. For the sake of selecting a file for uploading it, you have two options for uploading files:

Either select Add files and choose the sample file which you would like to store in your S3 Bucket, or simply Drag and Drop this file right into the upload box.

Click on Next when you have chosen a file to upload.

4. You will see that you are also capable of setting your needed permission settings on your object for granting access to chosen users. However, in our tutorial, we are going to leave the default values just as they are, then click on Next.

5. You can start setting your property settings for encryption, metadata and storage class with your selected object. However, we are going to leave the default values as they are, then click on Next.

6. Go over your chosen configurations and make sure they are exactly what you need, then click on Upload. You can find and locate your object has been added into your S3 bucket’s home screen.


Fourth Step: Retrieving your Object

For this step of the tutorial, you are going to download your newly added Amazon S3 file from your Amazon S3 bucket.

  1. Click on the checkbox located besides the Amazon S3 file which you want to start downloading, and click on Download.
Amazon S3 File - Download File

Amazon S3 File – Download File


Fifth Step: Deleting your Object and your Bucket

It is very simple for you to delete your object and your bucket from the Amazon S3 console. Also, keep in mind that it would be the best thing for you to delete your unwanted and unused resources so that you don’t remain being charged a fee for them.

  1. We are first going to delete an object. Click on the checkbox which is located besides the file which you would like to delete and click on More > Delete.
  2. Go over and make sure that this is the object which you are aiming to delete. Once certain, click on Delete.
  3. Go to Amazon S3 by clicking on the Amazon S3 section above for viewing all of your buckets that are located in the selected region.
    Amazon S3 File - Go Back to Amazon S3

    Amazon S3 File – Go Back to Amazon S3


  4. Click on the right side of the bucket name of your created bucket for the sake of selecting it, and click on the button Delete. Enter your bucket’s name for deleting it and click on Confirm.

CloudFlare AWS S3

Serverless AWS Function - Featured Image

Run a Serverless AWS Function for “Hello, World!”

Serverless AWS Function


First: Login to the Lambda Console

Head to your AWS Management Console and locate Lambda below the section of Compute. Then, select it for the sake of opening the Lambda Console.

Serverless AWS Function - Lambda Compute

Serverless AWS Function – Lambda Compute


Second: Selecting your Lambda Blueprint of your Serverless AWS Function

  1. From the Lambda console, click on the button Create a Function.

Keep in Mind the following:
Using the console you will be able to view this page just in case you don’t already have a Lambda function created before. In case you have previously created a function, you are going to get the Lambda > Functions page. From the list page, select the option Create a function in order to head straight to the Create function page.

Serverless AWS Function - Lambda Console

Serverless AWS Function – Lambda Console

  1. Click on Blueprints.
  2. Inside the Filter box, enter “hello-world-python” then choose the “hello-world-python” blueprint.
  3. After that, select Configure.
Serverless AWS Function - Lambda Blueprint

Serverless AWS Function – Lambda Blueprint

Third: Configuring and Creating the Lambda Function which is a Serverless AWS Function

  1. Start off by filling in the Basic Information regarding your Lambda function.

Basic Information:

  • Name: Give a unique name for your Lambda function. In this tutorial, you will need to fill in “hello-world-python”.
  • Role: Create an IAM role using the needed permissions which may be assumed by the AWS Lambda for the sake of invoking your Lambda function for you. Click on the option of Create new role from template(s).
  • Role name: Enter the following name “lambda_basic_execution”.

Lambda Function Code:

  • Under this section, you will be able to go over the example code which is written in Python.
  1. Head straight to the bottom of the page then click on Create Function.
Serverless AWS Function - Basic Information

Serverless AWS Function – Basic Information


  1. Runtime options: It is possible for you to write your Lambda function code using either Python, C#, Java, Node.js or Go. In this tutorial, you will leave it as it is on Python 2.7for your runtime.
  2. Handler options: It is possible for you to set a handler where Lambda may start with the execution of your code. Lambda offers event data to be this handler’s input, that processes the event.

For our example, Lambda can identify this using the code sample then this needs to be previously populated using “lambda_function.lambda_handler”.

Serverless AWS Function - Configuration

Serverless AWS Function – Configuration

  1. Keep scrolling down for configuring your VPC, timeout and memory settings. In this tutorial, you will not change the default Lambda function configuration values and instead leave them as they are.
Serverless AWS Function - Execution Role

Serverless AWS Function – Execution Role

Fourth: Invoking your Lambda Function & Verifying your Results for your Serverless AWS Function

Using the console, you will get to see your “hello-world-python” Lambda function. You will be able to test this function, then start verifying its results, and going over the logs.

  1. Click on Configure Test Event in the drop-down menu named “Select a test event…“.
Serverless AWS Function - Successfully Created

Serverless AWS Function – Successfully Created

  1. The editor will now show for you to fill in an event for the sake of testing your function.
  • Select “Hello World” out of the Sample event template list.
  • Enter a specific event name such as “HelloWorldEvent”.
  • You are capable of altering the values found in the sample JSON, without changing the event’s structure. In this tutorial, you will need to change the “value1” and enter “hello, world!”.

Click on Create.

Serverless AWS Function - Test Events

Serverless AWS Function – Test Events

  1. Click on Test.
Serverless AWS Function - Test Success

Serverless AWS Function – Test Success


  1.  When execution completes successfully, go and view your results using the console:
  • In the Execution results section, you can verify that that your function’s execution was successful.
  • In the Summary section, you can see key info reported in the Log output.
  • In the Log output section, you can see the logs which the Lambda function execution tends to generate.
Serverless AWS Function - Result

Serverless AWS Function – Result


Fifth: Monitoring Metrics of your Serverless AWS Function

  1. Begin with invoking your Lambda function a couple of extra times through continuously clicking on the Test button. By doing so, you will be generating the metrics which may get viewed in later on in the coming step.
  2. Click on Monitoring for the sake of viewing your results.
Serverless AWS Function - Monitoring Tab

Serverless AWS Function – Monitoring Tab

  1. Keep scrolling down for the sake of viewing your Lambda function’s metrics. These metrics get reported through CloudWatch. It will be possible for you to leverage them for setting custom alarms.

Monitoring tab will display the following six CloudWatch metrics: 

Invocation count

Invocation duration

Invocation errors

Throttled invocations

Iterator age

DLQ errors

Using AWS Lambda, you are charged according to your usage. Upon reaching the AWS Lambda free tier limit, you will begin getting charged according to the number of requests for every one of your functions which is known as the invocation count, and according to the time of execution of your code which is known as the invocation duration.

Serverless AWS Function - Monitoring

Serverless AWS Function – Monitoring

Sixth: Deleting your Lambda Serverless AWS Function

Even though in the free tier you are not going to be charged for keeping this Lambda function, you are capable of simply deleting it using the AWS Lambda console.

  1.  Click on the Actions button then select the option Delete Function.
  2. Now you will need to give confirmation for terminating this function by simply clicking on Delete.


At Last!

After following this tutorial, you will have completed the creation of your very own first serverless AWS Lambda function. This will be the first step you take for comprehending the way to start running applications with no need for provisioning or managing any servers. Lambda is capable of automatically scaling your apps through running code as a response to every single trigger, while scaling with great precision using your workload’s size.

AWS Lambda Extensions

AWS Saving Plans

AWS RDS Read Replica - Featured Image

2 Examples of Using AWS RDS Read Replica

AWS RDS Read Replica

How to Create an AWS RDS Read Replica?


Keep in Mind

It’s not possible to create a read replica in another AWS account from that of the source DB instance.

Using the Console

For creating an AWS RDS read replica out of a source SQL Server, Oracle, MySQL, MariaDB or PostgreSQL DB instance, follow the below steps:

  1. Login to the AWS Management Console. Then, head straight to the Amazon RDS console using the following link https://console.aws.amazon.com/rds/.
  2. From navigation pane, click on the option Databases.
    AWS RDS Read Replica - Databases

    AWS RDS Read Replica – Databases


  3. Select which SQL Server, Oracle, MySQL, MariaDB or PostgreSQL DB instance you’d like to utilize to be the source for a read replica.
  4. In the section of Actions, click on the option Create read replica.
    AWS RDS Read Replica - Create Read Replica

    AWS RDS Read Replica – Create Read Replica


  5. In the section of DB instance identifier, fill in a specific name for the read replica.
    AWS RDS Read Replica - Identifier

    AWS RDS Read Replica – Identifier


  6. Select your required instance specifications. It is recommended that you utilize the exact DB instance class as well as storage type to be the source DB instance for the read replica.
  7. In the section of Multi-AZ deployment, click on the option Yes for creating a standby of your replica in a different AZ to get failover support for your replica.

    AWS RDS Read Replica - Multi AZ

    AWS RDS Read Replica – Multi AZ

Keep in Mind

When you create a read replica to be a Multi-AZ DB instance does not depend on the fact that if the source database is a Multi-AZ DB instance or not.

  1. For creating an encrypted read replica:
    AWS RDS Read Replica - Encryption

    AWS RDS Read Replica – Encryption

    1. Click on the option Enable encryption.
    2. In the section of Master key, select the AWS KMS key identifier of the CMK.

Keep in Mind

Your source DB instance needs to be encrypted.

  1. Fill in other options, like storage autoscaling.
  2. Click on the option Create read replica.


How to Promote an AWS RDS read replica to be a standalone DB instance?


Using the Console

For the sake of promoting an AWS RDS read replica to a DB instance, follow the below listed steps:

  1. Login to the AWS Management Console. Then, head straight to the Amazon RDS console using the following link https://console.aws.amazon.com/rds/.
  2. From the Amazon RDS console, click on the option Databases.

You will now see the Databases pane displayed. Every read replica displays Replica in the Role column.

  1. Select the read replica which you’d like to promote.
  2. In the section of Actions, click on the option Promote.
  3. From the page called Promote Read Replica, fill in the backup retention period and the backup window for your promoted DB instance.
  4. As soon as all the settings are perfectly set, click on the option Continue.
  5. From the acknowledgment page, click on the option Promote Read Replica.


How to Create an AWS RDS read replica in another AWS Region?

Below you can learn how it is possible to create a read replica from a source PostgreSQL, Oracle, MariaDB or MySQL DB instance in another AWS Region.

Using the Console

It is possible to create a read replica across Regions through the Management Console.

For the sake of creating an AWS RDS read replica across Regions using the console, follow the steps listed below:

  1. Login to the AWS Management Console. Then, head straight to the Amazon RDS console using the following link https://console.aws.amazon.com/rds/.
  2. From navigation pane, click on the option Databases.
  3. Select which PostgreSQL, Oracle, MariaDB or MySQL DB instance you’d like to utilize to be the source for a read replica.
  4. In the section of Actions, click on the option Create read replica.
  5. In the section of DB instance identifier, fill in a name for the read replica.
  6. Click on Destination Region.
  7. Select all the instance specifications you’d like to use. It is recommended that you utilize the exact DB instance class as well as the same storage type for your read replica.
  8. For creating an encrypted read replica in a different AWS Region:
    1. Click on the option Enable encryption.
    2. In the section of Master key, select the AWS KMS key identifier of the CMK of the destination Region.

Keep in Mind

For creating an encrypted AWS RDS read replica, the source DB instance needs to be encrypted.

  1. Fill in the remaining different options, like storage autoscaling.
  2. Click on the option Create read replica.


Examples of Cross-Region replication:


Example One: Creating a cross-Region read replica located outside of a VPC

Below is an example for creating a read replica in the region of “us-west-2” from a source DB instance located in the region of “us-east-1”. This read replica will get created outside of a VPC:

Unix, Linux or macOS:

aws rds create-db-instance-read-replica \

–db-instance-identifier SimCoProd01Replica01 \

–region us-west-2

–source-db-instance-identifier arn:aws:rds:us-east-1:123456789012:db:SimcoProd01

Windows:

aws rds create-db-instance-read-replica ^

–db-instance-identifier SimCoProd01Replica01 ^

–region us-west-2

–source-db-instance-identifier arn:aws:rds:us-east-1:123456789012:db:SimcoProd01


Example Two: Creating a cross-Region read replica inside a VPC

In this example we are going to create a read replica in the region of “us-west-2” from a source DB instance located in the region of “us-east-1”. This read replica will get created in the VPC associated with the set DB subnet group:

Unix, Linux or macOS:

aws rds create-db-instance-read-replica \

–db-instance-identifier SimCoProd01Replica01 \

–region us-west-2

–db-subnet-group-name my-us-west-2-subnet

–source-db-instance-identifier arn:aws:rds:us-east-1:123456789012:db:SimcoProd01

Windows:

aws rds create-db-instance-read-replica ^

–db-instance-identifier SimCoProd01Replica01 ^

–region us-west-2

–db-subnet-group-name my-us-west-2-subnet

–source-db-instance-identifier arn:aws:rds:us-east-1:123456789012:db:SimcoProd01


How to Monitor your AWS RDS read replication?

It is possible for you to monitor the status of an AWS RDS read replica in multiple ways. The Amazon RDS console will display the status of a read replica under the section of Availability and durability in the read replica details. For seeing the details of a read replica, select the name of your needed read replica out of the listed instances on the Amazon RDS console.

AWS RDS Read Replica - Status

AWS RDS Read Replica – Status

It is as well possible to view the status of a read replica utilizing the following command: “CLI describe-db-instances”, or using the RDS API “DescribeDBInstances” operation.

A status of an AWS RDS read replica may be 1 of the below listed:

  • Replicating: It is successfully replicating.
  • Error: There is an error that happened with the replication.
  • replication degraded (SQL Server): Replicas are now getting data from the primary instance, yet 1 or more databases might not be receiving updates.
  • stopped (MariaDB or MySQL): Replication was stopped due to a customer-initiated request.
  • replication stop point set (MySQL): A customer-initiated stop point has been set with the mysql.rds_start_replication_until stored procedure and replication is taking place.
  • terminated (MariaDB, MySQL, or PostgreSQL): Replication has been terminated.
  • replication stop point reached (MySQL): A customer-initiated stop point has been set with the mysql.rds_start_replication_until stored procedure and replication gets stopped due to reaching the stop point.

You can learn about Option groups with the How to Manage Your AWS RDS Option Group article.

AWS RDS DB Instance

AWS RDS DB Instance - Featured Image

How to Manage AWS RDS DB Instance

AWS RDS DB Instance


1. How to Temporarily Stop an AWS RDS DB instance?

It is possible for you to stop a DB with the AWS Management Console.

Using the Console

For stopping a DB instance, go through the below steps:

  1. Login to the AWS Management Console. Then, head straight to the Amazon RDS console using the following link https://console.aws.amazon.com/rds/.
  2. From navigation pane, click on the option Databases, and then select which DB instance you’d like to stop.
  3. In the section of Actions, click on the option Stop.

    AWS RDS DB Instance - Stop

    AWS RDS DB Instance – Stop

  4. You can optionally use the Stop DB Instance window by clicking on the option Yes for “Create Snapshot?”. Then, fill in a name in Snapshot name. Click on the option Yes for creating a snapshot of this DB instance prior to stopping it.
  5. Click on the option Yes, Stop Now for the sake of stopping your DB instance. Otherwise, click on the option Cancel for canceling the operation.


2. How to Start an AWS RDS DB instance which had been stopped before?

Using the Console

For starting a DB instance, go through the below steps:

  1. Login to the AWS Management Console. Then, head straight to the Amazon RDS console using the following link https://console.aws.amazon.com/rds/.
  2. From navigation pane, click on the option Databases. Then, select which DB instance you’d like to start.
  3. In the section for Actions, click on the option Start.


3. How to Modify an AWS RDS DB instance?

Using the Console

For modifying a DB instance, follow the below steps:

  1. Login to the AWS Management Console. Then, head straight to the Amazon RDS console using the following link https://console.aws.amazon.com/rds/.
  2. From navigation pane, click on the option Databases. Then, select which DB instance you’d like to modify.
  3. Click on the option Modify. You will be taken to the Modify DB Instance page.
    AWS RDS DB Instance - Modify

    AWS RDS DB Instance – Modify


  4. Make changes to the necessary settings.
    AWS RDS DB Instance - Modify DB Instance

    AWS RDS DB Instance – Modify DB Instance


  5. As soon as you finish all the needed changes, click on the option Continue and go over the summary of modifications.
  6. You can optionally click on the option Apply immediately for the sake of applying these changes directly. By clicking on this option sometimes an outage may occur.
  7. From the page of confirmation, go over your changes. In case they are all as you want correctly, click on the option Modify DB Instance for the sake of saving your changes.

Otherwise, click on the option Back for editing your changes or Cancel for canceling your changes.


4. How to Apply updates for an AWS RDS DB instance?

Using the Console

For managing an update for a DB instance, go through the below steps;

  1. Login to the AWS Management Console. Then, head straight to the Amazon RDS console using the following link https://console.aws.amazon.com/rds/.
  2. From navigation pane, click on the option Databases.
  3. Select which DB instance needs a required update.
  4. In the section of Actions, go with 1 of the below choices:
  • Upgrade now
  • Upgrade at next window


5. How to Adjust the preferred AWS RDS DB instance maintenance window?

Using the Console

For adjusting the preferred maintenance window, go over the below steps:

  1. Login to the AWS Management Console. Then, head straight to the Amazon RDS console using the following link https://console.aws.amazon.com/rds/.
  2. From navigation pane, click on the option Databases. Then select which DB instance you’d like to modify.
  3. Click on the option Modify. You will find the Modify DB Instance page.
  4. For the Maintenance section, start updating the maintenance window.

    AWS RDS DB Instance - Maintenance

    AWS RDS DB Instance – Maintenance

  5. Click on the option Continue.

From the page of confirmation, go over your changes.

  1. For the sake of directly applying the changes to the maintenance window, click on Apply immediately.
  2. Click on the option Modify DB Instance for saving your changes.

Otherwise, you are capable of clicking on the option Back for editing your changes, or simply click on the option Cancel for canceling your changes.


6. How to Manually upgrade the engine version?

Using the Console

For upgrading the engine version of a DB instance through the console, go over the below steps:

  1. Login to the AWS Management Console. Then, head straight to the Amazon RDS console using the following steps https://console.aws.amazon.com/rds/.
  2. From navigation pane, click on the option Databases. Then, select which DB instance you’d like to upgrade.
  3. Click on the option Modify. You will find the Modify DB Instance page.
  4. In the section of DB engine version, select the new version.

    AWS RDS DB Instance - DB Engine Version

    AWS RDS DB Instance – DB Engine Version

  5. Click on the option Continue then go over the summary of modifications.
  6. For directly applying the changes, click on the option Apply immediately. By selecting this option, an outage may sometimes occur.
  7. From the page of confirmation, go over your changes. In case they are all completely right, click on the option Modify DB Instance for saving your changes.

Otherwise, click on the option Back for editing your changes, or click on the option Cancel for canceling your changes.


7. How to Rename for replacing an existing AWS RDS DB instance?

Using the Console

For renaming a DB instance, go over the below steps:

  1. Login to the AWS Management Console. Then, head straight to the Amazon RDS console using the following link https://console.aws.amazon.com/rds/.
  2. From navigation pane, click on the option Databases.
  3. Select which DB instance you’d like to rename.
  4. Click on the option Modify.
  5. For the option of Settings, fill in a new name for DB instance identifier.
  6. Click on the option Continue.
  7. For the sake of directly applying changes, click on the option Apply immediately. By selecting this option, an outage may sometimes occur.
  8. From the page of confirmation, go over your changes. In case they are all correct, click on the option Modify DB Instance for saving your changes.

Otherwise, you can click on the option Back for editing your changes, or click on the option Cancel for canceling your changes.

To learn about the prices of an AWS RDS DB Instance, check out the available article for AWS RDS Instance Pricing.