Amazon’s Simple Storage Service- S3 is a highly recommended service on the AWS platform. The service helps users to store content in the form of Buckets. Each bucket stores a variety of data for the users. The best thing about this service is you will be asked to pay for the storage space used by you. Reducing the data storage cost, it saves a lot of money in the monthly billing cycle. Sites that rely on AWS can be hosted on Cloudflare AWS S3. Let’s see how it is done!
Configuration of AWS S3 Buckets
A Bucket is a public cloud storage resource of the AWS S3 service. You can set up a separate Bucket for the main domain and for the subdomain. In this article, we will explain how you can set up AWS S3 Buckets on the subdomain and on the main domain.
Setting up an S3 Bucket for Subdomain and Root domain
The first thing you need to do here is to create an S3 Bucket. You can create a new Bucket from the AWS Console page. Log into your AWS account and search for the S3 service. Select the Bucket option and then click the Create a new Bucket option.
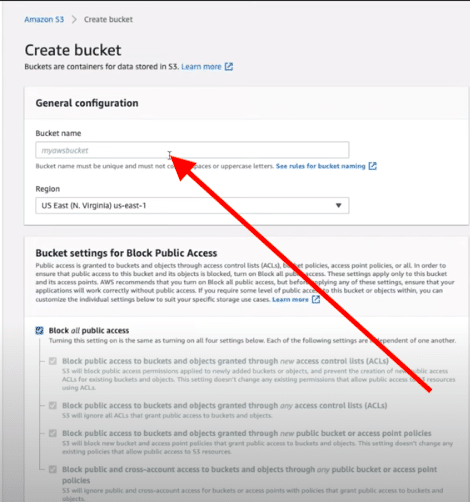
Setting up an S3 Bucket for Subdomain and Root domain
For better understanding, give a specific name to the newly created bucket. Once you create a bucket, you need to enable it for the static website. Go to the bucket and select the Properties option, select the Static Website Hosting option, and enable it.
Likewise, you need to follow the same steps for the main domain i.e. for the second bucket that you create for the main domain. You need to enable the Static Website Hosting option there as well. You need to be a little tech-savvy to do this, as it needs some additional changes while setting up a subdomain and domain with S3 Bucket for a new website.
Configuration of Cloudflare AWS S3
Until now, you have created your new Buckets using Amazon’s S3 service and also enabled hosting for them to behave as new websites. You need to setup Cloudflare Proxies so that the websites respond with Cloudflare’s IP addresses only. The list of working IP addresses of Cloudflare can be fetched from this link.
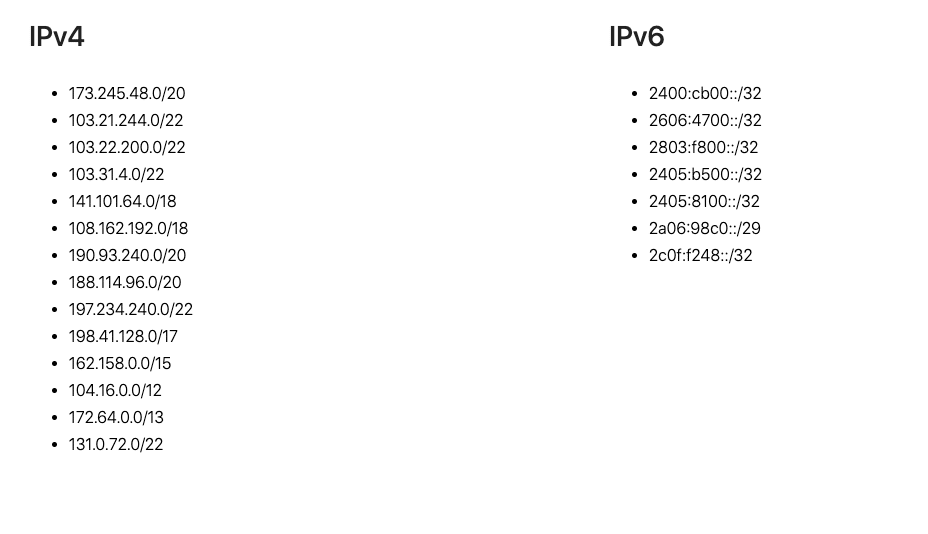
Configuration of Cloudflare AWS S3
For the newly created Bucket, you need to add Bucket Policy. The following steps will give you more information about this.
Go to the AWS S3 service page and select the Bucket name created by you. From the Dashboard of the Buckets, click the Permissions tab, and then choose the Bucket Policy option.
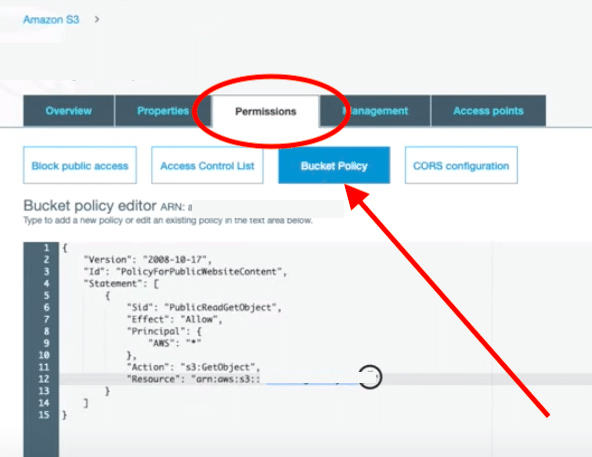
Configuration of Cloudflare AWS S3 – 2
Once you select the Bucket Policy Option, you will be presented with the editor window where you can enter the required code. Since we are setting up Cloudflare, you can copy and paste the below-given JSON code to the Bucket Policy Editor Window. If you know how to write JSON code, you can write up your own code in the editor window. For reference, you can use the below-given code.
{

  "Version": "2008-10-17",

  "Id": "PolicyForPublicWebsiteContent",

  "Statement": [

    {

      "Sid": "PublicReadGetObject",

      "Effect": "Allow",

      "Principal": {

        "AWS": "*"

      },

      "Action": "s3:GetObject",

      "Resource": "arn:aws:s3:::YOURBUCKETNAME/*”

    }

  ]

}
Setup new Website on Cloudflare with AWS S3
You need to locate the endpoint for each domain that you create to set up on Cloudflare. You can locate it from the Properties tab. Go to the AWS S3 page, select Bucket, and then choose Properties. From the Properties tab, select Static website hosting and then the Endpoint option.
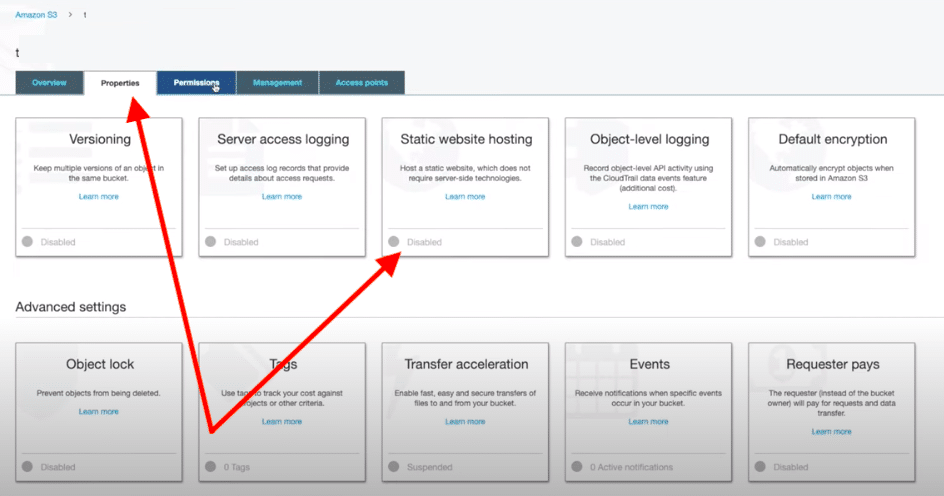
Setup up new Website on Cloudflare with AWS S3
Since you are going to set up a new website on Cloudflare, you must have an active account on Cloudflare. Go to the account by entering your username and password and then click the Add a domain to Cloudflare option.
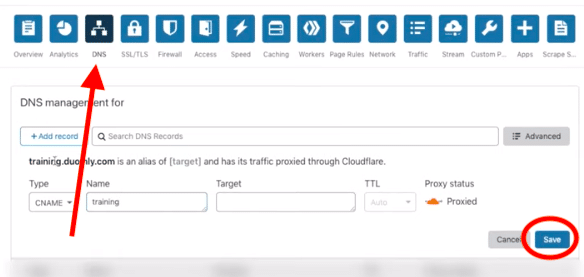
You need to create CNAME records for the main domain and the subdomain. From the Add a domain to Cloudflare page, select the DNS Query Results option. Here, you need to add CNAME records for each domain that you need to set up on Cloudflare.
Setup up a new Website on Cloudflare with AWS S3 – 2
In the records tab, you will be asked to enter the name, value, and other important details for the domain and subdomain. Make sure to enter these details carefully as these details are directly associated with the domains.
Once you save the Records i.e. the name and value for the domain and root domain, you need to finish up the setup process by changing the nameservers to Cloudflare.
Uploading a Website to S3
You have successfully set up the S3 Buckets as web hosting. You have also set up the websites to work with Cloudflare. The last thing you need to do is upload a website to S3 to make it public.
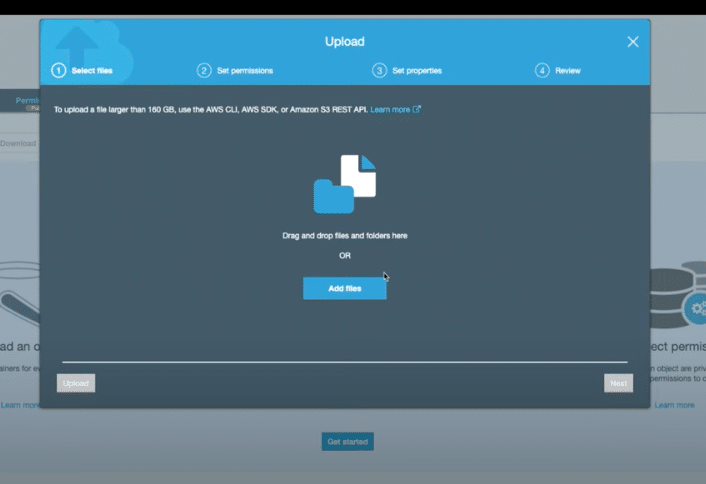
Go to the S3 Bucket option and select the View tab. From here, click the Upload option. From here, you can select files or drag and drop them from the Desk and then follow the on-screen instructions to save the data. You are allowed to set up permissions using the permissions window for each file that you create. Make sure you verify everything well before you hit the Save button.
Uploading a Website to S3
Conclusion:
This is how you can create a new S3 Bucket and can set it up to act as a website with Cloudflare. The configuration process is a bit lengthy and it requires a focused person. Make sure you know how to set up a new website and configure a new domain on the platform. You can also follow video tutorials that will help you to set up Cloudflare AWS S3.
See Also