Introduction Azure DevOps Pipelines
You are exhausted from monotonous manual tasks like building, testing, and deploying software applications, right? Azure DevOps Pipelines is here to save the day!
Microsoft’s Azure DevOps Pipelines is a cloud-based service that offers a wide-ranging continuous integration and continuous transfer (CI/CD) method as a key factor of the Azure DevOps suite. It permits development teams to create, test, and deploy software applications to any platform or cloud service, all within the same integrated Pipeline. Azure DevOps Pipelines is a vital tool for modern development teams as it empowers them to update their software distribution process and stay ahead of the competition.
Teams can adjust the whole software process, from source control to production deployment, and maximize a range of pre-built and modified tasks and integrations with the help of Azure DevOps Pipelines. This facility offers a flexible and scalable tactic for building and delivering software by permitting teams to lessen development cycle times, increase deployment frequency, and deliver high-quality software applications proficiently.
In this guide, we’ll go through generating an Azure DevOps Pipeline. So, let’s take it up!
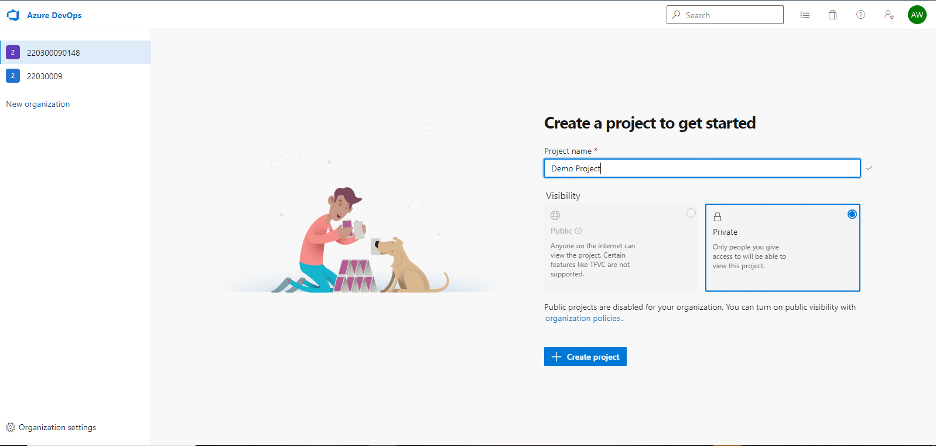
Before creating a Pipeline, You need to create a project. Let’s start by creating our project.
Step 1: Create a new Project
Log in to your Azure DevOps account, click the “New Project” button on the home screen, and track the prompts to create your project.

Step 2: Generate a new Repository.
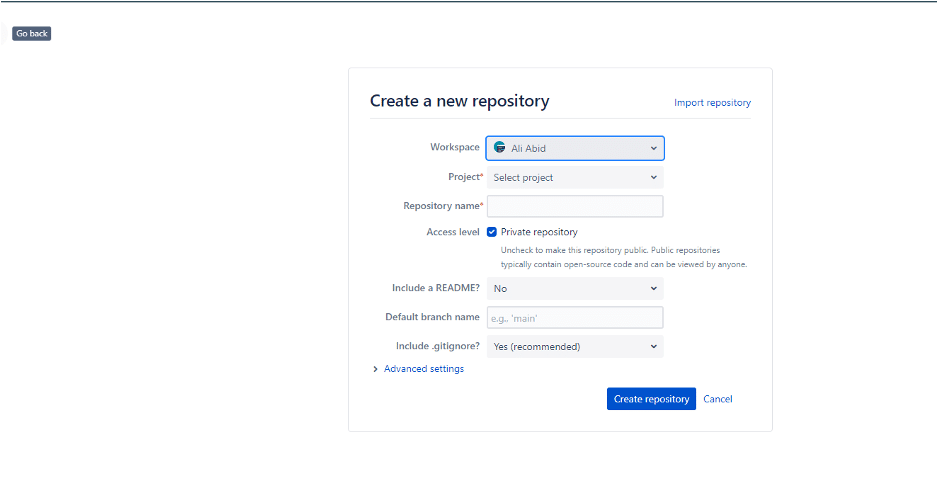
After creating your project, click the “Repositories” tab and the “New repository” button to create a new repository to store your code.

Here you can choose the type of repository you want to generate, such as Git or Team Foundation Version Control (TFVC), or you can also import your Fit Rep.

Step 3: Create a Pipeline After Adding the Code
After creating your repository, add your code by cloning the repository to your local machine and then push it back to Azure DevOps.
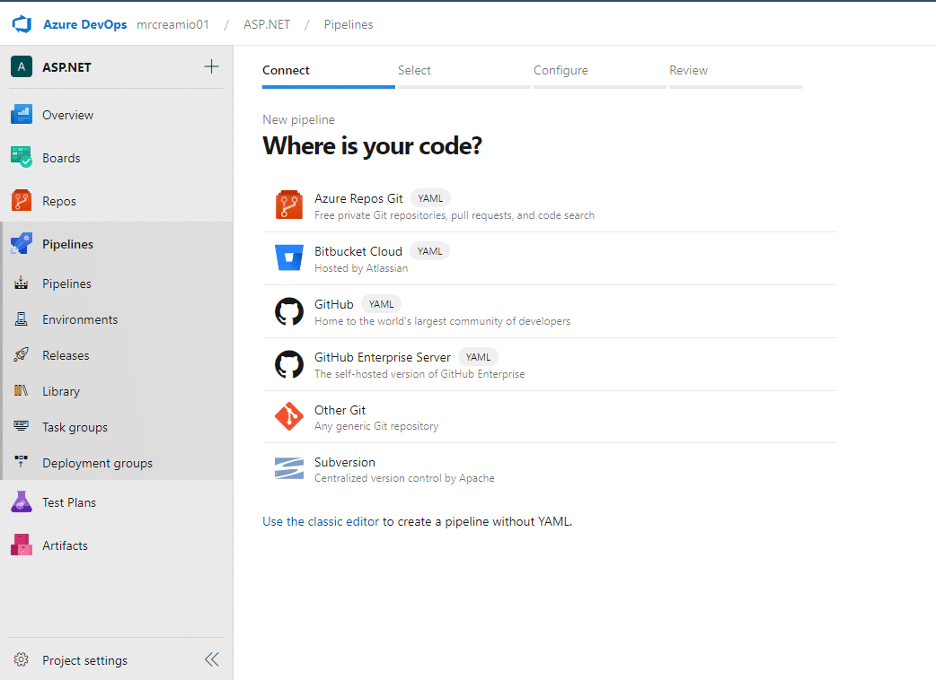
You can easily create a new Pipeline by clicking the “Pipelines” tab and selecting “Create Pipeline.”

Azure DevOps Pipelines
Creating a Pipeline is a simple 4-step process.
STEP 1
Azure DevOps offers numerous templates to select your code. To make a Classical Pipeline, choose the Other Git option and follow the steps. For now, we have created a YAML Pipeline. For this, Select GitHub.

STEP 2
The next step is to choose your Repository.

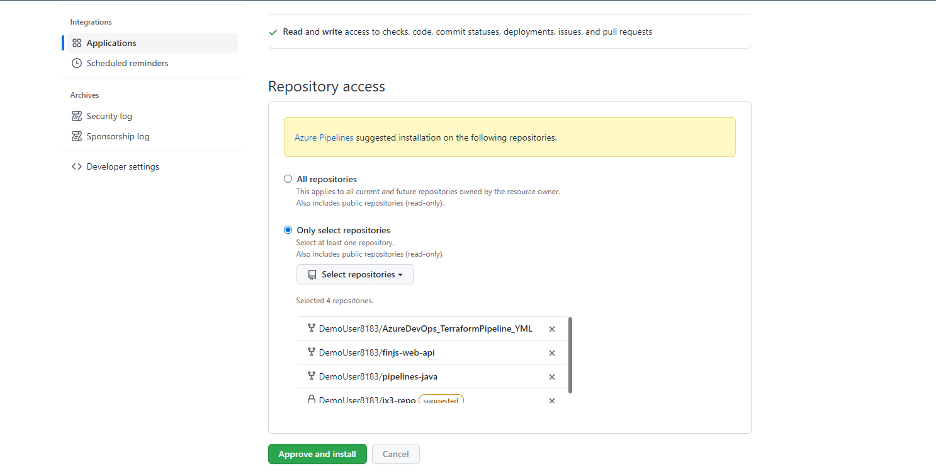
After choosing your Repo, Install it by implementing the authorisation procedure.

STEP 3
Here, the next step is to do configuration. For now, the ASP.NET option is chosen.

STEP 4
The last step is to review your Pipeline by customising the code.

The process mentioned above will create your Pipeline, as illustrated below.

Step 4: Run the Pipeline
After configuring and reviewing your Pipeline, you can run it by clicking the “Run Pipeline” button. It will trigger the Pipeline to execute your defined stages and tasks. You can view the Pipeline’s progress in real-time in Analytics, including failures.

Step 5: Monitoring the Pipeline
After running your Pipeline, you can monitor its status by going to the “Pipelines” tab. Here, you can see a summary of the Pipeline’s position, containing errors or warnings during the run. The Pipeline’s real-time Analytics can be seen here.

Overview of the Pipeline development process and settings: Triggers, Alerts, and Stages
Building a Pipeline defines a sequence of steps data goes through, from assimilation to processing to output. Each stage in the Pipeline can have different settings, triggers, and alerts that regulate how data streams through the Pipeline.
Here is a summary of the Pipeline formation process and settings.
Defining Triggers
Azure DevOps supports various triggers, including continuous integration (CI), scheduled, and manual triggers. Triggers are used to start the Pipeline spontaneously whenever there is an alteration in the code repository. CI triggers are the most common, allowing the Pipeline to start automatically whenever a new code change is pushed to the repository.

Configuring Alerts
Alerts notify team members of any issues or errors during the Pipeline run. Azure DevOps permits you to configure alerts for numerous actions, such as when a Pipeline run fails or a new release is deployed. Further, you can set up alerts to notify specific team members via email or other messaging services.

Setting up Stages
Stages signify the different phases of the Pipeline, such as building, testing, and deploying the code. Each stage can have one or more jobs, which define the specific tasks to be performed during that stage. Azure DevOps allows you to set up numerous stages to generate a Pipeline that fits your development process.
The “stage” keyword is only used when you want your Pipeline to organise into different stages. You do not need to define the keyword “stage” for simple logical boundaries in your Pipeline.

Configuring Pipeline Settings
Numerous Pipeline settings can be configured in Azure DevOps, including build options, artefact management, and deployment targets.
Build options allow you to modify the build procedure by identifying build scripts, tools, and configuration settings.
Artefact management empowers you to store and manage the artefacts generated during the Pipeline run, such as executable files, code libraries, and configuration files.

Deployment targets define the sceneries where the code will be deployed, such as test, staging, and production situations.

Adding new Tasks and Scripts to Pipeline Stages
Highly customisable Azure DevOps Pipelines allow teams to add new tasks and scripts to Pipeline stages to meet their needs. Here’s how to add new tasks and scripts to Pipeline stages in Azure DevOps.
Step 1: Open the Pipeline.
You must first open the Pipeline in the Azure DevOps interface to add new tasks or scripts to a Pipeline. Click the “Pipelines” tab and select the Pipeline you want to modify.

Step 2: Add a new task.
To add a new task to a stage, click on the stage you want to modify and then click on the “+” button to add a new task. Azure DevOps provides a diversity of pre-built tasks, such as “Copy Files” or “Publish Build Artifacts,” that you can use to configure your Pipeline. Choose a suitable task for your needs.

Step 3: Configure the Task
Configure after you have added a new task. Click on the task to open the configuration option.

Click on “View YAML”. Here, you can specify the task name, inputs, and outputs.

Step 4: Save and commit changes
After you have added and configured your new task, save and commit your changes to your Pipeline. Click the “Save and Queue” button to commit changes and trigger a recent Pipeline run.

Once you have saved the Pipeline, you must run it and check if it works properly.
By adding new tasks and scripts to Pipeline stages in Azure DevOps, you can customise your Pipelines to meet the specific needs of your software development process. With the ability to add custom tasks and scripts, you can automate repetitive tasks, improve the efficiency of your development process, and reduce errors.
Monitoring Pipeline Runs and Logs
It is essential in the Azure DevOps Pipeline to monitor Pipeline runs and logs. It helps to identify and troubleshoot errors and issues that may arise during Pipeline execution. Here are the steps for monitoring Pipeline runs and logs:
Step 1: Accessing the Pipeline
To monitor a Pipeline run, you must first access the Pipeline you want to monitor. Go to the Azure DevOps dashboard and click the “Pipelines” tab. From there, select the Pipeline that you want to monitor.

Step 2: View Pipeline Runs
Once you have accessed the Pipeline, you can view all the runs implemented. Select the “Runs” tab to see a list of all the runs executed for the Pipeline.

Step 3: Review the run details.
Click on the one you desire to screen for showing a particular run. That will take you to the run details page setup, where all the run specifics can be seen, including the time of beginning, end time, whole duration and status.

Step 4: Review the logs
To monitor the logs for the run, click on the tab saying “ Logs” on the page for run details. A detailed log of all the performed activities during the run will be displayed. You can use a log to identify the errors in between runs.

You can check raw logs by clicking the “ View Raw Log” button or download the log file by clicking the“ Download Log” button.
Step 5: Filter the logs.
If the log is extra-long and has irrelevant information, you can filter the log to display the relevant information only. You can use the logs to filter Stages, tasks or keywords etc.

Step 6: Debug the Pipeline
The log can debug the Pipeline if there are any issues or errors throughout your Pipeline run. The log provides information regarding any error, including the location and severity of the issue.

Summarizing all of the above, Pipelines run, and logs monitoring is essential to the Azure DevOps Pipeline process. By following the above points, Monitoring your Pipeline run and logs can be easy to recognise and troubleshoot errors and problems, ensuring that your Pipeline runs effectively.
Troubleshooting any problems with the Pipeline
Azure DevOps Pipelines are important parts of the software development procedure, but as with any other technology, they can sometimes meet issues. Here are some usual troubleshooting stages of recognising and resolving Pipeline problems:
Check the logs – If your Pipeline meets errors, the first step is to check the logs. The logs provide thorough details about what did happen during the run, including any errors or cautions.
Review Pipeline configuration – Evaluate the Pipeline configuration to confirm that all phases, tasks, and dependencies are properly configured. Ensure all the needed fields to be filled out, as well as necessary permissions, are included.
Check for updates – If you witness problems with a particular task or stage, check for any updates present. Azure DevOps frequently updates its task library, so updating your tasks can resolve errors.
Run the Pipeline in debug mode – Azure DevOps Pipelines possess a debug mode that can make identifying problems easy. The debug mode displays extensive information regarding tasks as they run, making them easier to pinpoint problems.
Check for dependencies –If your Pipeline fails to build, you may miss a dependency. So make sure that all the needed libraries, frameworks and required packages are in the repository.
Reach out to support – If you have tried all other troubleshooting steps and are still getting issues, contact Azure DevOps support. They offer extra management and aid to help you resolve the problem.
Pipeline Security and Permissions
Security is key to any software development method, and Azure DevOps suggests certain features to assist with managing Pipeline security and permissions. Here are some steps to secure your Pipelines:
Set up authorisations – Azure DevOps offer granular consent settings helping you take control of who can edit, view, and run Pipelines. Ensure permissions are set up correctly to prevent illegal access to your Pipelines.
Use role-based access control – RBAC is a privacy mechanism that enables the distribution of some specific roles to a wide range of users or groups based on which they are granted contact approvals. By implementing RBAC, it becomes possible to ensure that users are only given access to the relevant Pipelines necessary for performing their respective job responsibilities.
Use secure credentials – When configuring your Pipeline, use secure credentials for any required authentication. Azure DevOps provides numerous options for securely storing and handling credentials.
Enable two-factor authentication – Two-factor authentication adds more security to your Azure DevOps account. Enabling this feature stops illegal access to all your Pipelines.
Monitor Pipeline activity – Frequently monitor your Pipeline activity to identify any suspicious activity. Azure DevOps provides several tools for monitoring Pipeline activity, such as activity logs and security alerts.

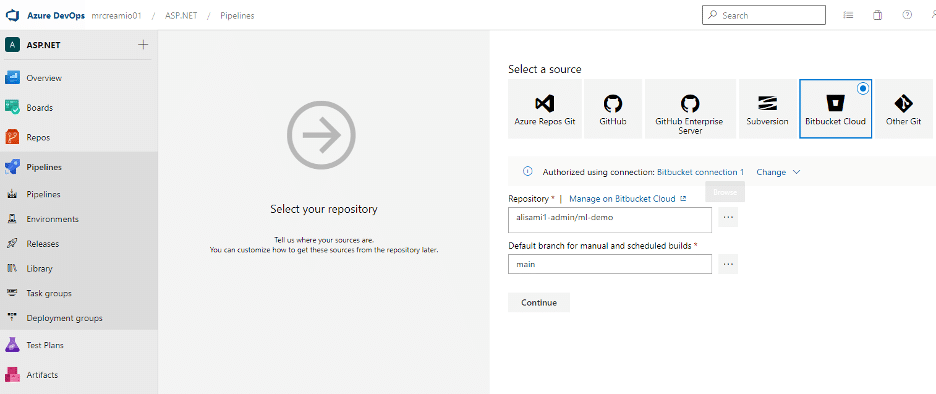
Integration with other services like Bitbucket.
Integration with other services like Bitbucket can streamline your development process. It allows you to handle code repositories efficiently, cooperate with team members, and automate testing and deployment processes. Here are the steps to integrate Bitbucket with other services:
- Create an account on Bitbucket and make a repository for your plan.
- Next, you must create an Azure DevOps organisation and project. You can create a free account at https://azure.microsoft.com/en-us/services/devops/.
- Select the Bitbucket repository as a source for your Pipeline by clicking on the “Other Git” link and selecting “Bitbucket Cloud” as the source.
- Follow the prompts to authorize Azure DevOps to get access to your Bitbucket account and select the repository you want to use.
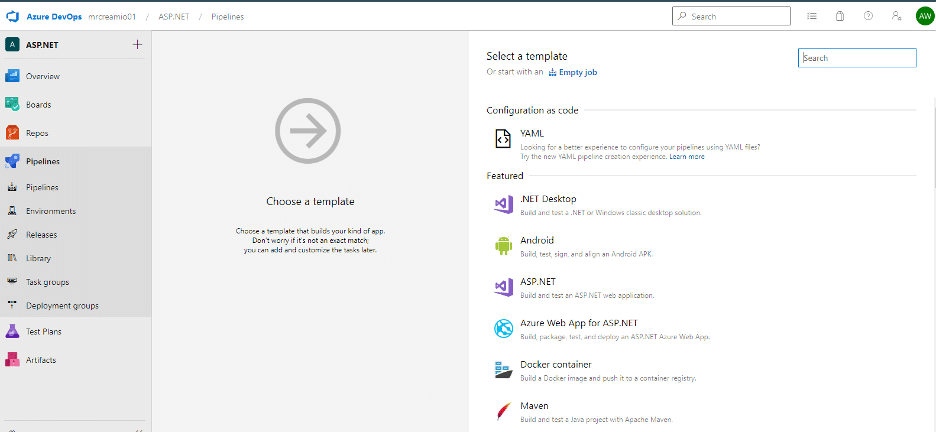
- The next step would be to select a Pipeline template. You can use various pre-built templates, or you can create your own.
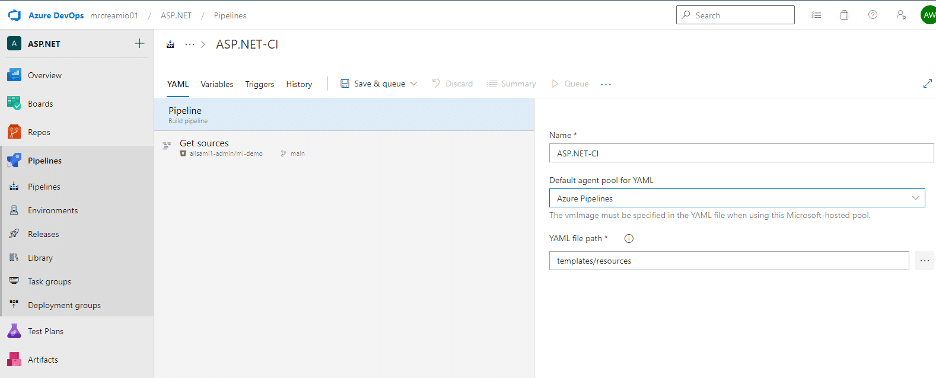
- Once the template is selected, you must configure your Pipeline settings, such as stipulating the built environment, signifying variables, and setting up triggers.
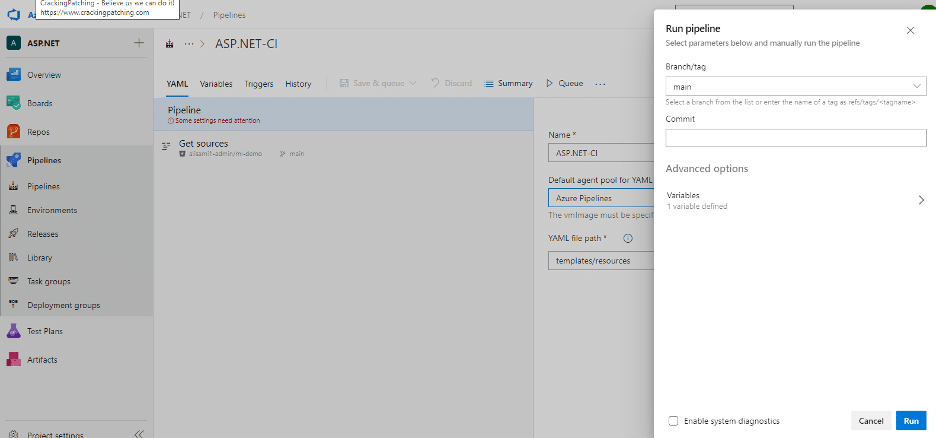
- Lastly, you can save your Pipeline and run it to check if it’s working properly.
Azure DevOps Pipelines


Integrating Bitbucket with other services can streamline your development workflow and make collaboration with team members effective. Ensuring the steps above, integrating Bitbucket with a wide range of services, from continuous integration tools to project running platforms.
Best Practices
Azure DevOps is an influential cloud-based platform empowering groups to streamline their software development procedures. One key characteristic of Azure DevOps is Pipelines, which can automate software application build, testing, and deployment. To regulate your Pipelines as effectively, here are some best practices:
Use templates – Templates are pre-defined tasks we can use across manifold Pipelines. By taking these templates, we can ensure your Pipelines are consistent by reducing the danger of errors.
Use variables – Variables can also store values across multiple tasks in a Pipeline. It is easy to inform values and reduce errors.
Test frequently – Regular testing can target major problems at the start of development. This proactive method aids in minimizing the possibility of defects increase overall productivity.
Use automated testing – Automated testing can quicken the testing procedure while safeguarding extensive testing of all code modifications.
Use source control – Source control is essential for managing and tracking code changes over time. By source control, you can determine all changes are tracked and can be rolled back if necessary.
Use artefacts – Artifacts are the output of a Pipeline, such as a compiled application or a package. By using artefacts, you can easily deploy your applications to various environments.
Monitor Pipelines – Monitoring Pipelines is essential for identifying issues and improving all performance. By monitoring your Pipelines, you can classify bottlenecks, track performance, and enhance your Pipelines for good.
By following these best practices, you can ensure that your Azure DevOps Pipelines are reliable and scalable. It also helps to enhance the performance of your software applications by running them smoothly.
Conclusion
Azure DevOps Pipelines are an innovative tool for automating software development. Following the step-by-step guide above, you can generate a simple Pipeline that mechanically builds, tests, and deploys your code. With Azure DevOps Pipelines, You can save time and errors by automating monotonous tasks and boosting your overall development process.
See Also
Azure DevOps Personal Access Token