Windows Server on EC2 – Taking Your Windows Server to the Cloud
Are you tired of managing your Windows Server environment on-premises? Say hello to the cloud! Cloud computing has revolutionized how businesses of all sizes meet their computing needs, and now you have multiple options to host your Windows Server environment. This article will compare two major cloud platforms – Amazon Web Services (AWS) EC2 and Microsoft Azure – widely used for Windows Server hosting. So, buckle up, and let’s explore the world of cloud computing and choose the best platform for your business!
Overview of hosting Windows Server in the cloud.
Hosting your Windows Server in the cloud offers a world of possibilities! One of the most significant benefits is scalability. With cloud computing, you can quickly add or remove computing resources as your business grows or your needs change without worrying about the physical limitations of your data centers. In addition, hosting Windows Server in the cloud can lead to cost savings, increased security, greater flexibility, and easier management.
A brief explanation of Windows Server hosting alternatives.
There are several alternatives to consider when hosting Windows Server workloads. Some common alternatives are
- Microsoft Azure: As a Microsoft product, Azure offers various services and tools for hosting Windows Server workloads. It supports multiple programming languages and tools like .NET, Visual Studio, and PowerShell. It integrates seamlessly with other Microsoft products and services, providing a comprehensive ecosystem for Windows Server workloads.
- Amazon Web Services (AWS): Popular cloud provider with various services and tools for hosting Windows Server workloads, including pre-configured Amazon Machine Images (AMIs) and a large ecosystem of third-party tools and services.
- Google Cloud Platform (GCP): Provides various services and tools for hosting Windows Server workloads, including support for various programming languages and integrations with various Google products and services, including Google Cloud Storage and BigQuery.
- IBM Cloud: Offers various services and tools for hosting Windows Server workloads, including integrating other IBM products and services such as Watson AI and Blockchain. IBM Cloud also supports various deployment options.
- Oracle Cloud Infrastructure (Gen 2): High-performance, highly available infrastructure for hosting Windows Server workloads with support for various programming languages and tools for managing and deploying workloads.
- Alibaba Cloud: Alibaba Cloud offers a scalable and flexible infrastructure for hosting Windows Server workloads with support for multiple programming languages and services like Elastic Compute Service (ECS) and Object Storage Service (OSS).
- Tencent Cloud: Tencent Cloud offers services and tools to host Windows Server workloads, supporting multiple programming languages and integrating with other Tencent products and services.
- vCloud Air: Highly available infrastructure for hosting Windows Server workloads with support for various programming languages and integration with other VMware products and services.
Each option has unique benefits and considerations, and businesses should carefully evaluate their needs before deciding. However, this article will focus on EC2 and Azure, two of the most popular cloud Windows server hosting options.
Windows Server on EC2
Amazon Web Services (AWS) Elastic Compute Cloud EC2 is a top choice for businesses looking to optimize their Windows Server workloads. Amazon Web Services (AWS) Elastic Compute Cloud (EC2) facilitates a scalable and reliable infrastructure that simplifies your Windows Server instance’s deployment, management, and scaling. With various pre-configured Amazon Machine Images (AMIs) available for Windows Server versions, such as the newest Windows Server 2019, you can enjoy the benefits of an up-to-date and secure environment without worrying about maintenance.
AWS provides tools and services, including IAM, AWS Directory Service, and Elastic Beanstalk, designed for Windows workloads running on EC2. Additionally, you can choose from flexible licensing options, such as bringing your license or an AWS-provided license, giving you control over licensing costs.
Benefits of hosting Windows Server on EC2
Here are some benefits of hosting Windows Server on EC2:
- Scalability: EC2 allows for easy scaling of resources as your workload grows or changes.
- Flexibility: EC2 offers a variety of instance types and sizes that are customizable to meet specific performance and capacity requirements.
- Reliability: EC2 provides availability and reliability through its fault-tolerant architecture and multiple availability zones.
- Integration: EC2 integrates with a wide range of other Amazon Web Services (AWS) tools, making it easy to manage all your AWS applications in one place.
- Security: EC2 provides a range of security features, such as encryption, network isolation, and identity and access management, to keep your instances and data secure.
Deploying a Windows Server instance on EC2.
Creating a windows server instance on EC2 includes the following steps.
Login to AWS.
To start the process, you need to have an AWS account. If you already have one, log in to your AWS account using your login credentials.

Launch EC2 Instance Wizard.
After logging in to your AWS account, you will see the AWS Management Console. Click on the “EC2” link in the console to navigate to the EC2 service.
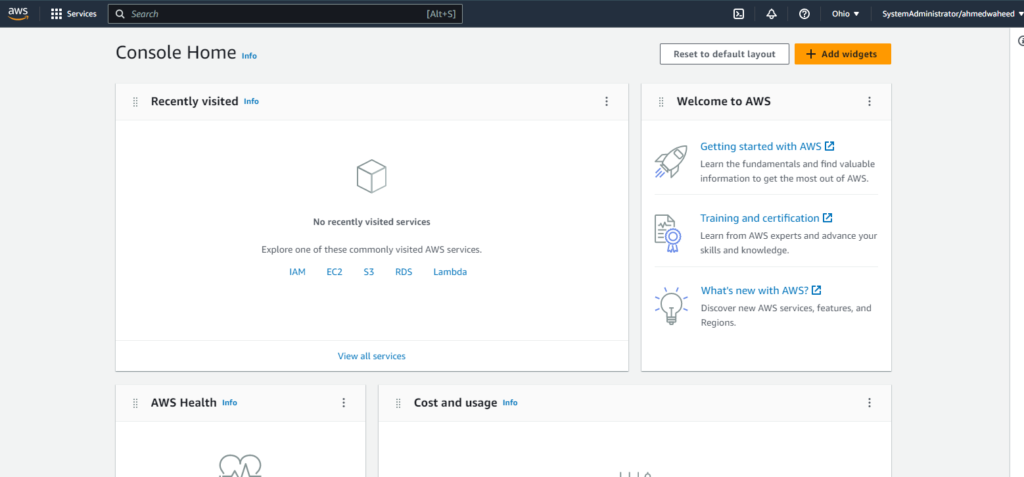
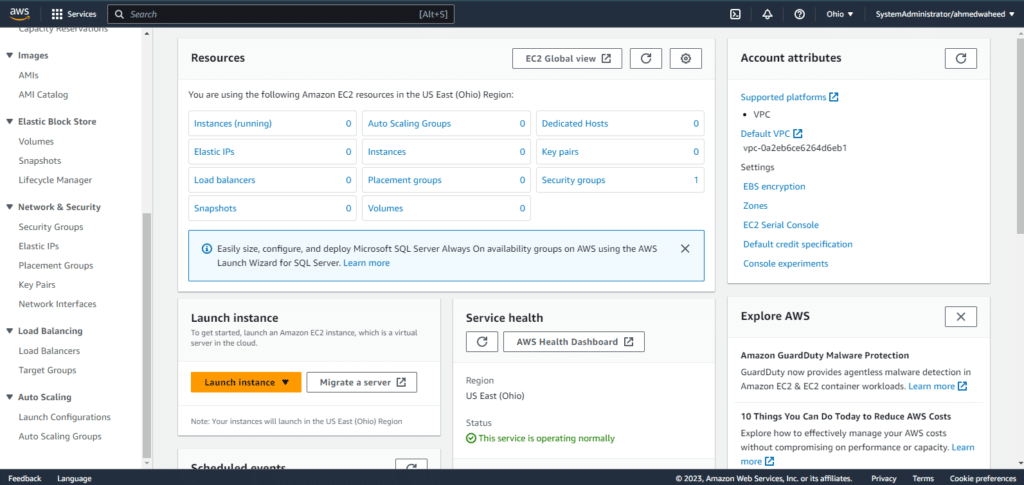
Click the “Launch Instance” button to launch the EC2 Instance Wizard. You can launch an instance from an existing template, such as AWS Marketplace or your custom Amazon Machine Image (AMI).
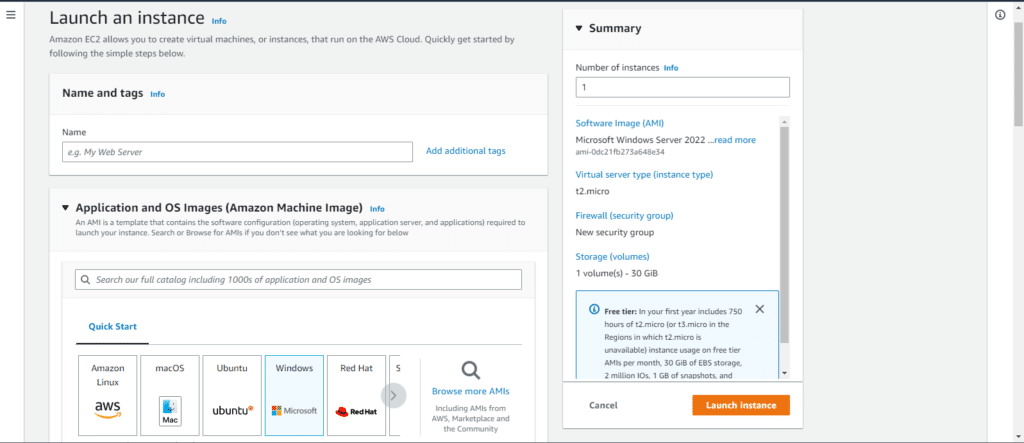
Amazon Machine Image (AMI).
An Amazon Machine Image (AMI) is a pre-configured virtual machine image that includes a specific operating system, software, and configuration settings. AWS offers a range of pre-configured AMIs for various Windows Server versions, including the latest security updates and patches. You can also create a custom AMI with your preferred software and configurations.
In the EC2 Instance Wizard, you can search for and select the AMI you want to use for your Windows Server instance. You can filter the AMIs by region, owner, or other criteria.
Additionally, you can choose between different AMI types, such as Amazon Linux, Windows, Ubuntu, and others.
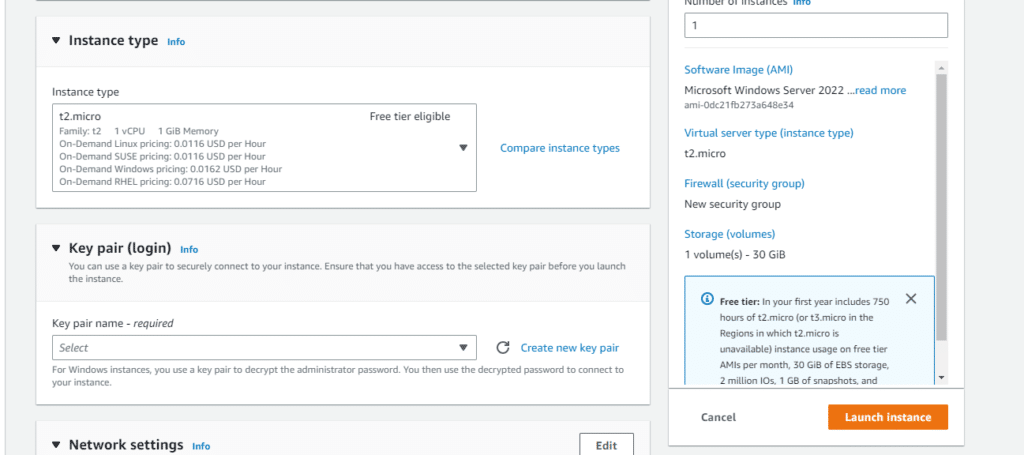
Choose an Instance Type.
AWS offers various instance types with unique CPU, memory, storage, and networking resource combinations. You should select an instance type that meets your performance and capacity requirements.
Additionally, you can choose Spot VMs for cost-effective unused capacity or Dedicated Instances to meet compliance needs.
In the EC2 Instance Wizard, you can choose an instance type that best suits your needs. You can filter the instance types by family, vCPU, memory, storage, and network performance. You can also compare the features and pricing of different instance types to make an informed decision.
Configure Instance Details.
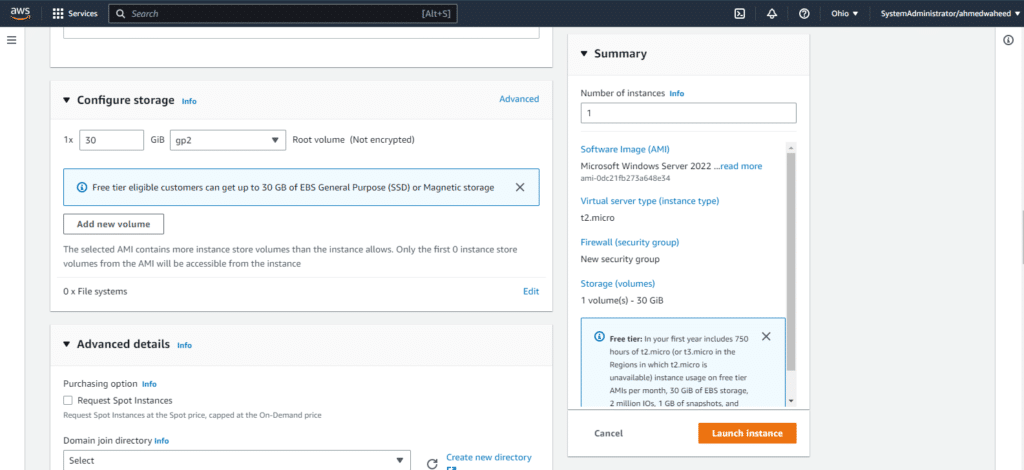
Customise your Windows Server instance on AWS by configuring network settings, storage options, and multiple instances. You can control inbound/outbound traffic with security groups and use Amazon Elastic Block Store (EBS) for persistent storage or Amazon Elastic File System (EFS) for shared file storage.
In the EC2 Instance Wizard, you can configure the instance details, including instances, VPC settings, subnet, IAM role, user data, more storage, additional EBS volumes, and configure instance metadata.
Add Tags.
Adding tags to your instance can help you organise and manage your resources. You can add tags with information such as the owner, department, or project name. You can use AWS Resource Groups to create custom groups of resources based on tags, making it easier to manage and monitor your Windows Server environment.
In the EC2 Instance Wizard, you can add tags to your instance. You can add tags to other AWS resources, such as EBS volumes, network interfaces, and security groups.

Key Pair.
Select from pre-existing key pairs or generate a new one to establish a secure connection with your Windows Server instance. AWS provides a range of security features to guarantee the safety of your instances and data. You can utilise AWS Certificate Manager to request and manage SSL/TLS certificates for your domain names.

Launch the Instance.
After reviewing the details of your instance and making any necessary changes, you can launch the instance by clicking on the “Launch Instance” button.
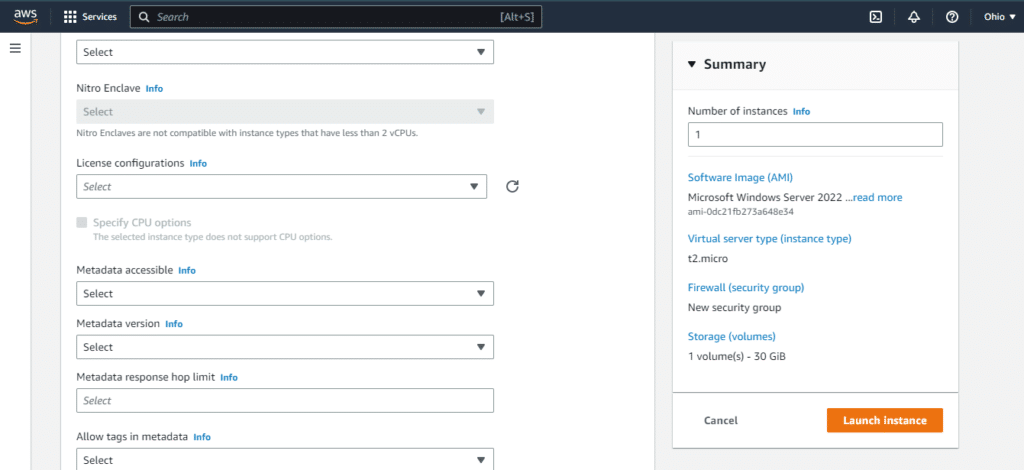
Once the Windows Server instance is launched, you can connect using RDP or other remote access tools. You can also install and configure any required software and services depending on the intended use of the instance. AWS provides various tools and services to help you manage and monitor your Windows Server environment, including AWS Systems Manager, AWS CloudTrail, and Amazon CloudWatch.

Overview of EC2’s features and tools for Windows Server hosting.
Let’s take an overview of the features and tools of EC2.
Features:
- Windows Server support with multiple versions.
- Compatibility with a wide range of Microsoft applications and services.
- Integration with other AWS services, such as S3, RDS, and EBS.
Tools:
- Amazon CloudWatch for monitoring and logging.
- AWS Systems Manager for managing and automating tasks.
- Amazon Elastic Block Store (EBS) has various performance and durability options for block-level storage.
- Amazon Relational Database Service (RDS) for managed database services.
Pricing options for Windows Server on EC2.
Regarding pricing options for Windows Server on EC2, several factors exist, such as the instance type, region, and usage. Here are some pricing options:
- On-Demand Instances: Pay-as-you-go pricing is charged hourly based on the instance type, region, and usage.
- Reserved Instances: Reserve capacity for 1-3 years for significant cost savings, with upfront payment varying by instance type, region, and term length.
- Spot Instances: Bid on the unused capacity for potentially lower prices than On-Demand Instances, with pricing fluctuating based on supply and demand.
- Dedicated Hosts: Provide an entire physical server for instances, offering more control and flexibility at a higher cost.
Windows Server on Azure.
Microsoft Azure is a leading contender in the cloud platform arena. Azure offers tailored features and tools to support Windows Server hosting. Windows Server applications can be effortlessly hosted on Azure, utilising advanced security and compliance capabilities while ensuring seamless hybrid cloud connectivity. Azure is highly interoperable with other Microsoft services, including Azure Active Directory, SQL Server, and System Center.
Businesses of all sizes can opt for flexible licensing options to customise their Windows Server experience on Azure. Moreover, with cost savings, improved scalability, and increased availability, Azure provides businesses with optimal Windows Server workload management capabilities.
The benefits of hosting Windows Server on Azure.
Azure offers several benefits for hosting Windows Server in the cloud.
- Scalability: Azure allows you to scale up or down your resources as needed, making it easy to handle sudden increases or decreases in traffic.
- Integration: Azure integrates with other Microsoft tools, such as Office 365 and Dynamics 365, making it easier to manage all Microsoft applications in one place.
- Flexibility: Azure provides a range of virtual machine sizes and types to meet your specific performance and capacity needs.
- Hybrid Cloud: Azure offers hybrid cloud capabilities, enabling you to run your applications on both on-premises and cloud infrastructure.
- Reliability: Azure provides high availability and reliability through its global data center network and service level agreements.
Deploying a Windows Server instance on Azure.
Here are the steps to create a Windows Server instance on Azure:
Login to your Azure Portal.
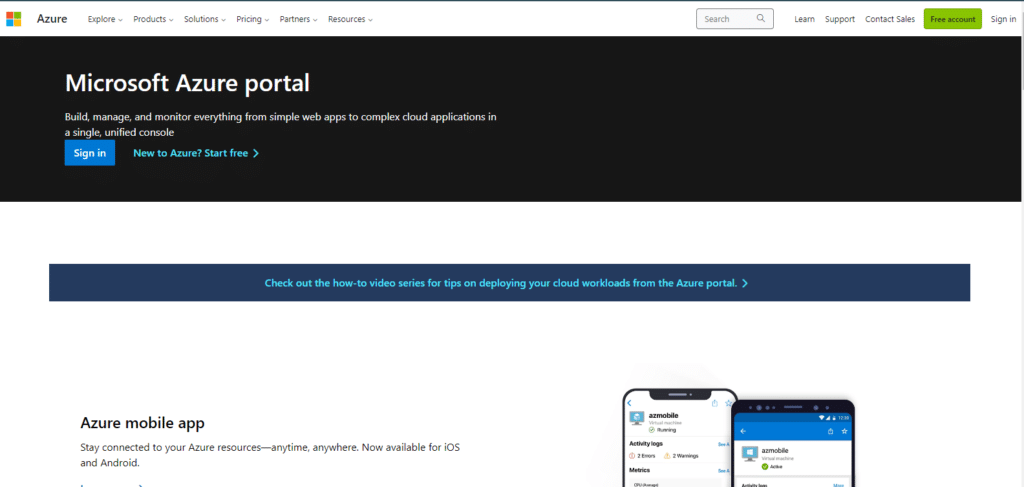
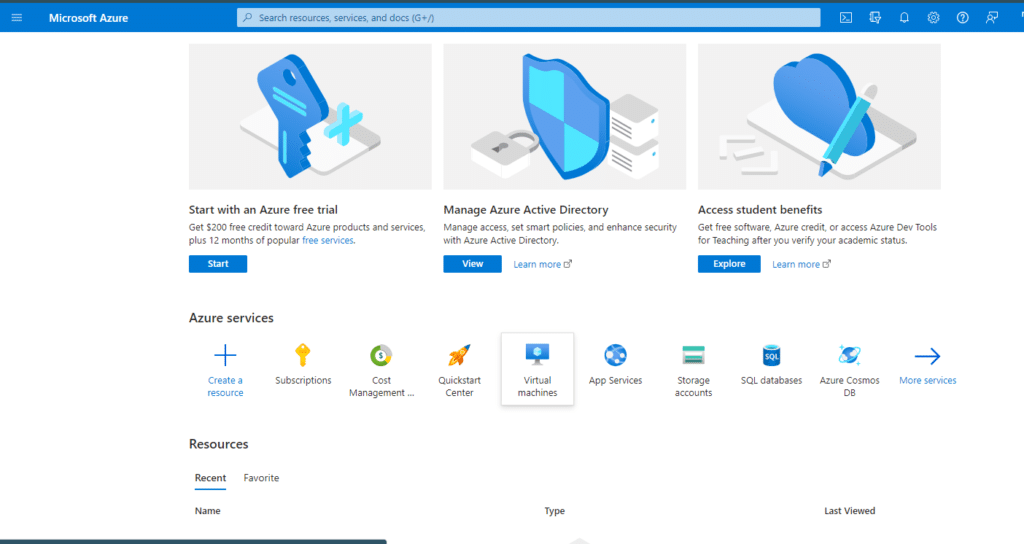
The first step is to log in to your Azure Portal to deploy a Windows Server instance on Azure. You can access the Azure Portal through a web browser or Azure CLI, PowerShell, or Azure Mobile App. Once logged in, you will see your dashboard, which overviews your resources, services, and activity logs.
Create a resource.
Click the “Create a resource” button to create a new resource. It will open the Azure Marketplace, a catalog of services, applications, and solutions you can deploy on Azure. From here, you can search for the Windows Server image or template you want to use.
Search for Windows Server.
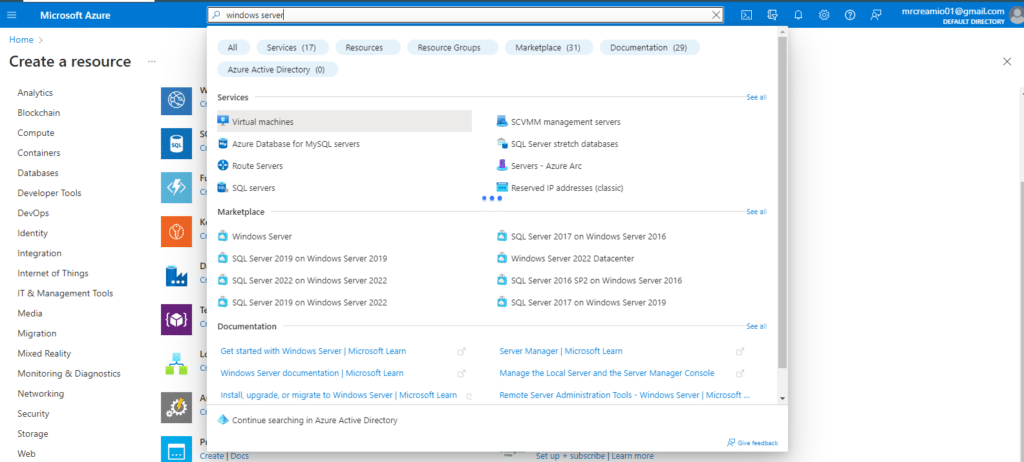
In the Azure Marketplace search bar, type “Windows Server” and press enter. It will display a list of available Windows Server versions, such as Windows Server 2019 or Windows Server 2016. You can choose the version that best suits your needs based on compatibility, performance, and features.
Select Version.
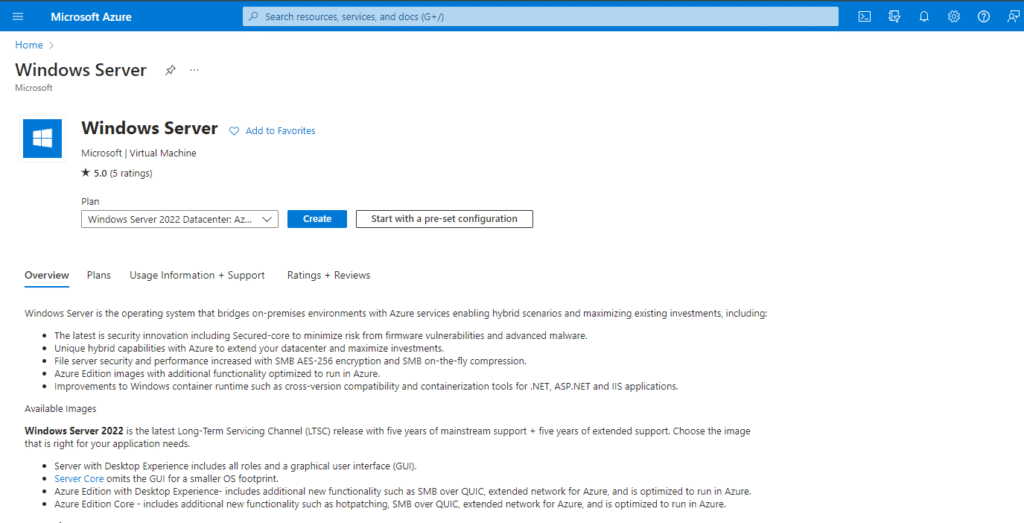
Once you have identified the version of Windows Server you want to use, click the “Create” button to continue. It will take you to the deployment page, where you can configure the instance settings.
Configure the instance.
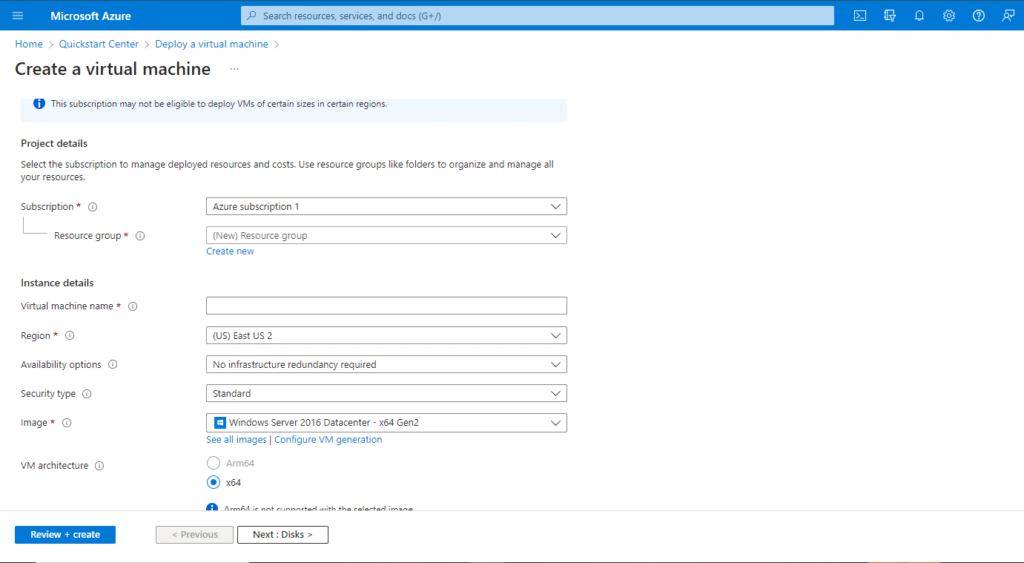
In this step, you need to configure the basic settings for your Windows Server instance, such as the resource group, the location, and the name. The resource group is a logical container for your resources, while the location determines the physical region where you will deploy your instance. You also need to choose the type of storage you want to use for your VM, such as Standard HDD, Standard SSD, or Premium SSD.
Setup Virtual Machine.
In this step, you must set up your virtual machine instance by selecting the appropriate VM size and configuring the networking settings. Azure offers a variety of VM sizes that differ in CPU, memory, and storage capacity. You can also configure the network settings, such as the virtual network, subnet, and network security group, to control the inbound and outbound traffic.
Create Admin Account.
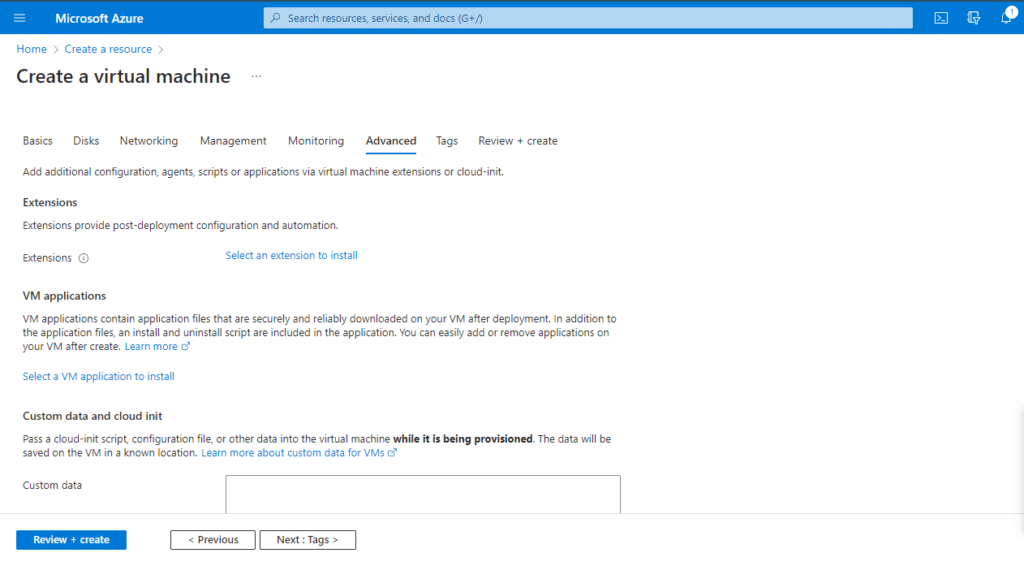
In this step, you need to create an admin account that you will use to access your Windows Server instance. You can choose the username and password or use an SSH public key. You can also configure the boot diagnostics, which enable you to troubleshoot the boot issues and capture the screenshot of your VM.
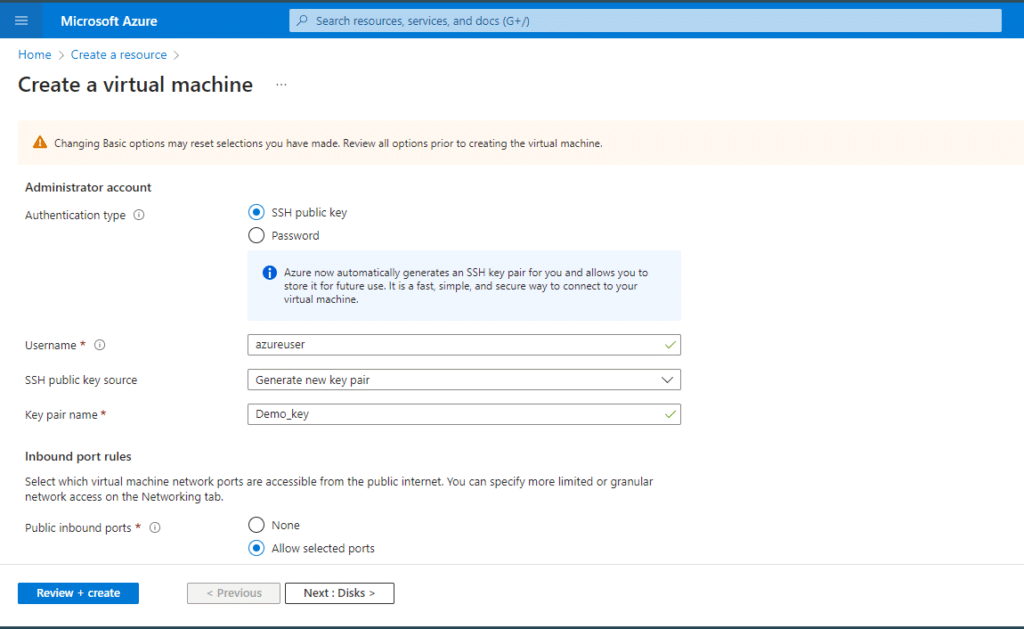
Review and create.
In this step, you must review your Windows Server instance’s configuration settings and ensure everything is correct. Once you have verified all the settings, click the “Create” button to start the deployment process. Azure will validate the settings, create the resources, and provision the VM. This process may take a few minutes, depending on the size and complexity of your deployment.
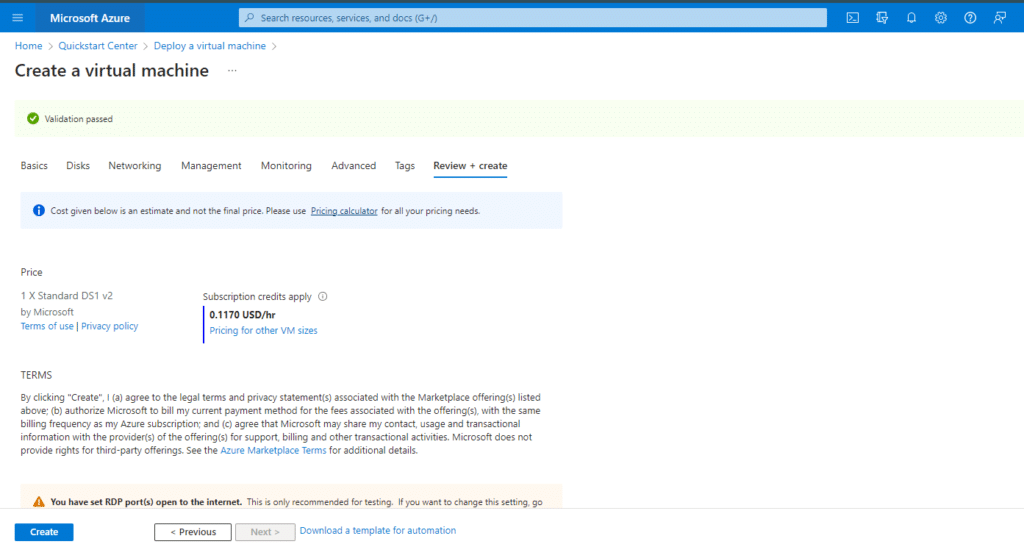
Create Instance.
After deployment, your Windows Server instance will be ready for use. Depending on your preference, you can access your instance through RDP or SSH. You can also customise your instance by installing applications, configuring settings, and creating data disks. Additionally, you can monitor your instance’s performance, availability, and security using Azure Monitor, Azure Security Center, and other Azure services.
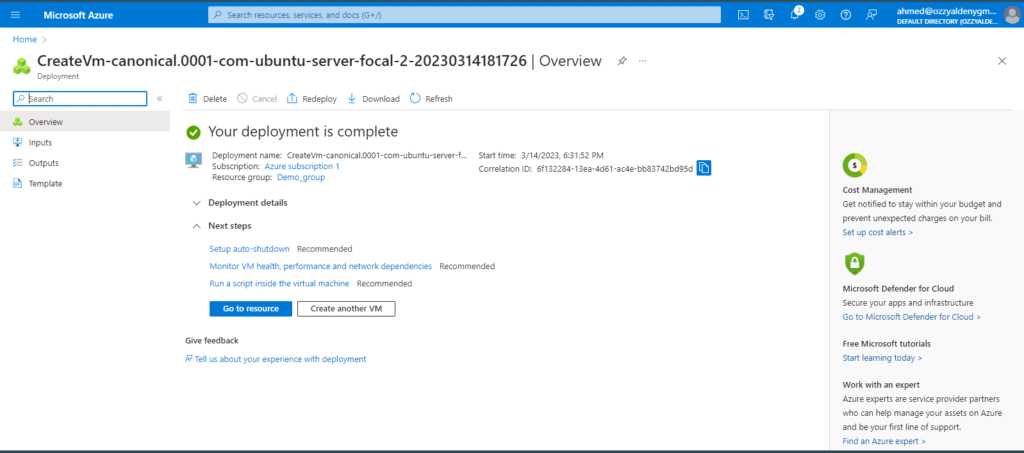
Connect to the instance.
You must use RDP or SSH client to connect to your Windows Server instance. If you are using Windows, you can use the Remote Desktop Connection app, which is pre-installed on most versions of Windows. If you use Linux or macOS, you can use the SSH client, which is typically available through the terminal or command prompt. Once you have launched the RDP or SSH client, you need to enter the IP address or hostname of your Windows Server instance and the credentials of the admin account you created earlier. It will allow you to access your instance’s desktop or command-line interface and perform tasks such as installing software, configuring settings, and managing files.
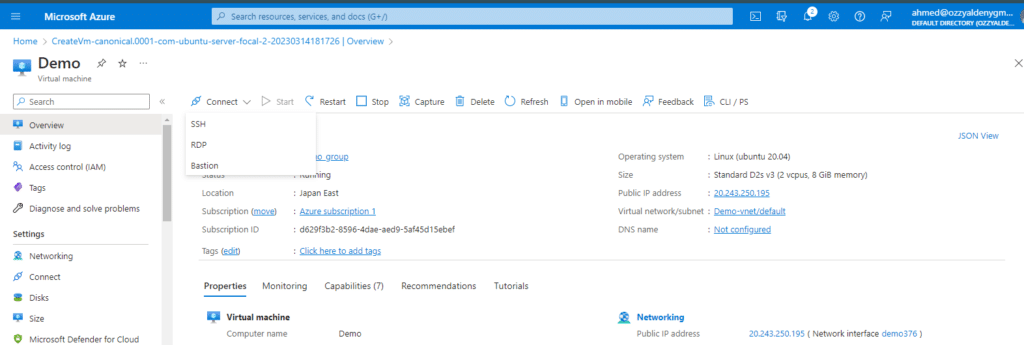
Overview of Azure’s features and tools for Windows Server hosting.
Let’s talk about the features and tools of Azure.
Features:
- Multiple versions of Windows Server support
- Compatibility with a wide range of Microsoft applications and services
- Virtual network capabilities for secure resource connection
- Hybrid identity services for on-premises Active Directory integration
Tools:
- Azure Monitor for monitoring and logging.
- Azure Resource Manager for managing and automating tasks.
- Azure Active Directory for access control.
- Azure Storage for various storage options.
- Azure SQL Database for managed database services
Pricing options for Windows Server on Azure.
Azure provides various pricing options for businesses that want to run Windows Server in the cloud. Here are the main pricing options:
- Pay-as-you-go: Charges businesses based on usage, allowing flexibility to scale up or down and pay only for what they use.
- Reserved Virtual Machines: Reserves capacity for one or three years, providing significant cost savings compared to pay-as-you-go pricing.
- Spot Virtual Machines: Bids unused capacity for lower pricing, but prices fluctuate based on supply and demand.
- Hybrid Benefits: Allows businesses to use their existing Windows Server licenses and save up to 40% on Azure costs.
- Dedicated Hosts: Provides additional control and flexibility but costs more than other options.
Comparison of EC2 and Azure for Windows Server
| Comparison Factors | EC2 | Azure |
|---|---|---|
| Availability | EC2 is available in more regions worldwide, with 25 regions compared to Azure's 22 regions. | Azure offers a more comprehensive global network, with more data centers and points of presence (PoPs) worldwide. |
| Scalability | EC2 offers instant scalability, allowing adding or removing instances as needed. | Azure offers similar scalability, with the ability to scale up or down depending on your needs. |
| Backup | EC2 offers backup and recovery features through Amazon S3, which provides reliable and secure data backup storage. | Azure offers backup and recovery features through Azure Backup, which can be configured to automatically back up your server data to Azure storage. |
| Encryption | EC2 offers encryption at rest and in transit, supporting various encryption methods, including AWS KMS and SSL/TLS. | Azure offers encryption at rest and in transit, supporting various encryption methods, including Azure Disk Encryption and Azure SSL/TLS. |
| M365 Support | EC2 supports Office 365 and integrates with other Microsoft services such as Active Directory. | Azure is a Microsoft product and offers extensive integration with M365 services, including Azure Active Directory and Microsoft Intune. |
| App Support & Performance | EC2 supports popular Windows Server applications such as Microsoft SQL Server and Active Directory, high-performance instances available for intensive workloads. | Azure supports popular Windows Server applications and offers optimized instances for applications such as SQL Server and SharePoint. |
| Hybrid Cloud Integration | Integration with AWS hybrid cloud services. | Integration with Azure hybrid cloud services. |
| AI/ML Capabilities | AWS offers a wide range of AI/ML tools through Amazon SageMaker. | Azure offers advanced AI/ML capabilities through Azure Machine Learning. |
| Developer Tools | AWS offers many developer tools, such as AWS CloudFormation and AWS CodePipeline. | Azure offers various developer tools, such as Azure DevOps and Visual Studio Code. |
EC2 and Azure offer many other features and tools beyond those listed here. This comparison provides a high-level overview of the most important factors when choosing between EC2 and Azure for Windows Server hosting—migration efforts between EC2 and Azure.
When considering migrating to the cloud, the effort required to move your Windows Server environment is a critical factor to consider.
Migration efforts EC2 vs Azure
Migrating Windows Server workloads to the cloud is a complex process, and the experience can differ depending on the cloud provider you choose. Here’s a comparison of migrating Windows Server workloads to EC2 and Azure:
Windows Server Licensing:
- EC2: Users can bring their own licenses or purchase licenses directly from AWS. It can provide cost savings for users who already have Windows Server licenses.
- Azure: Users must purchase licenses directly from Microsoft. It can increase licensing costs for users who do not already have Windows Server licenses.
Active Directory Integration:
- EC2: Active Directory integration is supported on EC2 instances, but the configuration may differ from on-premises setups.
- Azure: Active Directory integration is supported on Azure virtual machines, but the configuration may differ from on-premises setups.
Networking and Connectivity:
- EC2: EC2 instances use traditional VPNs for network connectivity to on-premises resources. It can provide flexibility but may require additional configuration for connectivity.
- Azure: Azure provides ExpressRoute for a dedicated private connection between on-premises resources and Azure data centres. It can provide faster and more reliable connectivity but may be more expensive.
Storage Options:
- EC2: EC2 instances use Amazon Elastic Block Store (EBS) for persistent block storage. EBS provides several storage types, including General Purpose SSD, Provisioned IOPS SSD, and Magnetic storage.
- Azure: Azure provides Blob Storage for object storage. Blob Storage can store large amounts of unstructured data, such as text and binary.
VM Import/Export:
- EC2: EC2 provides VM import/export features, allowing users to move virtual machines between on-premises environments and the cloud. However, users may need to convert virtual machines to a compatible format before importing.
- Azure: Azure also provides VM import/export features, allowing users to move virtual machines between on-premises environments and the cloud. However, users may need to convert virtual machines to a compatible format before importing.
Application Compatibility:
- EC2: Applications running on EC2 instances may require modifications to ensure compatibility with AWS services, such as Amazon RDS and Amazon S3.
- Azure: Applications running on Azure virtual machines may require modifications to ensure compatibility with Azure services, such as Azure App Service and Azure Storage.
Management and Monitoring:
- EC2: AWS provides CloudWatch to manage and monitor EC2 instances. CloudWatch allows users to monitor resource utilization, set alarms, and automate actions based on defined metrics.
- Azure: Azure provides Azure Monitor for managing and monitoring machines. Azure Monitor allows users to monitor resource utilization, set alerts, and automate actions based on defined metrics.
Security and Compliance:
- EC2: AWS provides various security and compliance services, such as Amazon GuardDuty for threat detection and AWS Certificate Manager for managing SSL/TLS certificates.
- Azure: Azure also provides a range of security and compliance services, such as Azure Security Center for threat detection and Azure Key Vault for managing SSL/TLS certificates.
Cost Optimization:
- EC2: AWS provides Cost Explorer for cost optimization of EC2 instances. Cost Explorer allows users to analyze their usage and identify cost-saving opportunities.
- Azure: Azure provides Cost Management for the cost optimization of virtual machines. Cost Management allows users to monitor and manage their Azure spending by analyzing usage patterns and identifying cost-saving opportunities.
EC2 and Azure offer comprehensive solutions for migrating and running Windows Server workloads in the cloud.
Conclusion: “The Right Choice for Your Windows Server Hosting Needs”
When deciding between EC2 and Azure for hosting Windows servers, businesses should carefully evaluate their needs and budget and compare the features and pricing of both platforms. Choosing can be challenging, but following best practices for optimizing performance and security, such as regular updates and proper configuration of firewalls and security measures, can help ensure the server runs smoothly and securely.
Monitoring and management tools can also keep the server in optimal condition. Consulting with cloud computing experts to manage and monitor optimizing the server’s configuration and ensuring it meets specific business needs. Ultimately, both platforms offer impressive performance, security, and a range of features, so businesses can rest assured they’re using a top-of-the-line cloud platform with cutting-edge technology.
See Also


