AWS RDS Option Group
How to Create an AWS RDS Option Group?
Using the Console
You can create an AWS RDS Option Group through the AWS Management Console.
To create a new option group through the console, follow the below steps:
- Log in to the AWS Management Console. Then, head straight to the Amazon RDS console using the following link https://console.aws.amazon.com/rds/.
- From the navigation pane, click on the section of Option groups.
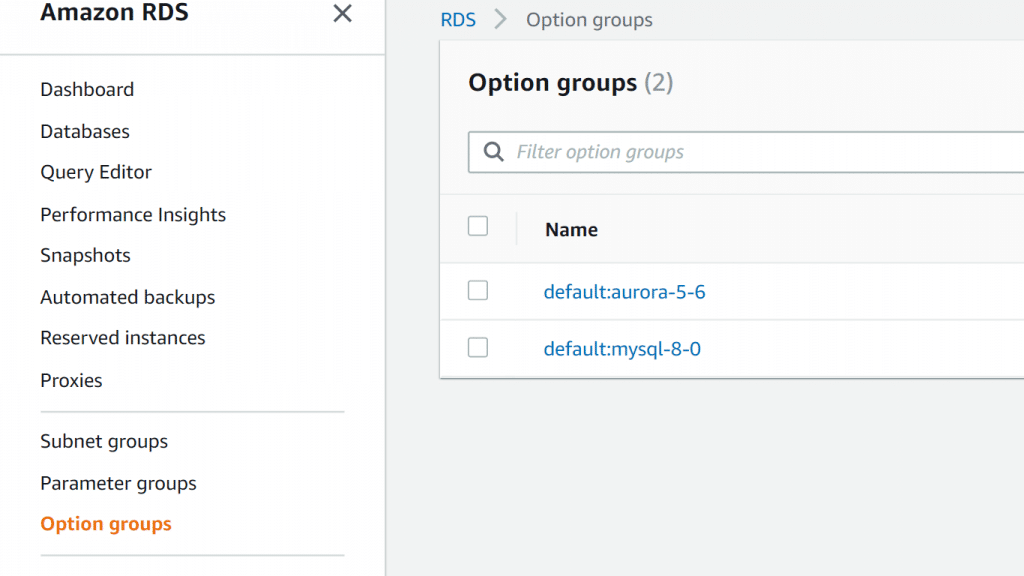
AWS RDS Option Group – Option Groups
- Click on the option Create group.

From the Create option group window, go through the below process:

AWS RDS Option Group – Create Option Group
- In the section of Name, fill in a name for the option group that is unique within your AWS account. The name can contain only letters, digits, and hyphens.
- In the section of Description, fill in a short description for the option group. It will be utilized for display purposes.
- In the section of Engine, select which DB engine you’d like to go with.
- In the section of Major engine version, select which major version of the DB engine you’d like to go with.
- To go further, click on the option Create. To cancel the operation, click on the option Cancel.
How to Copy an AWS RDS Option Group?
Keep in mind
It’s not possible for you to copy an option group to another AWS Region.
Using the AWS CLI
For the sake of copying an option group, utilize the AWS CLI copy-option-group command. Add the below needed options:
--source-option-group-identifier
--target-option-group-identifier
--target-option-group-description
Here is an Example;
Below is an example of creating an option group having the name new-option-group, and it’s a local copy of the option group my-option-group.
Unix, Linux, or macOS:
aws rds copy-option-group \

--source-option-group-identifier my-option-group \

--target-option-group-identifier new-option-group \

--target-option-group-description "This will be my new option group"
Windows:
aws rds copy-option-group ^

--source-option-group-identifier my-option-group ^

--target-option-group-identifier new-option-group ^

--target-option-group-description "This will be my new option group"
How to Add an option to an AWS RDS Option Group?
Using the Console
It is possible for you to utilize the AWS Management Console to add an option to an AWS RDS Option Group.
To add an option to an option group through the console, follow the below steps:
- Log in to the AWS Management Console. Then, head straight to the Amazon RDS console using the following link https://console.aws.amazon.com/rds/.
- From the navigation pane, click on the section of Option groups.
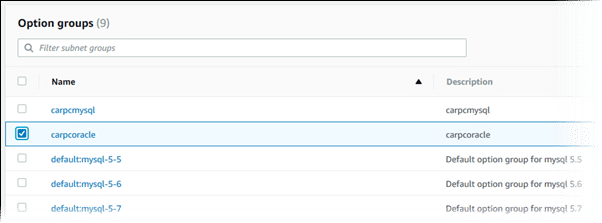
- Select which option group you’d like to modify, then click on Add option.
AWS RDS Option Group – Add Option

4. For the window of Add option, go through the below process:
-
- Select which option you’d like to add. You may be required to provide extra values according to which option you tend to choose. For instance, if you click on the OEM option, you will need to fill in a port value and set a particular security group.
- To enable the option on all associated DB instances upon adding it, in the section of Apply Immediately, click on the option Yes. In case you click on option No, which is the default choice, you will find that the option will get enabled for every associated DB instance while its next maintenance window is occurring.
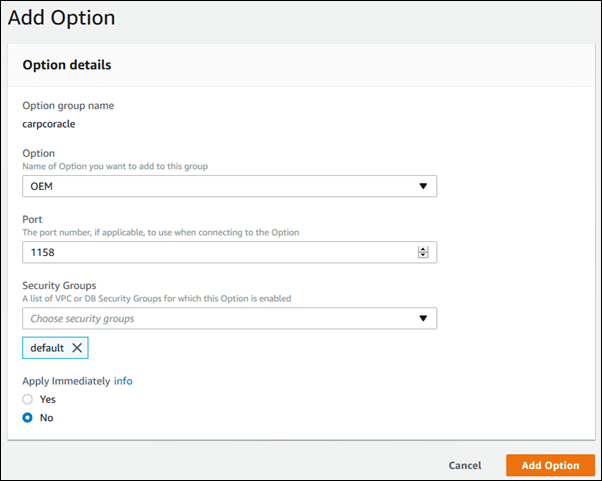
AWS RDS Option Group – Option Details

5. As soon as the settings become as you need them to be, click on the option Add option.
How to List the options and option settings for an AWS RDS Option Group?
You are capable of listing every single option and option set for a specific option group.
Using the Console
You are capable of utilizing the AWS Management Console to list all the options and option settings for a specifically chosen option group.
For listing the options and option settings for an option group, go over the below steps:
- Log in to the AWS Management Console. Then, head straight to the Amazon RDS console using the following link https://console.aws.amazon.com/rds/.
- From the navigation pane, click on the section of Option groups.
- Select the name of the option group that you have to check its details. Now you will find all the options and option settings in your selected option group gets listed.
How to Modify an option setting?
Keep in mind
In the case of specifying a security group to be a value for an option in a particular option group, you start managing the security group by modifying the AWS RDS Option Group. It is not possible for you to alter or remove this security group through the modification of a specific DB instance. In addition to this, the security group will not be found in the DB instance details that are located on the Management Console or in the AWS CLI command’s output of describe-DB-instances.
Using the Console
You are capable of utilizing the AWS Management Console for the sake of modifying an option setting.
For modifying an option setting through the console, go over the below steps:
- Log in to the AWS Management Console. Then, head straight to the Amazon RDS console using the following link https://console.aws.amazon.com/rds/.
- From the navigation pane, click on the section of Option groups.
- Choose which option group you want to modify its option, then click on the option Modify option.
- From the window of Modify option, in the section of Installed Options, select which one of the options you’d like to modify its setting. Perform all the necessary changes.
- For the sake of enabling the option upon adding it, in the section of Apply Immediately, click on the option of Yes. In case of clicking on the option No, which is the default choice, the option will get enabled for every single associated DB instance while its next maintenance window occurs.
- As soon as the settings become as needed, click on the option Modify Option.
How to Remove an option from an AWS RDS Option Group?
Using the Console
You are capable of utilizing the AWS Management Console for the sake of removing an option from an AWS RDS Option Group.
To remove an option from an option group through the console, go over the below steps:
- Log in to the AWS Management Console. Then, head straight to the Amazon RDS console using the following link https://console.aws.amazon.com/rds/.
- From the navigation pane, click on the section of Option groups.
- Choose which option group you’d like to remove its option, then click on the option Delete option.
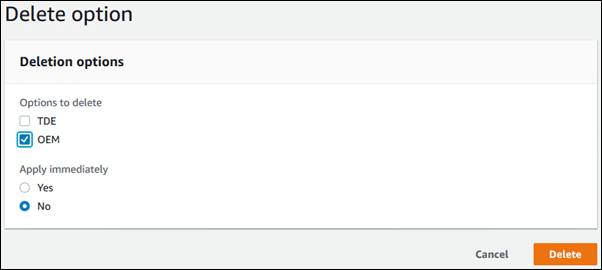
- From the window of the Delete option, go over the following procedure:
- Choose the check box of the option which you’d like to delete.
- In order for the deletion to work directly upon doing it, in the section of Apply immediately, click on the option Yes. In case you choose to click on the option No, which is the default choice, you will find that the option will get deleted for every single associated DB instance while its next maintenance window takes place.
AWS RDS Option Group – Delete Option

5. As soon as the settings become exactly as you need them to be, click on the option Yes, Delete.
How to Delete an AWS RDS Option Group?
In the case of trying to delete an option or group associated with an RDS resource, you will get an error just like the one shown below. This error will be returned.
An error occurred (InvalidOptionGroupStateFault) when calling the DeleteOptionGroup operation: The option group 'optionGroupName' cannot be deleted because it is in use.To find the Amazon RDS resources associated with an option group, you will need to go over the below steps:
- Log in to the AWS Management Console. Then, head straight to the Amazon RDS console using the following link https://console.aws.amazon.com/rds/.
- From the navigation pane, click on the section of Option groups.
- Select the option group’s that you wish to get their details shown.
- Go over the Associated Instances and Snapshots section of the associated Amazon RDS resources.
Keep in mind
It’s not possible for you to modify the option group of an automated DB snapshot.
Using the Console
You are capable of deleting an option group through the AWS Management Console.
For deleting an option group through the console, go over the below steps:
- Log in to the AWS Management Console. Then, head straight to the Amazon RDS console using the following link https://console.aws.amazon.com/rds/.
- In the navigation pane, click on the section of Option groups.
- Select your needed option group to delete it.
- Click on the option of Delete group.
- As soon as the confirmation page opens, click on the option Delete to finally complete the deletion of your selected option group. Otherwise, go ahead and click on the option of Cancel for the sake of canceling the deletion step.
Using the AWS CLI
For the sake of deleting an option group, you can also utilize the AWS CLI delete-option-group command using the below-needed parameter.
--option-group-nameCheck out an Example
The below example shows how you can delete an option group having the name testoptiongroup.
Unix, Linux and macOS:
aws rds delete-option-group \

--option-group-name testoptiongroup
Windows:
aws rds delete-option-group ^

--option-group-name testoptiongroup
Using the RDS API
For the sake of deleting an option group, you will need to simply call the Amazon RDS API DeleteOptionGroup operation. Add the below parameter:
OptionGroupNameYou can learn more about Amazon RDS pricing and how it is calculated.