AWS Cost Management from DevOps Perspective

This article is intended to general audience who are interested to explore more on AWS Cost Management Practices from DevOps standpoint. Lets get started…


Nowadays, DevOps became a common term in every team/organization. DevOps is still relatively a new term for some of the legacy companies and waiting their turn to explore more. As many of you don’t know, DevOps is not a practice like any other software engineering (or) management but rather a mindset of the team to have a standard workflows with relevant automation to deliver products & services at high velocity.

Most of the functional DevOps teams are leveraging Cloud Providers to enhance their pipelines. Even though DevOps teams are actively working on Cloud native services, there is still a huge gap in maintaining a cost-effective strategies to get their pipelines working. Few aspects like effective billing management, cost control approaches, Total Cost of Ownership (TCO) make teams to drive an effective mechanism to monitor and control costs. The approaches also empowers teams to think about cost-effective strategies while architecting a solution on Cloud platforms.


A few actions are discussed below to provide a decent understanding on utilizing DevOps strategies for AWS Cost Management.

User Management & Ownership

It’s always recommended to configure User and Role based permissions to a very granular level possible. Also, leverage the use of Service Control Policies (SCPs) when you are managing permissions within your organization. There are many other ways of pre-approving & authenticating users via a third-party public identity service providers (or) OpenID Connect.

Most of the companies doesn’t have any team working on spend monitoring and cost analysis. It’s a good standard to devote a small team to monitor cost based anomalies per service and timely. Also, make sure the team also oversees the resource-ownership which can help to streamline the overall spends. These team can set up a lambda invocations to automatically remediate if there is a potential anomaly detected.


Tagging and  Monitoring Process

AWS Tagging is essential not only to identify environments, resources etc. but also helps to drive financial management decisions based on existing resources and utilized services. Tagging should be mandated across every environment as most of the DevOps workflows/pipelines are derived on top of resource tagging. Improper tagging leads to unnecessary costs which are hard to catch and sometimes need manual intervention to remediate those.

Infrastructure monitoring is also a key thing in driving effective strategies to reduce costs as required. This can be costly at times but with the latest AWS services, this process is relatively cheap and efficient. Also extracting this data and plotting visual patterns will greatly assists the team to understand the non-standard behaviors. Make sure to include alerts on your budget thresholds, etc.


Thresholds based Alerting

Monitoring & Alerting are two faces of the same coin. No matter how granular and automated motoring setup is created. It’s the alerts that are icing on the cake.  Thresholds can help to quantify the expectations and it’s greatly suggested to create thresholds based on previous data-points. In terms of cost management, AWS provides budget level thresholds with service, tags, linked-accounts, region level granularity.

If thresholds are breached, automatically remediate the resources if possible. Also, alert the required ops team etc. with the respective breach to make sure the team is on the same page with automation. Sometimes manual approvals are also required to remediate the critical resources.


Programmatic Purchase Options

Everyone want to save their infrastructure costs. The best way to do that in cloud was to audit and inspect the infrastructure and include the saving plans if possible. This is a continuous improvement strategy and it’s is better recommended to automate the purchase options automatically. The above aspects also play a key role like identifying the savings opportunities based on thresholds.

Choosing effective and long-term saving-plan is also key thing. What is the best possible reserved instances that can be chosen for Compute, RDS, Elasticsearch etc. needs to be determined by creating a simple custom based data-lake solution. Automating these things can be a great benefit in the long-term for both org and operations team.


These are only a few aspects to be implemented to have a decent strategy for a start. Also, we will provide more articles in the near future to improve your AWS cloud posture wrt. cost management. Meanwhile, have a look at few other articles on AWS cost management.

Cloud Cost Analysis
AWS Cloud Migration Cost Estimation
AWS Cost Models
Service Now Devops Pricing


  • CloudySave is an all-round one stop-shop for your organization & teams to reduce your AWS Cloud Costs by more than 55%.
  • Cloudysave’s goal is to provide clear visibility about the spending and usage patterns to your Engineers and Ops teams.
  • Have a quick look at CloudySave’s Cost Caluculator to estimate real-time AWS costs.
  • Sign up Now and uncover instant savings opportunities.

Effective Cost Management Using AWS Unit Metrics

This article provides a general overview of leveraging unit metrics to manage AWS Costs. Let dive into details…


It’s a very common question that you’ve or your team might had came across, How do I manage my AWS costs more effectively?   Most of the teams & organizations are under the impression that spend is directly proportional to the bad cloud management. One simple reason can be not accurately predicting the granular costs from AWS Invoice itself. Sometimes the costs associated are providing more value & other times, its mostly under-utilized or unused cloud resources. That’s why unit metrics come in place to help teams/organizations to identify the difference.


What is a unit metric?

In simple terms, unit metric acts a Key Performance Indicator (KPI) that represents the rate of spend (or) rate of resource consumption. Depending on the audience, both can provide value appreciatively. I mathematical terms, it can be expressed as

Incremental unit cost = (amount of spend)/(number of resources being utilized) 
(or) 
Incremental unit consumption = (resource consumption)/(number of resources being utilized)

From above formula, we can understand that the main objective of unit-metrics are to provide value in terms of demand. According to AWS Cloud Financial management, demand driver is a word used to associated with these metrics and can be directly correlated to AWS Costs or AWS resource usage. The resources used and cost associated with them decides the demand driver which may increase or decrease accordingly.


Mapping Unit-Metrics with Demand

The best way to identify the demand driver candidate is to map it with your business activity itself. In simple terms, If you are running a Mobile company, the demand-driver metric can be dependent on the number of mobiles sold. Similarly in Cloud, demand-driver depends on the impact your products (or) services made positively (or) negatively on your customers.  The increase in demand-driver will subsequently increase the resource usage (or) consumption. The opposite is true as well.

Let’s discuss a few more scenarios where the costs are increased (or) can be justifiable with increasing costs.

  • Fixing a bug, Before the bug the costs can be understated since the application is not working as expected.
  • Implementing/Updating the regulatory (or) compliance requirements. This is necessary and need to be in-place.
  • Teams working on development/sandbox environments. Developers deploy code and test their work to make enhancements to the existing app or create a new one entirely. This might impact on spend accordingly.

It’s recommended to estimate of costs associated with the resources when teams are working on the product’s backlog. This helps developers to understand the cost-levers of the AWS services. Not only this, these estimates can act as a reference points that can be compared with an actual costs. The difference between expected and actual costs can help your engineers to architect the better cloud practice keeping all technical constraints in place. This approach further helps in reducing costs.

Also, expect that there should be a review process to calculate your unit-metrics. This improves confidence in choosing unit-metrics. Moreover, it’s recommended to preform a audit once in a while. This audit helps the teams to assess the systems nature and performance which might be useful to make their systems better.


Finally, I will conclude the article by providing few more details about unit-metrics that can improve your cloud posture.

  • Forecasting the future cost scenarios from the existing spend patterns will improve the cloud cost operations. This forecasting & predicting will greatly assist to determine if additional workload can align with the expected costs or not.
  • Chargebacks is normally used to accurately quantify the costs to the respective teams (or) Cost-Centers. This serves the purpose of attributing costs to proper ledger accounts and actions can be taken within the specific teams (or) Cost-Centers.
  • Gross Margin Analysis helps the financial teams to understand the impact of the specific product (or) application. Breaking down resources costs can be a great mechanism to improve & prioritize future costs accordingly.
  • Organizational Management by dividing the entire org into different functional units like Sales, Product, Engineering etc. can also improve the posture wrt. Cloud Operations.

  • CloudySave is an all-round one stop-shop for your organization & teams to reduce your AWS Cloud Costs by more than 55%.
  • Cloudysave’s goal is to provide clear visibility about the spending and usage patterns to your Engineers and Ops teams.
  • Sign up Now and uncover instant savings opportunities.

KOPS on EC2 vs EKS

KOPS on EC2 vs EKS: A comparison on pricing & characteristics

KOPS on EC2 vs EKS – Overview

Kubernetes (k8s) ecosystem is being adapted by many teams and organizations heavily. The ease of use and driving with immutable architecture ate the main reasons behind choosing k8s. There are many approaches to deploying/maintaining k8s on production-level clusters. KOPS on Ec2 & EKS is actively used with AWS.  This article provides a brief about KOPS on EC2 & EKS, and also highlights the characteristics & pricing model of both.


KOPS on EC2

  • KOPS is a utility tool developed by the k8s community to spin up production-level clusters on top of AWS EC2. KOPS was widely used even before AWS developed EKS.
  • KOPS typically uses declarative based configuration and this helps kops to understand the infrastructure changes and take actions accordingly.
  • It has great support for scaling up nodes/clusters based on needs and a major part of k8s operations are automated and managed by kops itself.
  • A few of the Key features are discussed below.
    • Deploy k8s clusters on existing or newly created VPC.
    • Public & Private network topologies are supported.
    • Dry runs using state sync model & idempotency-based automation.
    • Multiple instance groups can be created to support heterogeneous clusters type.
    • Easy rolling updates to cluster.
    • Direct support with domain name integrations.
    • The user needs to manage and maintain the k8s control plane(master, scheduler, API-server etc.)

AWS EKS (Managed K8S  Service)

  • AWS developed EKS to mimic what kops does EC2 but it is completely managed by AWS. Users can start, run & scale their k8s workloads without worrying about cluster updates, management and other technical things.
  • EKS is fully managed by AWS and this puts users in a great position to focus more on their apps rather than maintaining k8s cluster infra and management.
  • EKS can be natively integrated with many other AWS services, which really puts it in a better position when compared with kops.
  • A few of the Key features are discussed below.
    • Highly Available, scalable & consistent performance.
    •  EKS support deployments on EC2 & Fargate.
    • Choosing EC2 will deploy control nodes as Ec2 instances and k8s workloads are executed on top of them.
    • Choosing fargate will automatically provision/manages required resources. Users only pay for their requested resources.
    • Fargate also improves security by design as AWS deploys machines in an isolated environment.
    • EKS provides an integrated console for users. This can be a great benefit for users to organize, visualize & troubleshoot their k8s workloads over the console.
    • eksctl is a command-line tool for managing EKS environments. users can easily spin up, manage, and destroy clusters using this tool.

Comparison of Pricing Characteristics

The following Table illustrates the typical cost points and characteristics as well.

TypeKOPS on Ec2PricingEKS Managed K8s on EC2PricingEKS FargatePricing
K8s Masteruser manageddepends on ec2 instance typeAWS Managed0.10 USD/hr per clusterAWS Managed0.10/hr per cluster
for ex: t3a medium 75 USD/month with 30 Gb EBSaround 72-75 USD/month per cluster
K8s Control nodesuser manageddepends on ec2 instance typeuser manageddepends on ec2 instance typeAWS managedthe minimum charge incurred for one minute
for ex: t3a medium 75 USD/month with 30 Gb EBSfor ex: t3a medium 75 USD/month with 30 Gb EBScosts depend on the vCPU & Memory allocatedcomes to around 150 USD/month for normal usage
S3 Bucketsuser managed and2-5 USD/month (depending on the Size)None-None-
KOPS use S3 for storing k8s configuration
S3 Gets & PutsKOPS continuously polls S3 to maintain state5-10 USD/month depends on k8s cluster managementNone-None-
Route53 Records & CertificatesR53 hosted zone is a pre-requisite for KOPSCost around 5 USD/month(based on queries)Not a pre-requisite, but it can attach the zone to k8s clusterCost around 5 USD/month(based on queries)Not a pre-requisite but it can attach the zone to k8s clusterCost around 5 USD/month(based on queries)

Pros & Con’s of choosing k8s ecosystem

Choosing KOPS or EKS has its advantages and disadvantages. We analyzed a few generic use cases and came up with a list for you to check and understand before spinning up k8s on AWS.

KOPS Pro’s:

  • KOPS gives complete authority of master and architecture to the users. They can manage k8s infra as they need, for example, by implementing monitoring add-ons to an existing cluster.
  • The cost of the k8s cluster is similar and sometimes cheaper than EKS in many ways like the cot mostly depends on EC@ instances & traffic. Anyways, KOPS is an independent tool that can directly configure and provide a working cluster in a few mins & anywhere.
  • Control: KOPS is better suited in the long run because of user management & complete control of how things are getting managed.

KOPS Con’s:

  • More effort is required to integrate with AWS Native Tools.
  • More developer eyes need when performing rollouts or upgrades to the k8s cluster.
  • AWS Shared Responsibility model for KOPS. Users need to manage the security modes for their k8s architecture.
  • Community-driven software. Sometimes, it takes more time than expected to fix a bug or introduce a new feature.

EKS Pros:

  • AWS Managed, just spin up cluster and attach nodes, start developing ion working k8s cluster. Users can focus more on their apps and worry less about cluster management activities like scaling and upgrades.
  • Affordable Pricing 0.10$/hr. This really helps many teams to dive into k8s and explore more in EKS.
  • Native integrations with other AWS services. IAM-driven architecture, which improves security posture.
  • Numerous getting started articles with extended AWS support.

EKS Con’s:

  • Worker nodes should be created manually and only a few AMI-Id’s support as of now.
  • Deep AWS integration makes users difficult to change as per their needs/configuration.
  • Little to no influence on managing master nodes. Difficult to integrate with a few third-party services.

On the whole, EKS & KOPS can be great services to start with. However, it’s suitable to deploy and maintain most of the dev & sandbox environments in KOPS. It’s recommended to use EKS if your application is deeply integrated with other AWS services. Have a look at some of CloudySave’s Articles below.

AWS ECS for K8S

What is AWS Fargate?

AWS Fargate Price Reduction


  • CloudySave is an all-around one-stop-shop for your organization & teams to reduce your AWS Cloud Costs by more than 55%.
  • Cloudysave’s goal is to provide clear visibility about the spending and usage patterns to your Engineers and Ops teams.
  • Have a quick look at CloudySave’s Cost Calculator to estimate real-time AWS costs.
AWS Elastic File System

Getting started with AWS Elastic File System

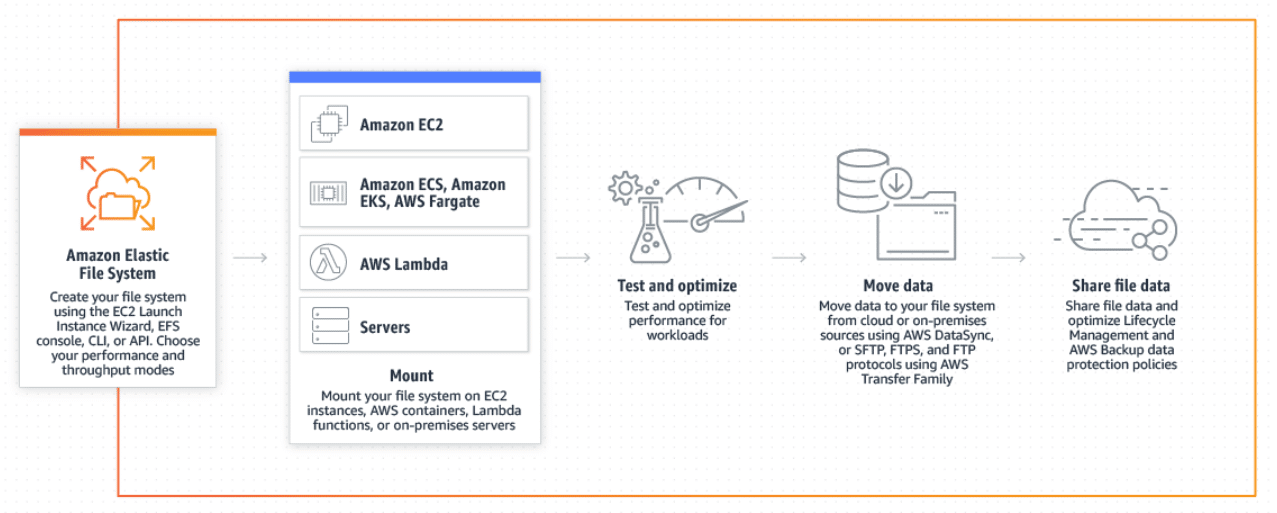
This article provides a general overview about AWS Elastic File System (EFS), also highlights few of key features of AWS EFS.


What is an AWS EFS and What is it Used For?

  • AWS EFS is introduced to assist users to create & mange the file-systems with minimal user intervention.
  • EFS features a very simple, scalable & server-less elastic file system that lets users to share data without worrying about provisioning or managing storage.
  • EFS can be used with AWS or any on-premises resources. It’s scalable to terabytes and can provide reliable data management across numerous applications.
  • Most of the use-cases include server-less apps, backups, big-data analytics, app development, content, media & entertainment and many more.


AWS EFS Features
  • As of now, EFS comes with two different regional storage classes.
    • Regional class can store data securely & durably within single region & across multiple availability zones (AZ). This is the most common class used.
    • One Zone storage class stores data redundantly within single AZ. This approach potentially reduce 47% of the cost compared with standard class. This class is recommended for data which doesn’t require multi-AZ resilience.
  • Also, users can further classify their data into one of the following storage classes.
    • Standard Access storage class is the default storage class. This is recommended for general use-case where data is being actively shared across multiple entities.
    • Infrequent Access storage class is recommend for files that are less accessed or managed. Make sure to use this if around 80% of files are less frequently accessed. This class has less durability than above standard class. Also, using this class significantly improves cost-savings around 40% compared to Standard class.
  • Users don’t need to worry about scalability as AWS takes care about the capacity planning. AWS in the background  makes sure to scale up or down based on the usage.
  • EFS also have an option to encrypt the data at-rest & in-transit. Also, AWS-IAM can be integrated to effectively manage the permissions to the users within AWS.

Lets get to the practicality of EFS by creating one and mounting EC2 instance to it. We are considering us-east-1(NV) for the following usage.

Creating EFS using Console
  • Log-in to AWS console and navigate to EFS dashboard here.
AWS Elastic File System

AWS Elastic File System

  • Let’s create a new file system by clicking on the Create File System.
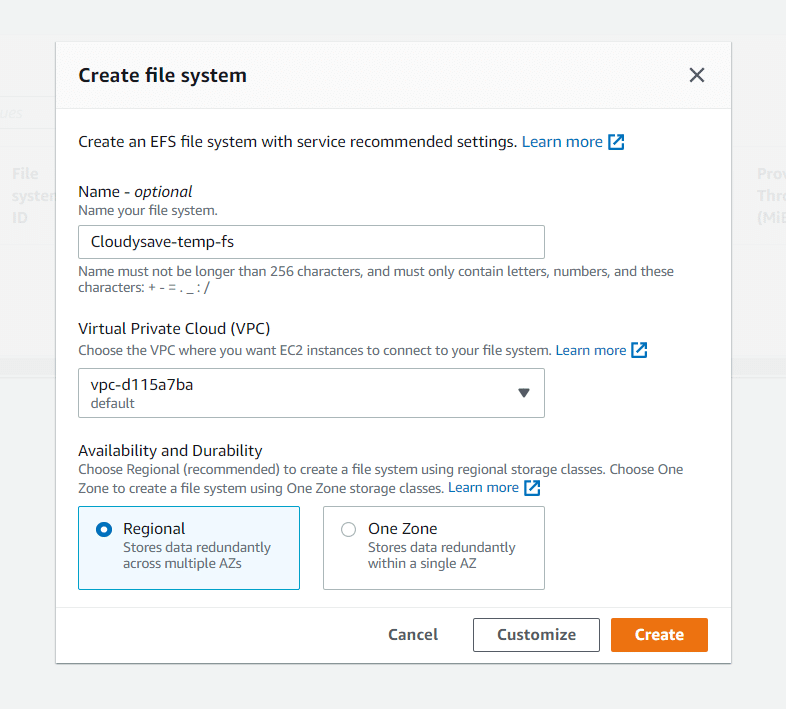
  • Provide a name to the File-system & choose the VPC where the file-system needs to be created. Choose the storage class depending the needs of the data classification. We are going with Regional as of now.

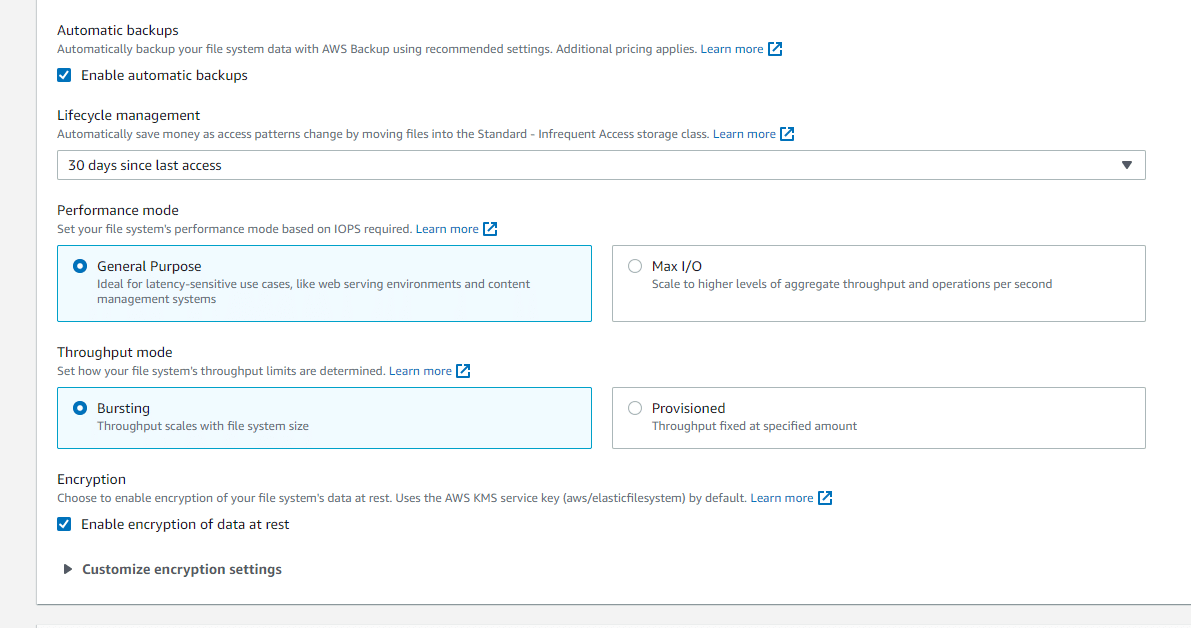
  • You can further customize the settings options over here. Also create tags if necessary to identify your file-system.

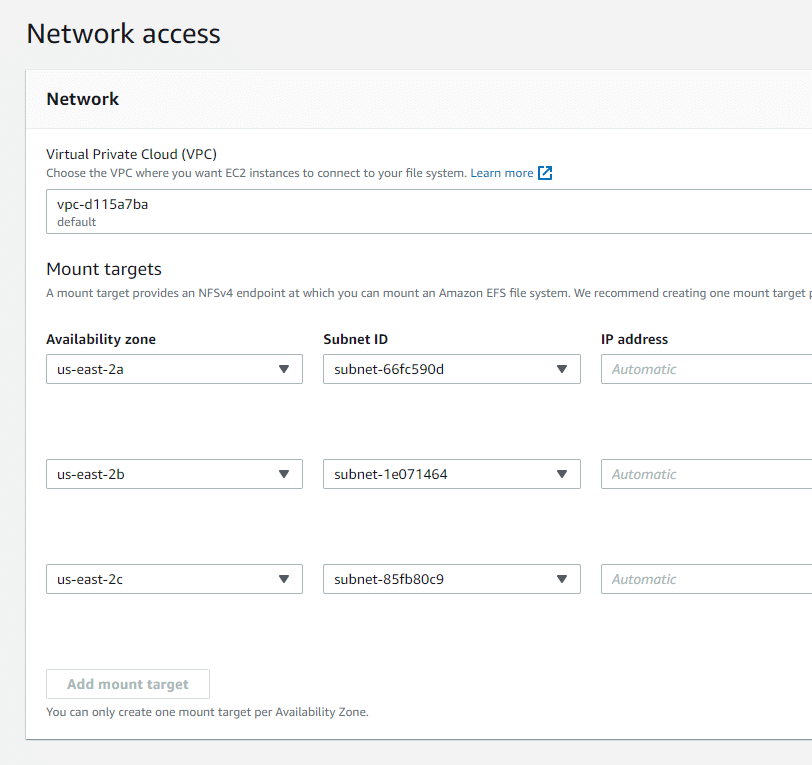
  • The next step is to manage the network configuration of the file-system. By default, a mount target is defined which provides an endpoint at which users can mount an EFS to their devices. Typically, AWS assigns one mount target per AZ.

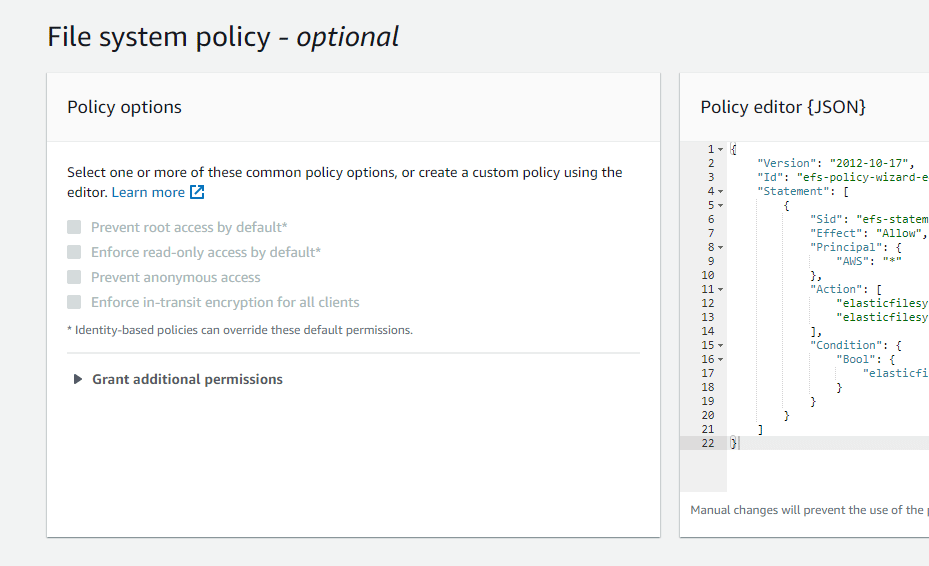
  • The next step is to manage access/security of the file-system. AWS provides few sets of default policies. Foe ex: enforce read-only access policy has the following policy content.
{
    "Version": "2012-10-17",
    "Id": "efs-policy-wizard-e40e3562-9d51-4387-905b-d9c4bff3346b",
    "Statement": [
        {
            "Sid": "efs-statement-4aa1fef9-8b13-4571-a156-8195963aa51b",
            "Effect": "Allow",
            "Principal": {
                "AWS": "*"
            },
            "Action": [
                "elasticfilesystem:ClientRootAccess",
                "elasticfilesystem:ClientMount"
            ],
            "Condition": {
                "Bool": {
                    "elasticfilesystem:AccessedViaMountTarget": "true"
                }
            }
        }
    ]
}


  • The Next step is the review tab and users can have a final look at the configuration before creating the file-system.
AWS Elastic File System

AWS Elastic File System


Mounting EC2 instance to EFS
  • SSH to the EC2 instance. We are currently using AWS-Linux2 ec2 instance.
  • amazon-efs-utils package needs to be installed to attach EFS with EC2. Update & then isntall the efs-utils using the following commands.
    • sudo yum update -y
      sudo yum install -y amazon-efs-utils
  • After successfully install efs-utils, create a directory where efs should be mounted in your system.
    • Update your Ec2 security group to allow inbound for NFS port (2049).
    • Make sure to allow EC2 SG in EFS SG.
    • Provide a EC2 role for EFS if you are trying to make any changes to the EFS other than writing & storing data/files.
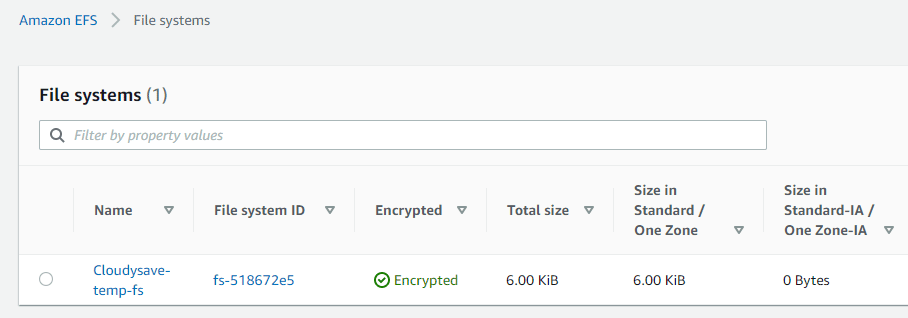
  • Fetch the EFS name from the console and then run the following command updating your fs name below.
    • sudo mkdir efs
      sudo mount -t efs <fs_name_here>:/ efs


  • Now you can use your NFS for storing & managing files as you need.
  • EFS mount will not be attached when your machine is rebooted/stop-started. To make it mounted on every go, update the above command in /etc/fstab.

This article just provided few details on how to get started with AWS EFS. Give it a try and see yourself the nature of EFS and how it can assist you and your teams in enabling an effective data access & management patterns. We are working on more articles to get you more idea on how AWS services work. Please have a look at few awesome articles here….

AWS Lambda Queue
What’s in EC2 dashboard?
What are Lambda Triggers?

  • CloudySave is an all-round one stop-shop for your organization & teams to reduce your AWS Cloud Costs by more than 55%.
  • Cloudysave’s goal is to provide clear visibility about the spending and usage patterns to your Engineers and Ops teams.
  • Have a quick look at CloudySave’s Cost Caluculator to estimate real-time AWS costs.
  • Sign up Now and uncover instant savings opportunities.
Everything to Know About AWS Systems Manager Parameter Store

This article provides a detailed overview of the AWS Systems Manager Parameter Store, and also highlights its key features.


What is AWS Systems Manager Parameter Store?

  • AWS came up with a service called Parameter Store to provide secure, hierarchical storage for data & secrets management.
  • This service assists users in storing & maintain their data such as passwords, database strings, AMI-Ids, configuration codes, license keys, etc. The data can be stored as plain text or encrypted data.
  • Parameter store can be integrated with any other service and users can easily refer to parameters in their scripts, automation workflows, configurations etc.
  • AWS also provides version tracking & auditing. This greatly helps users to improve their security posture.
  • In simple terms, a Parameter store is more like a key-value store, where the parameter name represents the name provided by the user and the value represents the secret/data that is associated with the parameter.

In this article, we will discuss the creation and usage of Parameter Store via console & AWS-CLI. For the article, we are referring to everything in the us-east-1 (NV) region.

Creating Parameter Via AWS Console
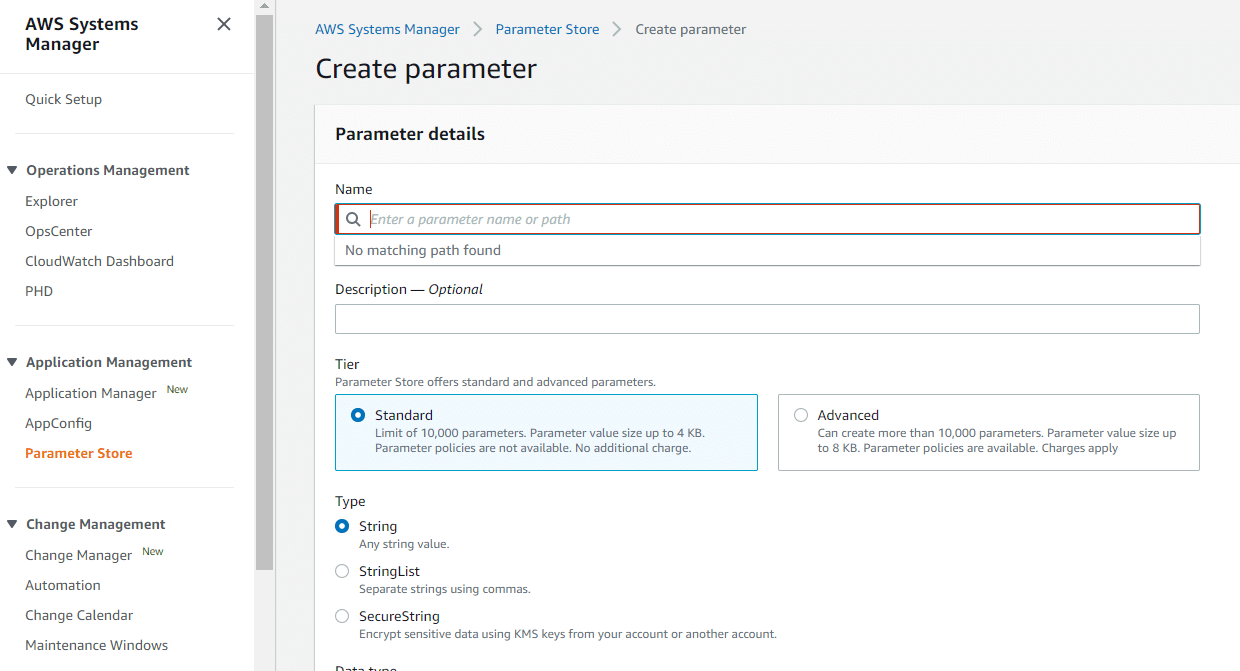
  • Log-in to AWS Console. Navigate to Parameter Store under Systems Manager service here.

  • Let’s create a new parameter. Provide a name to the parameter. AWS suggests using a path-based naming convention as it is easy to manage when there are parameters created in large numbers.
  • Provide the description if possible. This acts as metadata that can help users to identify the nature of parameters.
  • Currently, AWS offers two tiers for parameter stores.
    • Standard Tier is the default tier and params can have a value with a max size of 4Kb.
    • Advanced Tier comes with some cost and params can have a value with a max size of 4Kb. Also, parameter policies can be used with this tier(for ex: parameter expiration, change notifications, etc.)

  • The TYPE defines the type of value that can be provided to the parameter. Currently, AWS offers three types of parameters for data values.
    • String Type is the default and string parameters consist of any text block. (For Ex: clod123, img-src=1234.sas etc.)
    • AWS also provides default support to store AMI Ids as well in the string type parameter.
    • String-list types are just a bunch of comma-separated string parameters. (For Ex: Jan, Feb, March, etc.)
    • SecureString Type is an interesting one. This parameter type is commonly used for sensitive data that needs to be stored & retrieved in a secure way. (For Ex: data such as passwords or license keys etc.)
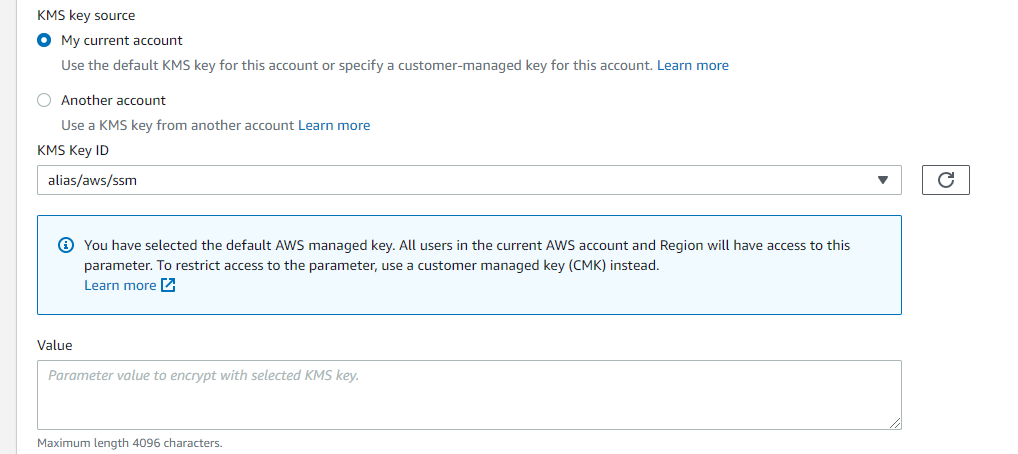
    • The data that is stored as the secure string is encrypted & decrypted using an AWS KMS key. By default, AWS uses its default KMS key. Users can also create a customer-managed key and use it with secure string type.

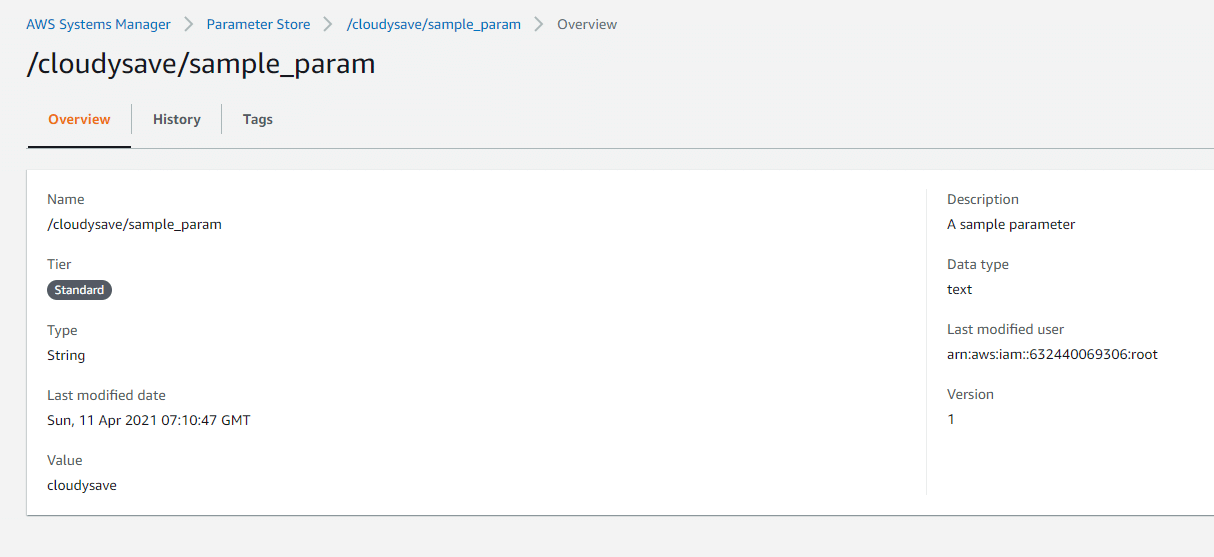
  • Create the parameter. After creating the param, you can start using that in your SDKs, automation etc.

  • You can also edit the parameter as you need. Click on edit in the top-right corner and after successful. This updates the version as well.

Creating Parameter Via AWS CLI
  • Make sure to configure AWS-CLI before getting started.
  • We can use the AWS put-parameter to create SSM parameters programmatically. The following snippet will create a simple string-based parameter.
    • aws ssm put-parameter \
      --name "/cloudysave/sample_param_1" \
      --value "Star Wars Episode VI" \
      --type "String"
      

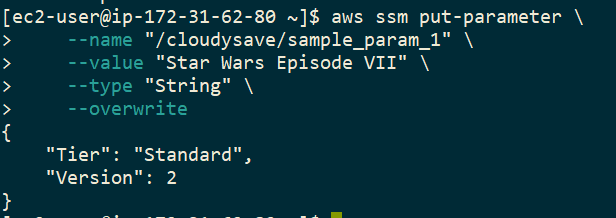
  • Now we can update the parameter created above with –override.
    • aws ssm put-parameter \
          --name "/cloudysave/sample_param_1" \
          --value "Star Wars Episode VII" \
          --type "String" \
          --overwrite
      

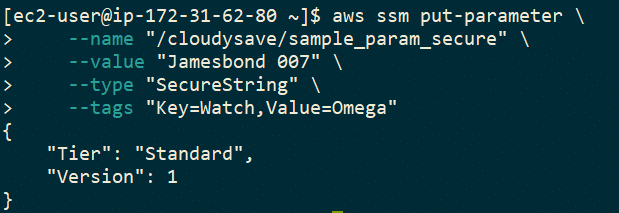
  • Lets you create a new secure string param using the following snippet.
    • aws ssm put-parameter \
          --name "/cloudysave/sample_param_secure" \
          --value "Jamesbond 007" \
          --type "SecureString" \
          --tags "Key=Watch,Value=Omega"
      

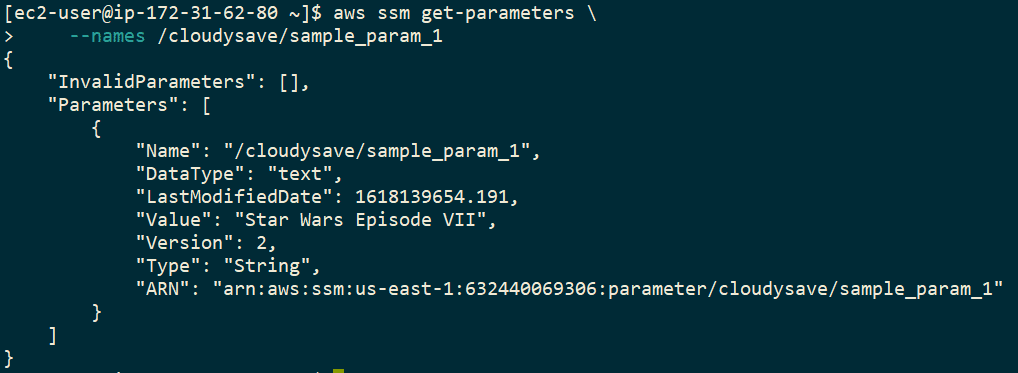
  • We can use get-parameter/get-parameters to fetch the parameters using cli.
    • aws ssm get-parameters \
          --names /cloudysave/sample_param_1
      

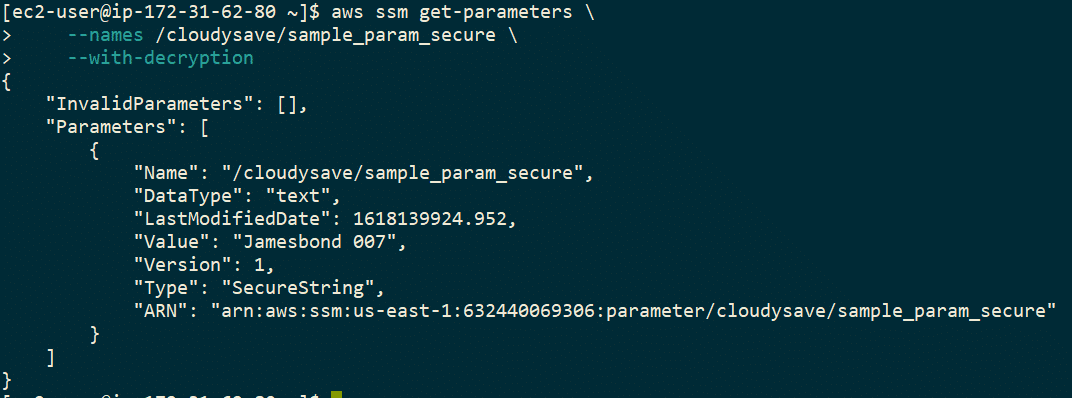
  • If you try to fetch secure params, the outputs show this way. Make sure to use –with-decryption to decrypt the value.
    • aws ssm get-parameters \
          --names /cloudysave/sample_param_secure \
          --with-decryption


Further Thoughts

AWS Systems Manager Parameter store is really easy to start with and can integrate with many SDKs & other tools. Go through the following article to understand how to use boto3 to talk with parameter store. This article provided few key details on getting started with Parameter Store. Follow us for more articles on AWS services.

What is new with AWS Lambda?


  • CloudySave is an all-round one stop-shop for your organization & teams to reduce your AWS Cloud Costs by more than 55%.
  • Cloudysave’s goal is to provide clear visibility about the spending and usage patterns to your Engineers and Ops teams.
  • Have a quick look at CloudySave’s Cost Calculator to estimate real-time AWS costs

What’s new with AWS Lambda?

This article provides a detailed overview about new & updated AWS Lambda, also highlights latest features of AWS Lambda.


AWS updates their services very frequently to make them suitable to different use-cases (or) add more features to attract more users. Not only in terms of functionality, AWS also updates their services UI regularly. Sometimes, even a small change might take some time to fully get adopted by the users.

In this article, we discuss more about the latest changes and enhancements made to AWS Lambda. We will cover other services in detail in different blog posts.


Let’s Get Started…

AWS Lambda goes through many enhancements along the way. We will cover few of the technical updates and console based changes that were made recently and currently available to users.


AWS Lambda Technical Releases

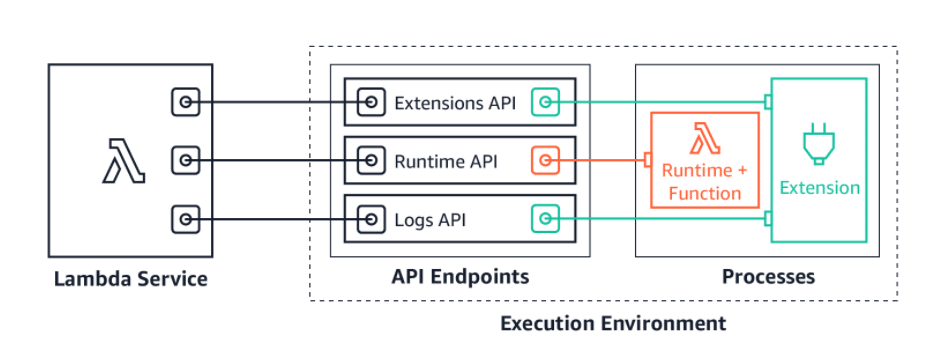
AWS Lambda Logs API
  • AWS Lambda is updated functionally to capture runtime logs at the time of execution & then stream them AWS Cloudwatch.
  • Most of the logs are generated by the Lambda function code invocations & executions are pushed as a Log streams.
  • Runtime logs API can be referred with Lambda extensions to get subscribed to log streams directly from function execution.
  • Currently, HTTP (recommended) & TCP endpoints are supported.

Code signing configurations
  • This feature was introduced to make sure only a trusted code can be deployed & executed via AWS Lambda.

  • Users can now configure their functions to accept only signed code for deployment. In the background, Lambda verifies the signatures and make sure to skip the execution if the code is altered or tampered.
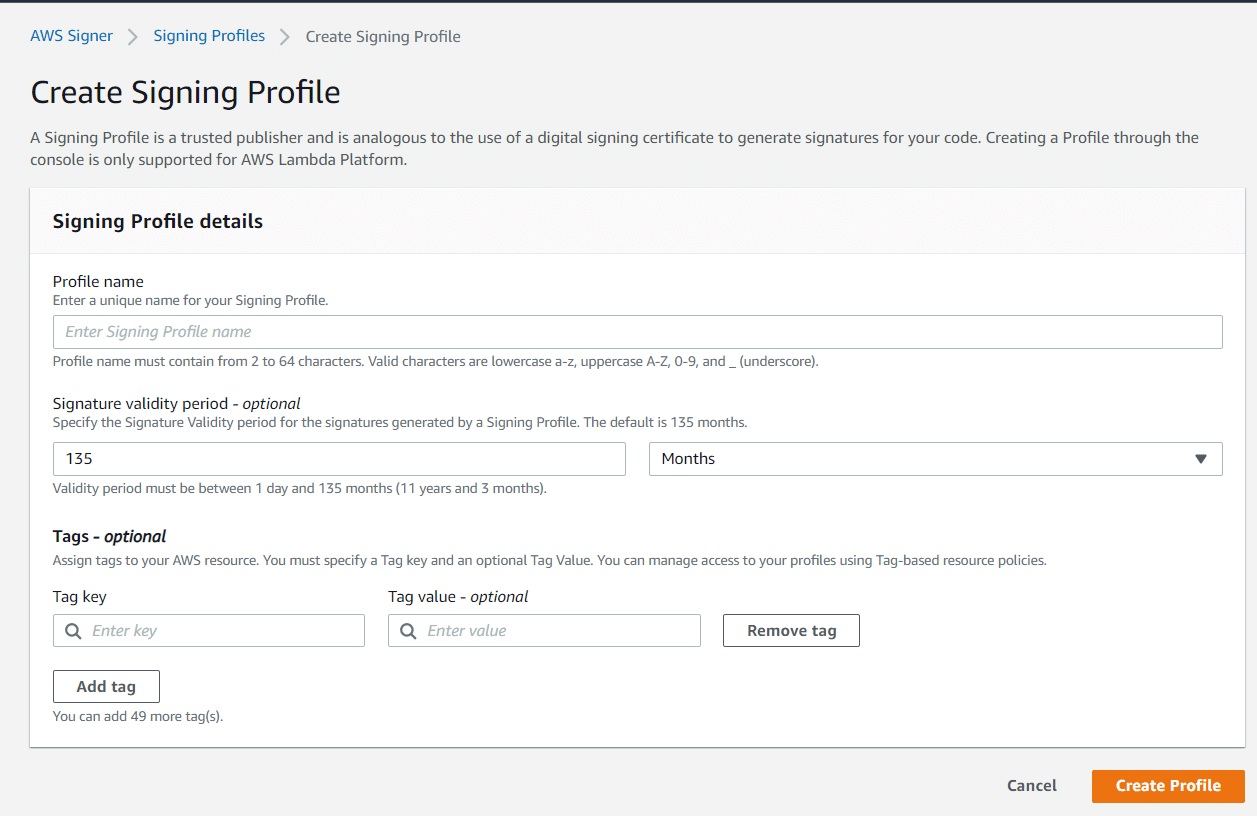
  • This configuration is easy to start with,

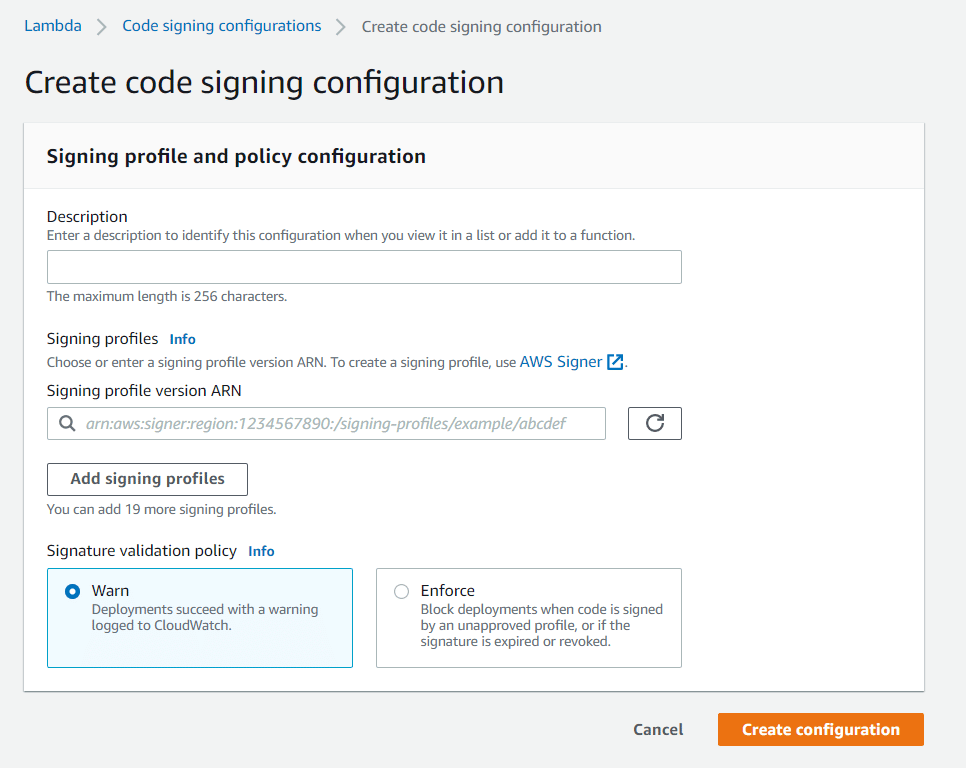
    • After creating signing profile, navigate to Lambda console and create a new code signing configuration. Update your signing profile over here.

    • Users can manage the validation policy as well, for example WARN > warn & execute the code (or) ENFORCE > block executions when signature is tampered/expired.
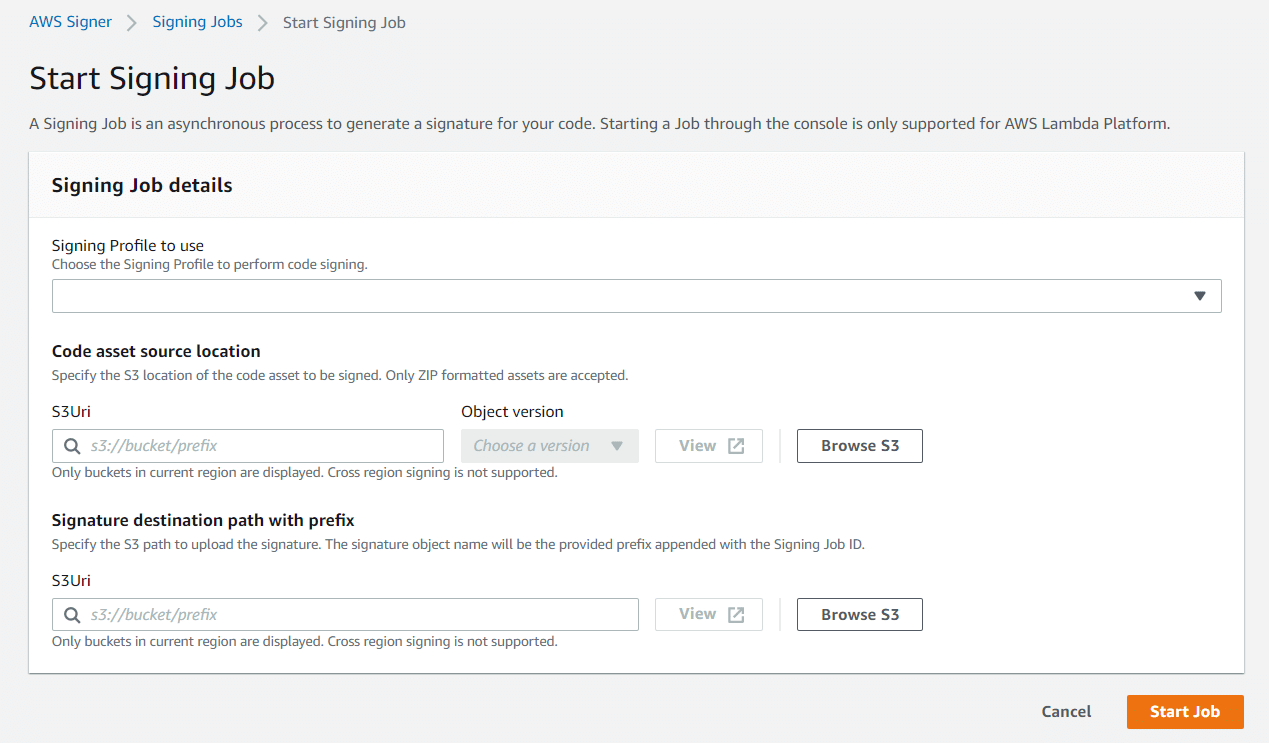
    • Users can create signing jobs to automatically sign the code that is deployed in S3.


Lambda container images
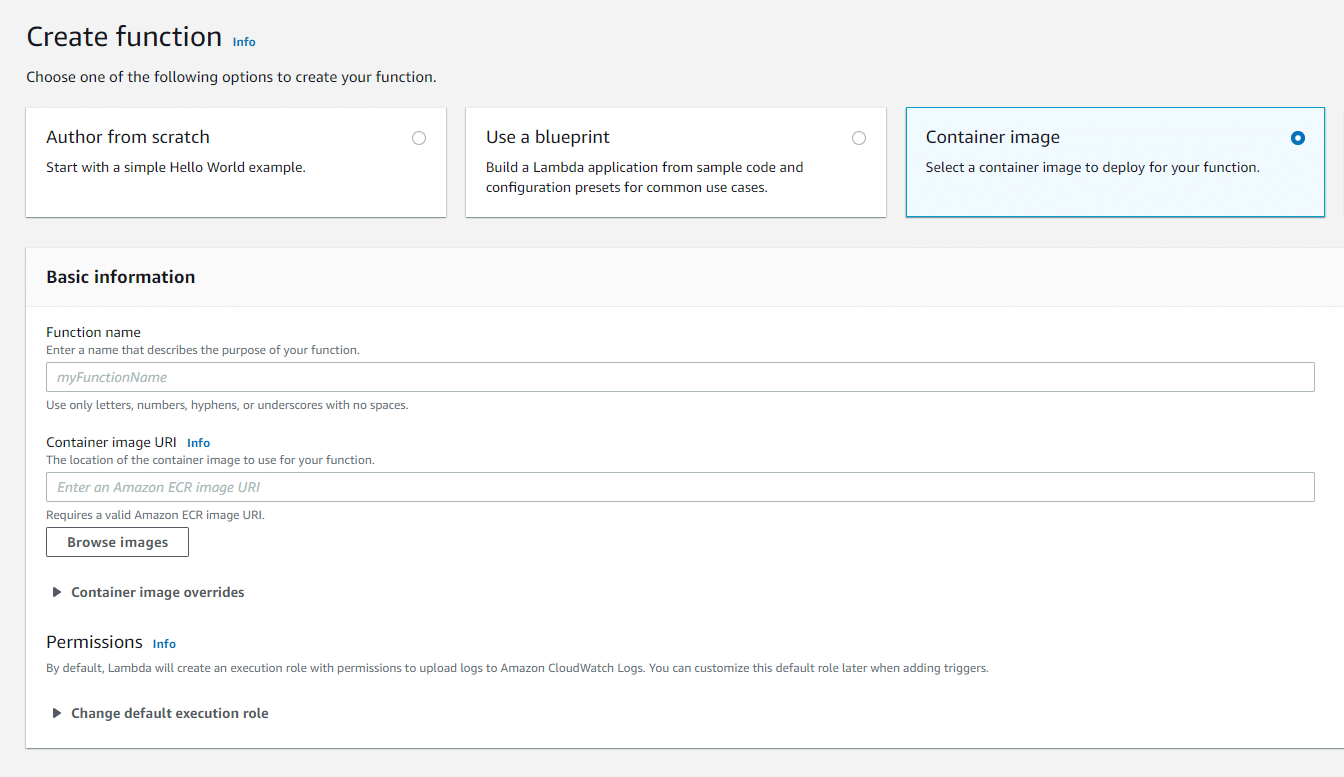
  • Lambda now provides users to packages & deploy their code as container images. This feature assists teams to easily build, manage & deploy massive workloads (for Ex: ML/AI workloads, data mapping etc.)
  • Similar to code based functions, users can just point to their container image location and create a Lambda function.
  • Container images Lambda functions will have the same features as any other code based functions like auto-scaling, availability, integrations with other AWS services etc.

  • AWS currently provides base-images for all Lambda supported runtimes as of now. Custom images can also be created & deployed, but users should make sure they are compatible with Amazon Linux environments.
  • There is no additional costs incurred for using container images. Users should only pay for the execution time and storage for ECR repository.

Amazon MQ as event source
  • Apache ActiveMQ can now act as an event source for AWS Lambda. That means, Lambda can process event-data from your Amazon MQ message broker.
  • Typically, a message broker is used to communicate with various software components via topic (or) queue based events. It supports diverse programming languages, operating systems and messaging protocols.
  • A consumer group is created within Lambda to interact with Amazon MQ. The consumer group ID will be same as the event source mapping UUID.
  • The following options for Amazon MQ event sources are currently supported by Lambda:
    • MQ broker – Amazon MQ broker ID.
    • Batch size – Max # of messages to retrieve within a single batch.
    • Queue name – Amazon MQ queue to use.
    • Source access configuration – AWS Secrets Manager secret that stores the broker credentials.
    • Enable trigger – Enable/Disable the trigger to start/stop processing records.

AWS Lambda Console Updates

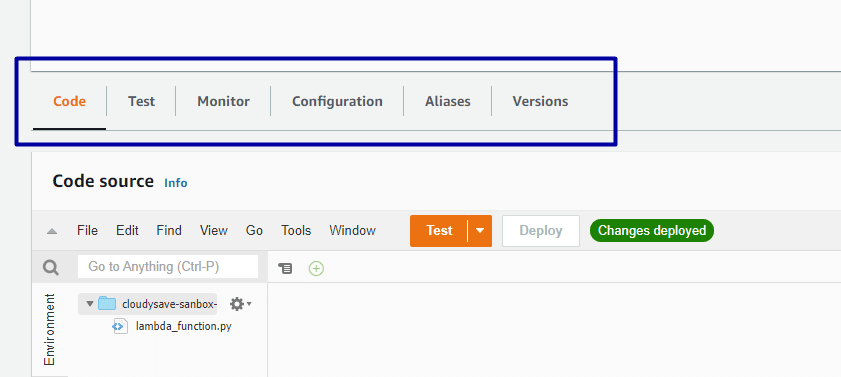
AWS Lambda revamped most of the console to support diverse features. Previously, Lambda console is single page user-plane which had all the necessary configurations in a single page. Now, they are using a single page approach but divided all the components in multiple tabs.

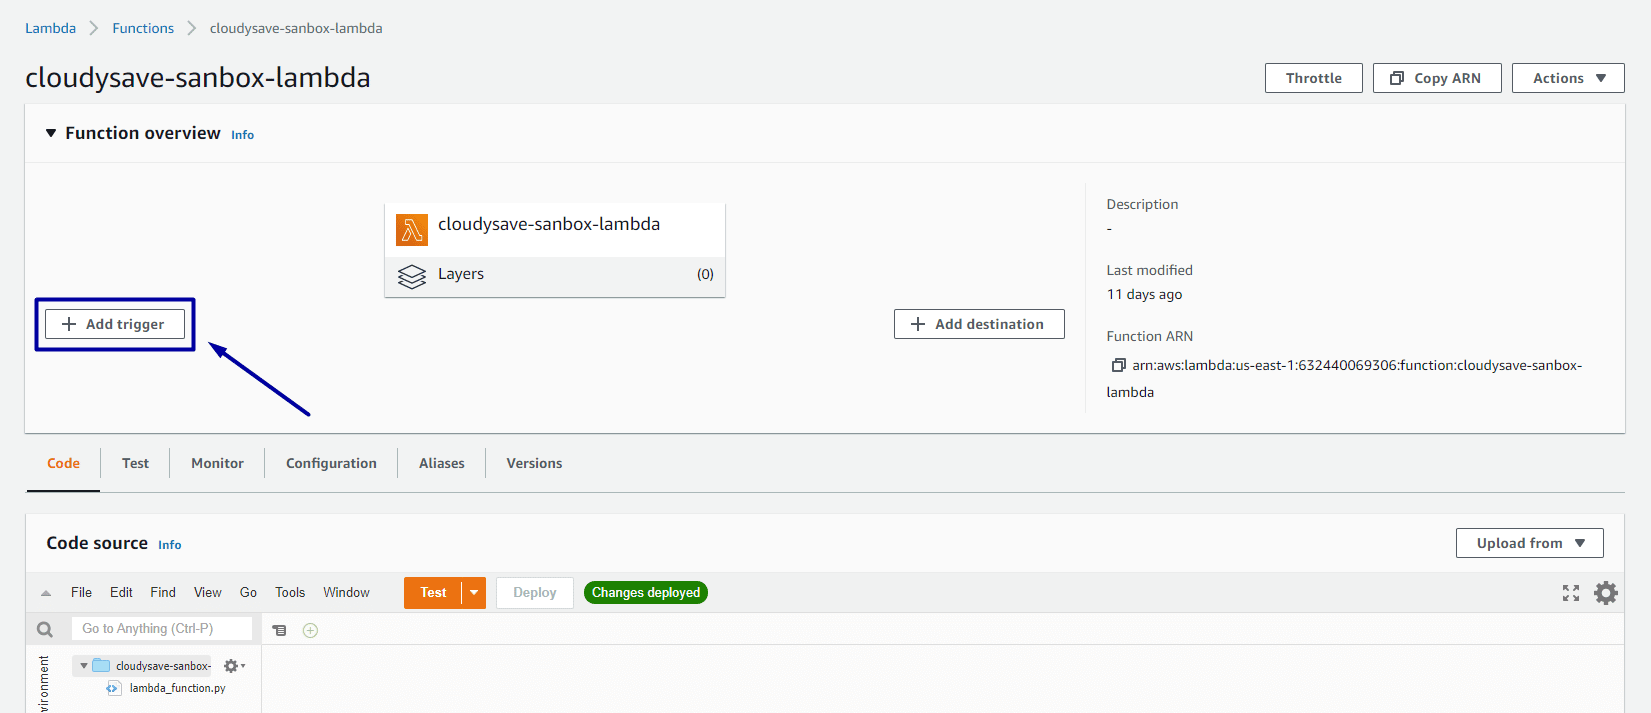
  • The typical Lambda home page looks like this.

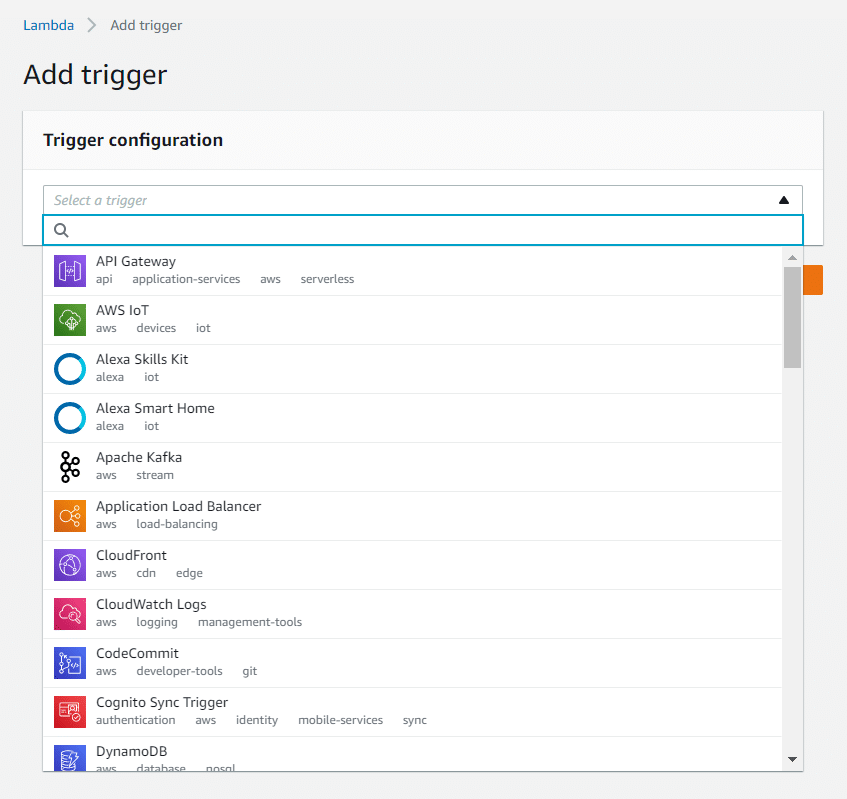
  • You can find most of the features as buttons. For example, if you click to add new trigger, lambda opens a different web-page to create a new trigger.

  • Users can see the different tabs above code-source to configure their Lambda.

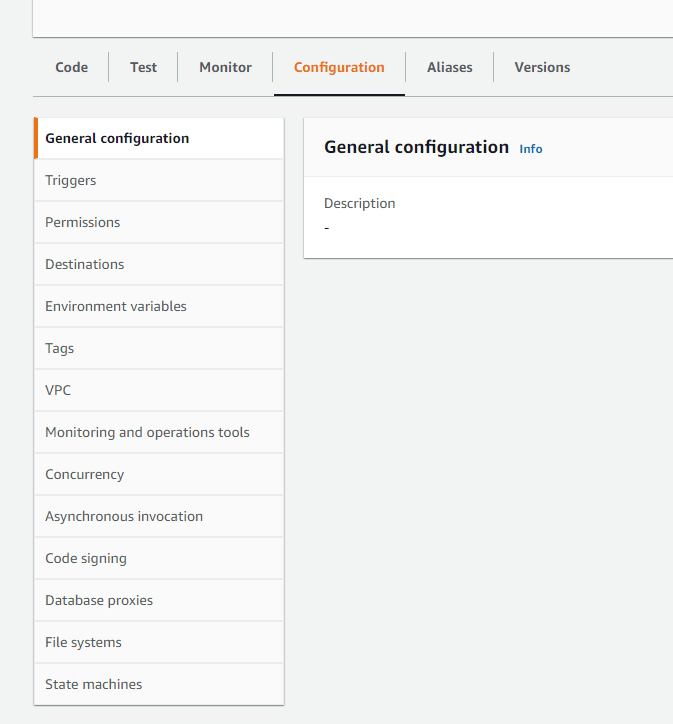
  • For example, Configuration Tab opens all the necessary features required to configure the function.

  • Monitor Tab provides the necessary features required to manage & monitor Lambda function.

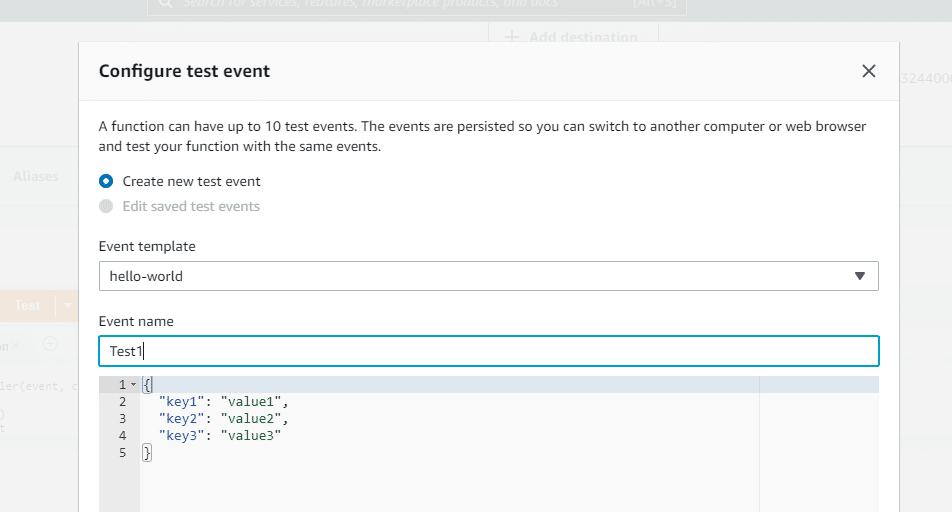
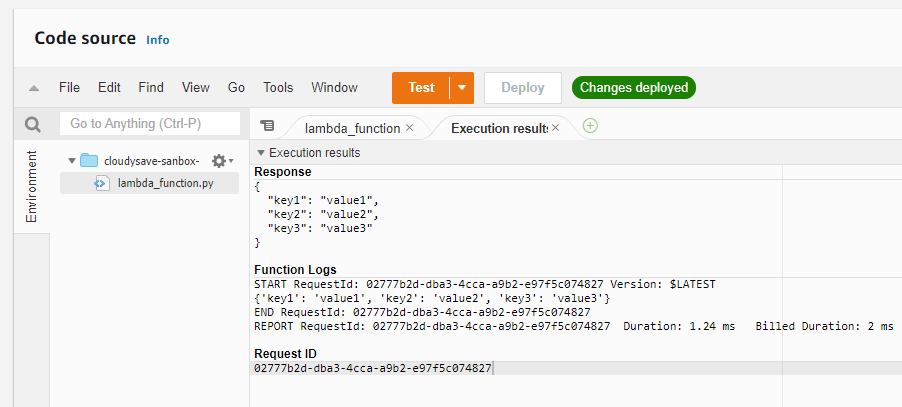
  • Users can manually create a test event and test their function and the output will be shown in a new tab in code source.


AWS frequently updates the features and these are the major changes at this point of time. Also find more resources on AWS Lambda

AWS Lambda Response Size Limit
AWS Lambda Queue
What are Lambda Triggers?
Invoke AWS Lambda


  • CloudySave is an all-round one stop-shop for your organization & teams to reduce your AWS Cloud Costs by more than 55%.
  • Cloudysave’s goal is to provide clear visibility about the spending and usage patterns to your Engineers and Ops teams.
  • Have a quick look at CloudySave’s Cost Calculator to estimate real-time AWS costs.
  • Sign up Now and uncover instant savings opportunities.