This article provides a detailed overview of AWS S3 Costs Patterns and provides insights about different cost components.
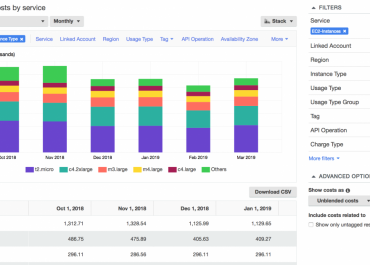
S3 Data Transfer Cost
Amazon storage service is an object storage that is specifically designed to store & access data (of any type) over the internet. Amazon storage is completely secure, 99.99% durable, and can scale millions of applications for companies throughout the world.
Customers of all industries (no matter what size) can use Amazon S3 to store & protect any amount of data for a diverse range of use cases, such as backup/restore, mobile apps, websites, archives, enterprise-apps, IoT devices, AI/ML & big data analytics.
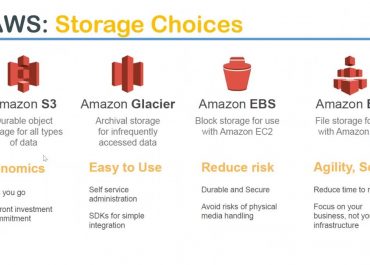
Amazon offers different storage choices for its users, including Amazon S3, Amazon Glacier, Amazon EBS, and Amazon EFS.

S3 Data Transfer Cost – storage choices
What is Amazon S3?

S3 Data Transfer Cost – amazon s3
Amazon S3 is an object storage service built to store & retrieve any amount of data from anywhere on the Internet. Amazon S3 service is highly available, extremely durable, highly flexible, and offers unlimited data storage infrastructure at very low costs.
What can you do with Amazon S3?
Amazon S3 is an object storage service helping you develop applications that use internet storage. For this service, you need to pay for what you use. This means you can start small and can grow as per your business requirement. The S3 service ensures that there is no compromise on reliability and your application’s performance.
Amazon S3 is highly flexible. This means you can use it to store any type and amount of data that you want; read the same piece of data during emergency disaster recovery or as much as the time you want. You can also use it to build a simple FTP application or a sophisticated web application such as the Amazon.com retail web site.
How much does Amazon S3 Pricing?
The invoice for Amazon S3 is based on pay for what you use. You don’t need to pay any minimum fee for AWS S3. You can get an estimate of your monthly bill by using our CloudySave’s Cost Calculator.

S3 Data Transfer Cost – AWS s3 pricing calculator
The cost of storage varies across Amazon S3 Regions. To choose the best S3 fit for your profile, you must consider the four cost components.
- Storage pricing.
- Request & data retrieval pricing.
- Data transfer & transfer acceleration pricing.
- Data management features pricing.
# Storage
With Storage, you pay for storing objects in your S3 buckets. Your billing varies on your objects’ size, for how long you stored the objects and your storage class. The following storage classes are available as of now:
- S3 Standard,
- S3 Intelligent-Tiering
- S3 Standard – Infrequent Access
- S3 One Zone – Infrequent Access
- S3 Glacier
- S3 Glacier Deep Archive
- Reduced Redundancy Storage (RRS).
If you want to monitor access patterns & move objects between access tiers in S3 Intelligent Tiering, you need to pay monthly monitoring and automation fee per object stored in the S3 Intelligent-Tiering storage class. You can get an estimate of your costs using CloudySave’s Cost Calculator.
# Request and data retrievals
- In this, you pay for every request you make against your S3 bucket and objects.
- Your invoice is based on the request type as well as the number of requests made.
- You also get charged for browsing facilitate requests such as GET, LIST, and more.
- Charges are accrued at the same rate as requests that are made using the API/SDK.
- Requests such as COPY, PUT, SELECT, LIST, Data Retrievals, Lifecycle Transition, Cancel, and DELETE are made for free.
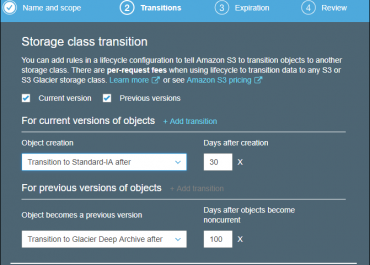
However, if you’re trying to retrieve objects that are stored in S3 – Infrequent Access, S3 One Zone – Infrequent Access, S3 Glacier, and S3 Glacier Deep Archive storage, your overall billing will increase.
# Data Transfer
You will be charged for transferring data in and out of Amazon S3, except for the following:
- Transferring data in from the internet.
- Transferring data out to an AWS Elastic Compute Cloud (AWS EC2) instance when the instance is in the same AWS Region as the S3 bucket.
- Transferring data out to AWS CloudFront.
There is no charge for transferring data between S3 buckets or from Amazon S3 to any service(s) within the same AWS Region. However, if you transfer data using Amazon S3 Transfer Acceleration, you’ll get charged for the request.
# Management and Replication
Management: You pay for storage management features such as Amazon S3 inventory, analytics, and object tagging.

S3 Data Transfer Cost – management and replication
S3 Replication pricing: For S3 replication, you pay the S3 charges for storage in the selected destination S3 storage class, the storage charges for the primary copy, replication PUT requests and applicable infrequent access storage retrieval fees.

S3 Data Transfer Cost -replication time
How to get started with Amazon S3?
To start with Amazon S3, you must have access to AWS. If you’re not an active AWS user, you will be prompted to create an account, to begin with Amazon S3 sign-up process. Once you sign-up for Amazon services, ensure to go through Amazon S3 documentation as well as the sample code in the Resource Center. This documentation and sample code will help in using Amazon S3.
If in case, you’re planning to use S3 Storage services for data storage, ensure to go through its pricing structure to avoid hefty bills and any sort of confusion. Want to get more information on Amazon S3 or facing issues with S3 Data Transfer Costs, do let us know in the comment section. Our experts will definitely come out with the best possible solution for you.
See Also
- CloudySave is an all-round one stop-shop for your organization & teams to reduce your AWS Cloud Costs by more than 55%.
- Cloudysave’s goal is to provide clear visibility about the spending and usage patterns to your Engineers and Ops teams.