Manage Redshift Cluster Subnet Groups
Creating a cluster subnet group:
How to use the console to manage redshift cluster subnet groups?
A minimum of 1 cluster subnet groups should be available to be able to start provisioning a selected cluster in a VPC. If you’d like to learn about VPC data transfer pricing you can check the AWS VPC Data Transfer Pricing manual.
To begin with, you must know that there are now 2 consoles that you can work with on Amazon Redshift. A New console or simply the Original console. Go over the steps for each according to which console you’re using.
Using new console to Manage Redshift Cluster Subnet Groups
For the sake of creating a cluster subnet group using the new console:
- Login to the Management Console and head to the Redshift console using the following link https://console.aws.amazon.com/redshift/.
- From the navigation menu, select CONFIG, then click on Subnet groups. You will get a list of available subnet groups.
- Select Create cluster subnet group for checking the create page.
- Fill in data for your subnet group, as well as the subnets for adding.
- Click on Create cluster subnet group in order to get the group created having your selected subnets.
Using original console to Manage Redshift Cluster Subnet Groups
For the sake of creating a cluster subnet group using the original console:
- Login to the Management Console and head to the Redshift console using the following link https://console.aws.amazon.com/redshift/.
- From left navigation pane, select Security.
- From Subnet Groups tab, click on Create Cluster Subnet Group.
Manage Redshift Cluster Subnet Groups -Click Create Cluster Subnet Group

- Inside Create Cluster Subnet Group box, start adding some subnets.
-
- Enter a unique Name, a specific Description, and a value for VPC ID.
- Start adding subnets through performing 1 of the below actions:
- Select the link named add all the subnets.
- From the boxes of Availability Zone and Subnet ID select a particular subnet then click on Add.
Below you can see how a cluster subnet group has been specified with 1 subnet.

Manage Redshift Cluster Subnet Groups -1 Subnet added
- Click on Yes, Create.
You can find your newly created group listed under cluster subnet groups.
How to modify a cluster subnet group?
Using new console to Manage Redshift Cluster Subnet Groups
For the sake of modifying a cluster subnet group using the new console:
- Login to the Management Console and head to the Redshift console at https://console.aws.amazon.com/redshift/.
- From navigation menu, Select CONFIG, and click on Subnet groups. You will get a list of subnet groups.
- Select the needed subnet group for modification.
- Under Actions, Select Modify for showing information about the subnet group.
- Update the subnet group.
- Select Save for modifying your group accordingly.
Using original console to Manage Redshift Cluster Subnet Groups
For the sake of editing a cluster subnet group using the original console:
- Login to the Management Console and head to the Redshift console at https://console.aws.amazon.com/redshift/.
- From left navigation pane, Select Security.
- From Subnet Groups tab, head to the cluster subnet group list, and select the needed group’s row for modification, then click on Edit.
Below you can see that subnetgroup2 will be the selected cluster subnet group for modification.
- For Cluster Subnet Group Details, you can perform one of the below actions.
Action 1:
You can choose to add 1 or multiple subnets to the group.
Select subnets one by one according to their Availability Zone and Subnet ID boxes or just select the option of add all the subnets.

Manage Redshift Cluster Subnet Groups -Add Cluster Subnet Groups
Click on the Save Button.
Action 2:
You can choose to get a subnet removed from the group.
From the listed subnets used for the group, select the Remove option located on the side of the needed subnet.

Manage Redshift Cluster Subnet Groups -Remove Cluster Subnet
Click on the Save Button.
How to delete a cluster subnet group?
A used cluster subnet group is not capable of getting deleted.
Using new console to Manage Redshift Cluster Subnet Groups
For the sake of deleting a cluster subnet group using the new console:
- Login to the Management Console and head to the Redshift console at https://console.aws.amazon.com/redshift/.
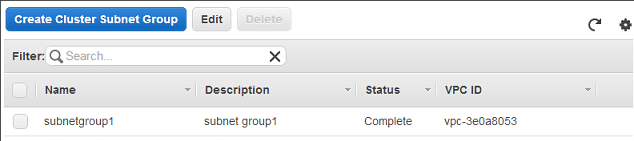
- From navigation menu, select CONFIG, and click on Subnet groups. You will get to see a list of subnet groups.
- Select the needed subnet group for deletion, and click on Delete.
Using original console to Manage Redshift Cluster Subnet Groups
For the sake of deleting a cluster subnet group using the original console:
- Login to the Management Console and head to the Redshift console at https://console.aws.amazon.com/redshift/.
- From left navigation pane, click on Security.
- From Subnet Groups tab, select the needed group’s row for deletion form the listed cluster subnet group.
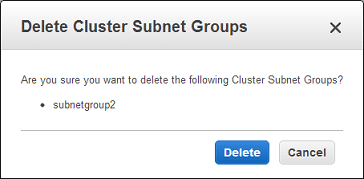
Below you can see that subnetgroup2 will be the group ready to get deleted.

Manage Redshift Cluster Subnet Groups – Delete subnetgroup2
- When the Delete Cluster Subnet Group dialog box appears, click on Delete.
Manage Redshift Cluster Subnet Groups – Delete Cluster Subnet Groups
