This article provides a detailed overview of uploading files/folders to S3, also highlights few of the use-cases in general.
Uploading Files and Folders to S3 Bucket
An uploaded file is saved as an object. This object is made up of the file’s data and the metadata which describes this object. There is no limit on the #objects added to the bucket.
An S3 object can be of any type (Ex: images, backups, data, movies, etc.) A file can have a size of 160GB at max. For larger files AWS suggests to upload them using AWS CLI, S3 REST API or AWS SDK.
Files can be uploaded by:
- Dragging and dropping
- Pointing and clicking
To upload folders, you must drag and drop them (only for Chrome and Firefox browsers).
When a folder is uploaded, the bucket gets its files and subfolders. Then it gets an object key name = uploaded file name + folder name.
For Example, Uploading a folder called /pictures with two files: pic1.jpg and pic2.jpg, The file will be uploaded and assigned with this key name: pictures/pic1.jpg and pictures/pic2.jpg.
- Key names= folder name (prefix). The part that follows the last “/” is what gets displayed. Example: in a pictures folder the pictures/pic1.jpg and pictures/pic2.jpg objects get shown as pic1.jpg and a pic2.jpg.
- Uploading individual files with an open folder in the S3 console: when files are uploaded, they get the name of the open folder as prefix for the key names.
- Example of a folder named review open in the console and you upload a file with the name trial1.jpg, the key name will be review/trial1.jpg, but the object is shown in the console as trial1.jpg in the review folder.
- Uploading individual files with no open folder in the console: when files are uploaded, only the file name becomes the key name. Example of a file named trial1.jpg, the key name is trial1.jpg.
- Uploading an object of key name already found in a versioning-enabled bucket, another version of this object gets created instead of getting the already existing one replaced.
How to Upload Files and Folders Using “Drag and Drop”?
With Chrome/Firefox browsers, you get to choose the folders and files you want to upload, then you simply drag and drop them down into the destination bucket. To drag and drop is just the only possible way for uploading folders.
Uploading folders and files to a bucket by drag and drop:
- Log into the Management Console and go open the S3 console using this link https://console.aws.amazon.com/s3/.
- From Bucket name list, select the bucket to get your folders and files uploaded to.
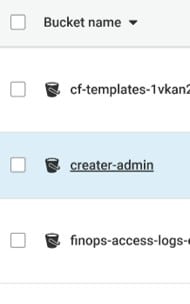
upload files and folders to s3 bucket – bucket name
- In another window, select all the files and folders for uploading. After that you drag and drop the selection right into the console window that where there’s the list of objects in the destination bucket.
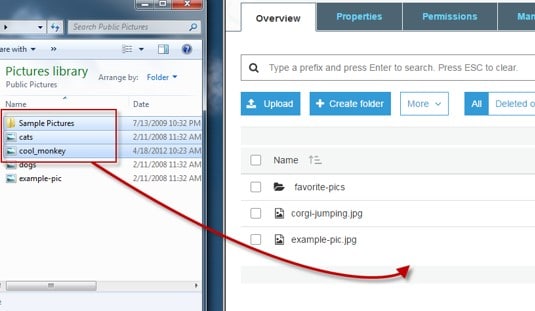
upload files and folders to s3 bucket – upload
- Chosen files get listed in the Upload dialog box.
- At Upload dialog box, choose to perform one of the following processes:
- Drag and drop even more files and folders to the console window at the Upload dialog box. If you wish to add some more files, you may select Add more files (only files, not folders).
- For quickly uploading listed files and folders with no permissions granted or removed for specific users or not even having to set public permissions for all the files, click on Upload .
- For permissions or properties to the files being uploaded, click on Next.
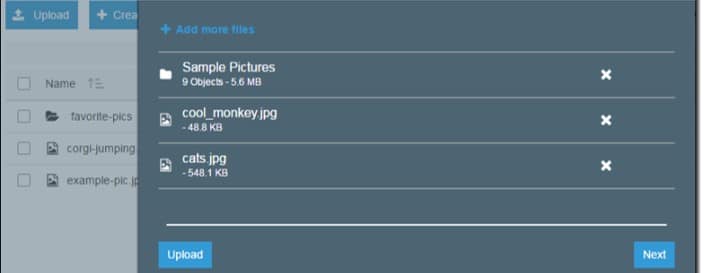
upload files and folders to s3 bucket – permissions
- In the Set Permissions page, for Manage users you have the chance to choose the permissions you require for the account owner. Owner= the account root user, not just an IAM user.
- Select the Add account for granting access to another account.
- For Manage public permissions you have the ability to allow read access to objects to everyone around the globe, for all uploaded files.
- Public read access could be granted when there is a subset of use cases for example: using buckets for websites.
- It is advised not to change the default setting regarding “Do not grant public read access to this object(s)”.
- After the object is uploaded, it’s possible to still make extra permission changes.
- After finishing the configuring process for permissions, click Next.
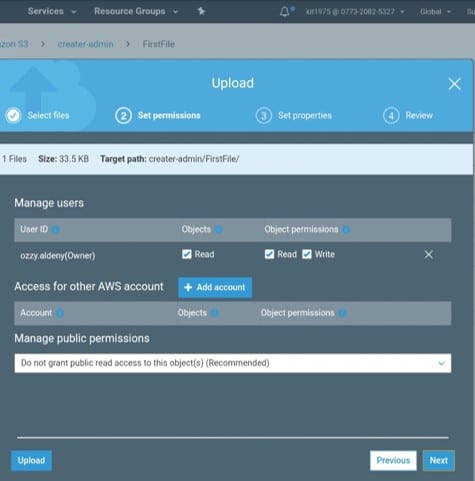
upload files and folders to s3 bucket – public read access
- For the Set Properties page, select the storage class you want and the encryption method for the files being uploaded. Metadata can also be added or modified. Select a storage class.
- To encrypt objects in a bucket, only CMKs found in the same Region as the bucket can be used.
- An external account can be given the ability to utilize an object under the protection of an AWS KMS CMK.
- For this to happen, click on Custom KMS ARN in the list and fill in the Amazon Resource Name for the external account.
- Access can further be restricted by administrators (external account) with usage permissions to an object which is protected by your AWS KMS CMK, through the creation of a resource-level IAM pol.
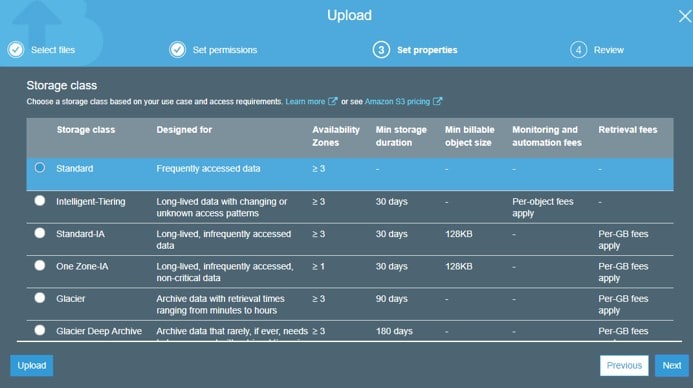
upload files and folders to s3 bucket – storage class
- Choose the type of encryption you want for the files. For no encryption, select None.
- Foe encryption using keys managed by S3, select the Amazon S3 master-key.
- For encryption using AWS KMS, select the AWS KMS master-key, and pick a customer master key from the list.
- Metadata is represented by: key-value pair, and this metadata comes in two kinds: system-defined and user-defined.To add S3 system-defined metadata to all uploaded objects:Choose a header for Header. (common HTTP headers, like: Content-Type & Content-Disposition). Fill in a specific value for the header, then select Save.
- Metadata with prefix: x-amz-meta-will be treated as being user-defined. (stored with the object, and returned when downloading this object)Adding user-defined metadata to all objects being uploaded: write x-amz-meta- and a custom name in Header field. Fill in a value for header, and select Save. Keys and their values need to be in conformation with the US-ASCII standards. (can be as large as 2 KB)
- Object tagging: to categorize storage.Tag: a key-value pair.Key and tag values: case sensitive. (up to 10 tags per object)
- Adding tags to all objects being uploaded: write a tag name for Key. Fill in a specific value for the tag, and click on Save.
- Click on Next.
- From Upload review page, make sure that all of your selected settings are correct, then click on the Upload button. For making additional corrections and alterations, click on Previous.
- If you want to check out the progress of upload, click on In progress from the bottom browser window.
- For checking history of uploads + other operations, click on Success.
Uploading Files by Pointing and Clicking
These steps show the way to upload files into a bucket through Upload .
-
- Log into the Management Console and go to the S3 console through this link https://console.aws.amazon.com/s3/.
- From the Bucket name list, click on the bucket name you wish to get your files uploaded to.
- Click on the Upload button.
- From the Upload dialog box, click on Add files.
- Go ahead and select some files to start uploading, and click on
- When your files get listed in the Upload dialog box, you can choose to perform one of those operations:-Select Add more files, for adding additional files.-Select Upload , to directly get your listed files uploaded.-Select Next if you want to start setting permissions and properties for your files.In order to start setting permissions or properties, begin by following with Step 5 of Uploading folders and files to a bucket by drag and drop.
Here are few awesome resources on AWS Services:
AWS S3 Bucket Details
AWS S3 Bucket Versioning
AWS S3 LifeCycle Management
AWS S3 File Explorer
Create AWS S3 Access Keys
AWS S3 Bucket Costs
AWS S3 Custom Key Store
- CloudySave is an all-round one stop-shop for your organization & teams to reduce your AWS Cloud Costs by more than 55%.
- Cloudysave’s goal is to provide clear visibility about the spending and usage patterns to your Engineers and Ops teams.
- Have a quick look at CloudySave’s Cost Caluculator to estimate real-time AWS costs.
- Sign up Now and uncover instant savings opportunities.