You will find that there are many steps for the process of creating a role from CLI.
Using a console, a lot of the role creation steps get made for you, while with the CLI, you will need to manually get each step done on your very own.
You will have to get the role created and get a permissions policy assigned to it.
With EC2 service, an instance profile needs to be created with a role added to it.
It is also optional to specify a permissions boundary for the newly created role.
How to get a role created for a specific service through the use of CLI?
- First off, get a role created with: aws iam create-role
- Then get a managed permissions policy attached to it with: aws iam attach-role-policy
Otherwise,
Get an inline permissions policy created for it with: aws iam put-role-policy
- You can optionally get custom attributes added to it by getting tags attached using: aws iam tag-role
- You can optionally get the permissions boundary specified for it using: aws iam put-role-permissions-boundary
Permissions boundary: It is in charge of the max permissions allowed for the role, as an advanced feature.
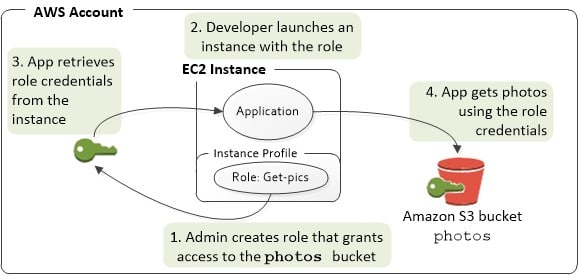
In case you choose to utilize your role with EC2 or a specific other service which relies on EC2, you will need an instance profile for storing your role.
Instance profile: Contains the role which is capable of getting attached to an EC2 instance upon launching. Just 1 role can be found in an instance profile, with no possibility for adding more.
In case your role gets created with the Management Console, you will get the instance profile instantly created having the exact name as that of your role.
How to get an instance profile created then storing your role inside using CLI?

AWS CloudTrail service role – CLI
- First step is to get an instance profile created using: aws iam create-instance-profile
- Then, you will need to get your role added to it with: aws iam add-role-to-instance-profile
- An example Command which includes the following:
– The 1st 2 steps in the process of getting a role created and attached with permissions.
– 2 steps of instance profile creation and role addition to the profile.
– Granting permission to the EC2 service for assuming the role and getting the example_bucket S3 bucket viewed.
– Running on a client computer which runs Windows and has previously gotten your command line interface configured with your Region and account credentials.

AWS CloudTrail service role – region
- As you go through the following example, add the below trust policy in your 1st command upon the role creation. It will give permission to the EC2 service to get the role assumed.
| { |
| “Version”: “2012-10-17”, |
| “Statement”: { |
| “Effect”: “Allow”, |
| “Principal”: {“Service”: “ec2.amazonaws.com”}, |
| “Action”: “sts:AssumeRole” |
| } |
| } |
- With the 2nd command, get a permissions policy attached to the role.

AWS CloudTrail service role – permission policy
For example, in the permissions policy below you will only grant permission to the role for performing the ListBucket action upon an S3 bucket named example_bucket.
| { |
| “Version”: “2012-10-17”, |
| “Statement”: { |
| “Effect”: “Allow”, |
| “Action”: “s3:ListBucket”, |
| “Resource”: “arn:aws:s3:::example_bucket” |
| } |
| } |
- For getting the Test-Role-for-EC2role created, you will need to start with saving the previously added trust policy under the name of trustpolicyforec2.jsonand the previously added permissions policy under the name permissionspolicyforec2.json to the directory named policies located inside the local C: drive.
Later on, the below commands may be used for the following steps:
– Creating role
– Attaching policy
– Creating instance profile
– Adding role to instance profile
# First, get role created while attaching trust policy which grants permission to EC2 for assume the created role.
$ aws iam create-role –role-name Test-Role-for-EC2 –assume-role-policy-document file://C:\policies\trustpolicyforec2.json
# Get the inline policy embedded to this role for setting the actions it can take.
$ aws iam put-role-policy –role-name Test-Role-for-EC2 –policy-name Permissions-Policy-For-Ec2 –policy-document file://permissionspolicyforec2.json
# Get instance profile created since its needed for EC2 to be able to take this role.
$ aws iam create-instance-profile –instance-profile-name EC2-ListBucket-S3
# Get role added to instance profile.
$ aws iam add-role-to-instance-profile –instance-profile-name EC2-ListBucket-S3 –role-name Test-Role-for-EC2
- Upon launching of this EC2 instance, you will need to set your instance profile name on Configure Instance Detailspage (with console).
However, with the aws ec2 run-instances CLI command, you will need to set the –iam-instance-profile parameter.
How to Create a Role for a Service Using API?
There are a lot of steps to take for the sake of getting a role created using API.
With console a lot of those steps will be automatically made, unlike the API which requires you to manually make perform all the steps alone.
You are need to get the role created and later get a permissions policy assigned to it.
I case you choose the EC2 service, you are needed to get an instance profile created and then adding to it your role.
It is optional to specify permissions boundary for the role.
To create a role for an AWS service (AWS API)
- First, get a role created using: CreateRole
Role trust policy: Set a specific file location.
- Get a managed permissions policy attached to it using: AttachRolePolicy
Otherwise,
Get an inline permissions policy created for it through: PutRolePolicy
- You can optionally get your attributes customized for user through simply getting tags attached with: TagRole
- You can optionally get the permissions boundary specified for it using: PutRolePermissionsBoundary
Permissions boundary: Is in charge of the max permissions allowed for a role (Advanced feature).
– In case you choose to utilize your role with EC2 or a specific other service which relies on EC2, you will need an instance profile for storing your role.
– Instance profile: Contains the role which is capable of getting attached to an EC2 instance upon launching. Just 1 role can be found in an instance profile, with no possibility for adding more.
– In case your role gets created with the Management Console, you will get the instance profile instantly created having the exact name as that of your role.
How to get an instance profile created and storing your role in it using API?
- Get an instance profile created with: CreateInstanceProfile
- Get your role added to this instance profile using: AddRoleToInstanceProfile