AWS CloudTrail Role
In this article, we will explain how an AWS CloudTrail Role works by looking at an example that includes:
– 3 Accounts: D, E, and R having no rights until granted.
– Account Admin, which has full read access to every log file found in our bucket.
Upon the aggregation of log files from various accounts into just 1 bucket, only the account with total control over the bucket is capable of accessing it. To be able to share log files between accounts, cross-account access is required. It can be enabled through the creation of IAM roles along with their access policies.
What is an AWS CloudTrail Role?
IAM roles need to be created for every single account you would like to grant access to.
For this example, we’re going to take 3 roles, where every 1 of the accounts D, E, and R has a role.
Every IAM role specifies a particular permissions or access policy which will allow those accounts to access the log files of the owning account named “Admin.”
Type of Policies:

AWS CloudTrail Role – Type of Policy
There are 2 policies for each IAM role you create.
Trust policy: sets either a trusted entity or a principle.
For the example at hand, we will consider that accounts D, E, and R refer to trusted entities, with an IAM user having the required permissions from those accounts.
Trust policy:
– Directly created upon utilizing console for the creation of the role.
In case you choose to go for the CLI when creating the role, you will need to provide the trust policy for CLI command of create-role.
Utilizing the SDK for the creation of the role means that you need to add the trust policy as a parameter to API CreateRole.
Role access policy:
– Needs to be created by the owner of Account Admin.
– Specifies resources and actions that are permitted access to by the trusted entity or principal.
How to Create an AWS CloudTrail Role
To create an AWS CloudTrail Role through the Console:
- Login to the Management Console as an administrator of Account “Admin”.
- Go straight to the IAM console.

AWS CloudTrail Role – Dashboard
- From under navigation pane, click on Roles.

AWS CloudTrail Role – Roles Page
- Select Create New Role.
- Type a name for the new role, and click on Next Step.

AWS CloudTrail Role – Type of Trusted Entity
- Select the option: “Role for Cross-Account Access”.
AWS CloudTrail Role – Type Permissions Policy Name
- If you choose to go with Scenario 1, you will need to perform the below steps in order to grant access between your owned accounts:
- Select the option: “Provide access between AWS accounts you own”.
- Fill in the 12-digit account ID of the chosen account (D, E, or R) which will be given access.
- Leave a check mark for Require MFA in case you’d like multi-factor authentication to be provided by a user prior to his assuming of this role.

If you wish to follow Scenario 2, you must perform the below listed steps in order to grant a 3rd-party account access.
In this chosen example, the following steps are to be made for Account R (3rd-party log analyzer):
- Select the option: “Allows IAM users from a 3rd party AWS account to access this account”.
- Fill in 12-digit ID of the account you choose to give access to your role.
- Fill in an external ID for adding more control over the accounts that may be able to assume your role.
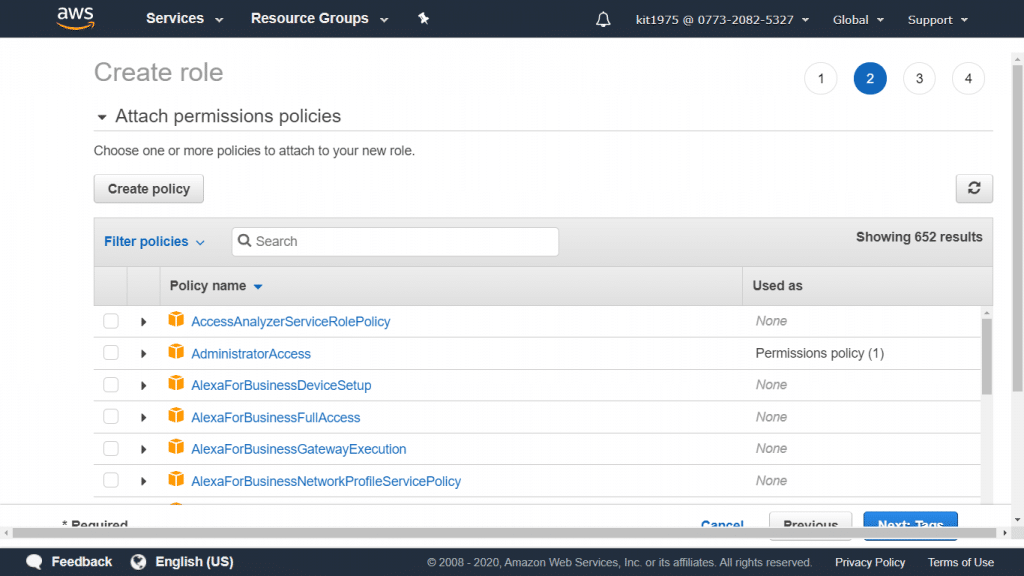
- Click on Next Step in order to start attaching a specific policy for granting permissions to your role.

AWS CloudTrail Role – Attach Permissions Policies
- For the Attach Policy, select the policy named AmazonS3ReadOnlyAccess.
Keep in mind the following:
AmazonS3ReadOnlyAccess policy: This policy will grant list and retrieval rights to every single S3 bucket found in the user’s account.
– You can grant access only to a specific account’s log files.
– You can grant access to every single log file found in your S3 bucket.
- Click on Next Step

AWS CloudTrail Role – Review Page
- Go over your role information.
Notice that:
Now, it’s possible to alter the role name. However, this will let you return to page Step 2: Select Role Type and you will have to go over it again and enter the required info once more.
- Select Create Role. As soon as your role creation finishes, the new role will be displayed in your role list.
Common Scenarios for an AWS CloudTrail Role:
There are 2 ways for role utilization:
– Interactively – IAM console
– Programmatically – API, Tools for Windows PowerShell, or CLI
- Your account’s IAM users who work through the IAM console are capable of switching to a role for the sake of temporarily utilizing its permissions. They do this through letting go of their primary permissions and taking on those permissions which are assigned to the chosen role. Upon exiting this role, the users’ primary permissions will get restored again.
- A specific service (EC2, S3…) or an application is capable of assuming a role through requesting temporary security credentials for a chosen role for performing programmatic requests. A role may be utilized as such in order to prevent sharing or keeping track of any long-term security credentials for every single entity in need of being granted access to a particular resource. To learn how to create a Service Roles, check out the article about AWS CloudTrail: Creating a Service Role.
See Also: