How to Launch AWS Instance with Launch Wizard
Launch Instance Wizard: How to Launch AWS Instance

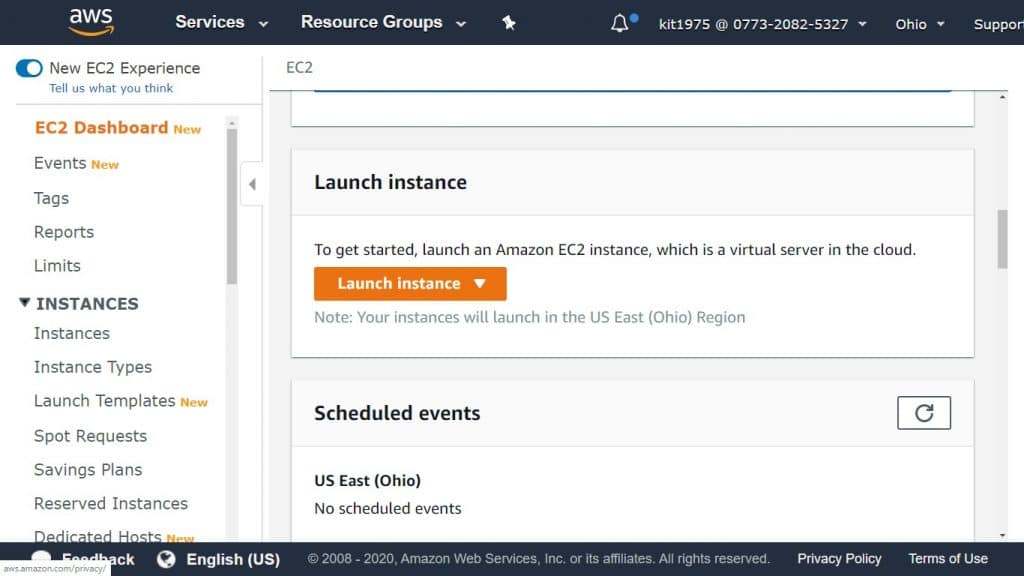
Launch AWS Instance – ec2 dashboard
An instance may be launched through the launch instance wizard. This wizard sets out every launch parameter needed for the launching of a chosen instance. Wherever a default value is set by the wizard, it can be accepted or changed to a specific value of your own. An AMI + a key pair must be chosen for launching the instance.
Prior to launching an instance, you must be set up.
Note
Upon launching an instance outside of Free Tier, you will get charged for the period in which instance continues to run, even when it stays idle.
Process for launching an instance:
1. Choosing Amazon Machine Image (AMI)
2. Choosing Instance Type
3. Configuring Instance Details
4. Adding Storage
5. Adding Tags
6. Configuring Security Group
7. Reviewing Instance Launch and Selecting Key Pair
Choosing Amazon Machine Image (AMI)

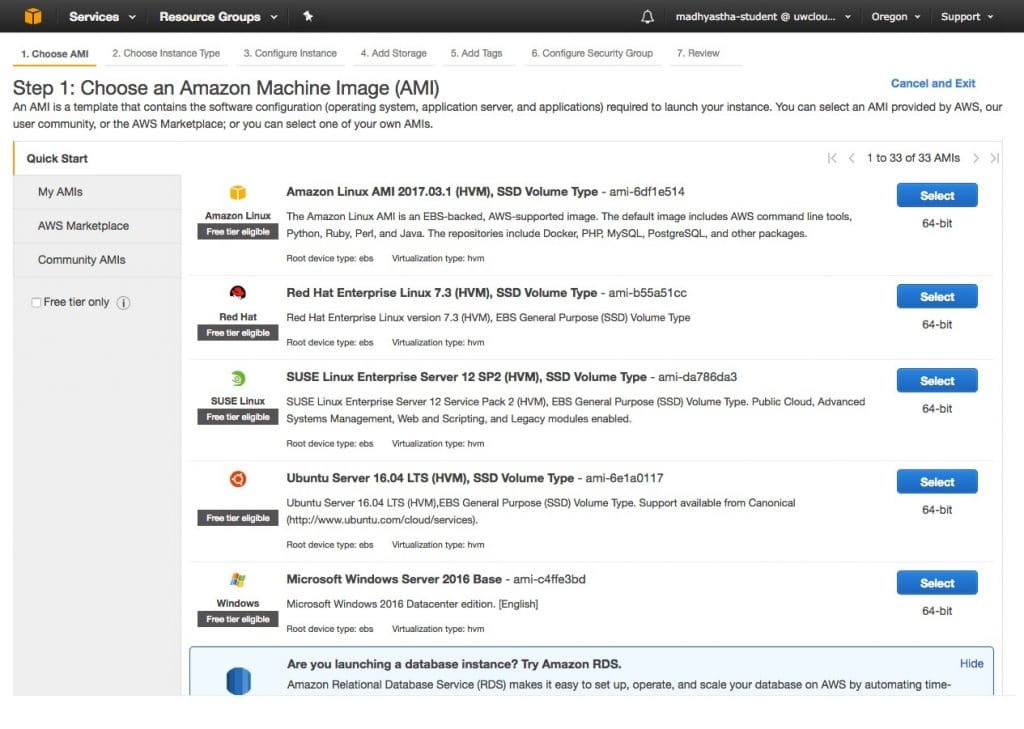
Launch AWS Instance – Amazon Machine Image (AMI)
- Go to the EC2 console at the following link https://console.aws.amazon.com/ec2/.
- From the navigation bar, you can check your current Region (such as: US East (Ohio)). Choose a Region in accordance with your requirements. This is significant since a couple of EC2 resources are shared between Regions, while others can’t.
- On the EC2 console dashboard, select Launch Instance.
- From the Choose an Amazon Machine Image (AMI) page, select an AMI as said below:
-
- Choose which type of AMI you want from the left pane:
How to quickly Start?
You get a few selected AMIs that will aid you in a quick start. For choosing an AMI which can be used with the free tier, select Free tier only from the left pane. Such AMIs are known as Free tier eligible.
– Check My AMIs
Your own private AMIs, or shared private AMIs. For checking the AMIs that have been shared with you, select Shared with me from the left pane.
– Marketplace
A store on the internet that allows you to buy software running on AWS, which include AMIs.
– Community AMIs
AMIs that community members are making available for other users. For getting the list of AMIs filtered by operating system, select the necessary check box from beneath Operating system. It may be filtered by architecture and root device type as well.
- View Root device type found for every AMI. Find the type of AMIs that you require, such as ebs or instance-store.
- View every Virtualization type for AMIs. Find the type of AMIs that you require, such as hvm or paravirtual.
- Select one of the AMIs that you require, then click on Select.
Launching your instance from an AMI
Upon launching an instance, you will need to choose a configuration (The Amazon Machine Image (AMI)). It includes the data needed for creating a new instance.
E.g. AMI may include software that is necessary for acting as a web server: Apache, Linux and a website.
Choosing your Instance Type

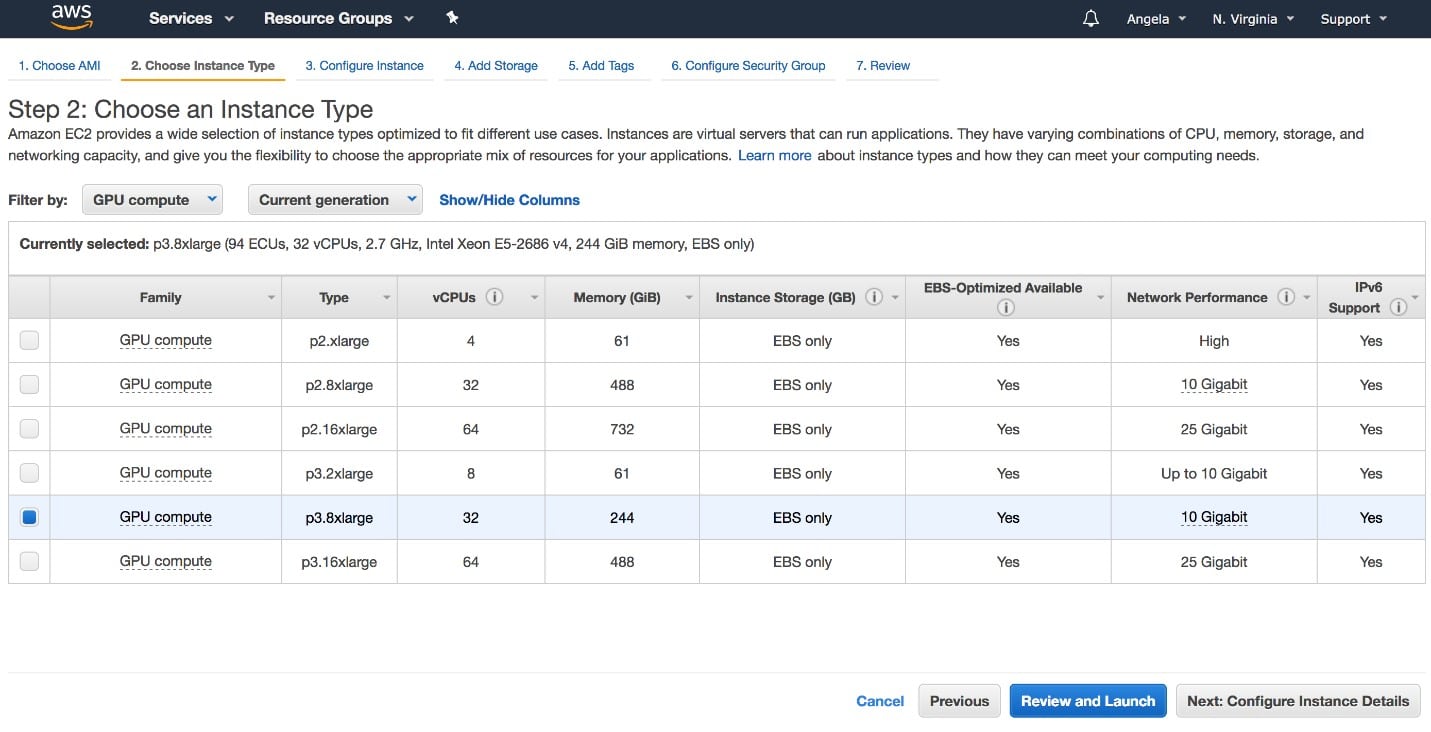
Launch AWS Instance – choosing instance type
From Choose an Instance Type page, choose which hardware configuration and size you need for the instance your launching. Greater sized instance types come with added CPU and memory.
To be able to use the free tier, select instance type t2.micro.
Default: current generation instance types will be shown, and first available instance type will be selected according to the AMI that you have chosen. To check out the older generation instance types, select All generations in filter list.
Keep a Note
For setting up an instance in a fast manner and for testing purposes, select Review and Launch to go with default configuration settings, and start with launching the instance. However, if you wish to configure the instance even more, click on Next: Configure Instance Details.
Configuring the Instance Details

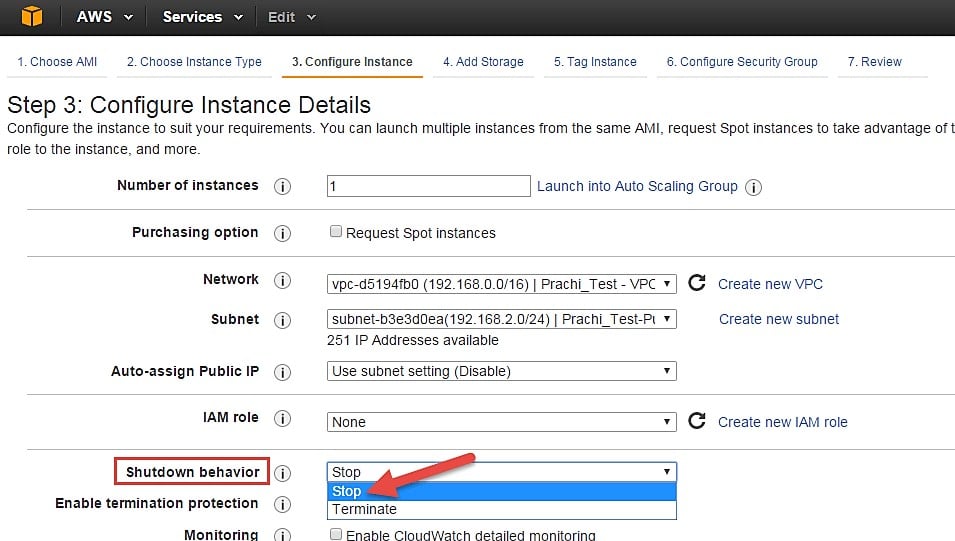
Launch AWS Instance – configuring instance details
From Configure Instance Details page, do the following alterations for settings as required (expand Advanced Details to see more settings), and select Next: Add Storage:
- “Number of instances”: Type in the value of instances to get launched.
Tip
To get even faster instance launches, divide your big requests to make them into smaller batches. E.g. create 5 different launch requests for a hundred instances every one in the lace of setting one launch request for five hundred instances.
- Optional: For ensuring the right number of instances to control the demand on your chosen app, you may select Launch into Auto Scaling Group for creating a launch configuration + Auto Scaling group. Auto Scaling: scales number of instances in the group in accordance to what you specify.
- Purchasing option: Select Request Spot instances for launching a Spot Instance. Doing so will add and remove options from the current page. Specify maximum price, and if you wish you may update request type, validity and interruption behavior.
- Network: Choose VPC, or if you want to create new VPC, select Create new VPC for heading to VPC console. After finishing, go back to the wizard and select Refresh so that you load your VPC into the list.
- Subnet: It is possible to launch an instance in a subnet along with a chosen Availability Zone, Outpost or Local Zone.
For launching your instance in an Availability Zone, choose the subnet where you want to get your instance launched. You may choose No preference to get a default subnet chosen in any Availability Zone. For the sake of creating a new subnet, select Create new subnet so that you head to the VPC console. After finishing, go back to the wizard and select Refresh to get your subnet loaded in the list.
Launching instance in a Local Zone: Choose a subnet you created in Local Zone.
Launching instance in an Outpost: choose a subnet in the VPC which you gave along with an Outpost.
- Auto-assign Public IP: Set whether you’d like your instance to receive a public IPv4 address. Instances found in default subnet will get a public IPv4 address and those found in a nondefault subnet will not. It is possible to choose Enable or Disable to override the default setting of the subnet.
- Auto-assign IPv6 IP: Set whether you’d like your instance to get an IPv6 address from the range of the subnet. Choose Enable or Disable for the sake of overriding the default setting of the subnet. This may be available merely if an IPv6 CIDR block is associated with your VPC and your subnet.
- Capacity Reservation: Set whether you’d like to launch the instance into either a shared capacity or into an already existing Capacity Reservation.
- IAM role: Choose an Identity and Access Management (IAM) role to get them associated with your instance.
- CPU options: Select Specify CPU options for the sake of setting a custom number of vCPUs while launching. Specify the number of CPU cores + threads/core.
- Shutdown behavior: Choose whether you’d like the instance to stop or get terminated upon shut down.
- Stop – Hibernate behavior: For allowing hibernation, choose this check box. This may only be available for instances that meet hibernation prerequisites.
- Enable termination protection: For the prevention of accidental termination, choose this check box.
- Monitoring: Choose this check box for enabling detailed monitoring for the instance by CloudWatch. Extra charges will be applied.
- EBS-Optimized instance: It utilizes an optimized configuration stack and gives extra, its capacity is for EBS I/O. In case this feature works with the instance type, choose this check box for getting it enabled. Extra charges may get applied.
- Tenancy: When launching an instance into a VPC, your instance may be run on isolated, dedicated Host (Dedicated host) or on a Dedicated hardware (Dedicated). Extra charges may be applied.
- T2/T3 Unlimited: Choose this check box for the sake of enabling apps to burst far over the baseline for as much time as required. Extra charges may be applied.
- Network interfaces: When choosing a specific subnet, it’s possible to set up to 2 network interfaces for the given instance:
– For section Network Interface, choose New network interface for allowing AWS to create a newly made interface, or choose an existing and already available network interface.
– For section Primary IP, fill in a private IPv4 address from the various range of your subnet, or keep Auto-assign so that AWS selects a private IPv4 address.
– For section Secondary IP addresses, select Add IP to place multiple private IPv4 address to the chosen network interface.
– For section IPv6 IPs, select Add IP, and fill in an IPv6 address from the various range of the subnet, or keep Auto-assign to allow AWS to select one.
– Select Add Device for adding a secondary network interface, which can fall into another subnet of the VPC, given that it lies in the exact Availability Zone as that of your instance. – In case of setting multiple network interfaces, your instance will no longer get a public IPv4 address. – also, in case of setting an already existing network interface for eth0, it wouldn’t be possible to override the subnet’s public IPv4 setting through Auto-assign Public IP.
- Kernel ID: (paravirtual (PV) AMIs) Choose Use default only if you don’t wish utilize a specific kernel.
- RAM disk ID: (paravirtual (PV) AMIs) Choose Use default if you don’t wish to utilize a specific RAM disk. In case you choose a kernel, you are going to have to choose a specific RAM disk with the specific drivers in order to support it.
- Placement group: It chooses the placement strategy of every instance. Choose an already existing placement group, or you can go ahead and create a newly made one. This is merely available for instance types that support placement groups.
- User data: It can be specified for the sake of configuring an instance while launching, or running a configuration script. For attaching a file, choose As file and search for the file you’d like to attach.