AWS EC2 Image Builder
Instances are launched by Auto Scaling groups during the building and testing phases of the image pipeline. An Amazon EC2 Auto Scaling group needs to be created at least once before creating an image with EC2 Image Builder. Upon the usage of Auto Scaling, a service-linked role gets created in your account.

ec2 image builder
Service-Linked Role of EC2 Image Builder:
- On your behalf, a service linked-role is used for granting permissions to other AWS services.
- There is no need to manually create a service-linked role.
- The service-linked role is created by the image builder upon the creation of the first Image Builder resource. The service-linked role is created by image builder upon the creation of the first Image Builder resource.
Access EC2 Image Builder by the following Interfaces:
- Image Builder console landing page: Go to the EC2 Image Builder landing page.
- Tools for SDKs: Use SDKs and Tools to be able to both access and also manage Image Builder using the language which you choose.
- Command Line Interface (CLI): Use Command Line Interface to get access to the API operations.
How to Build and Automate “OS Image Deployment” through Image Builder Console:
- Go to the EC2 Image Builder landing page and click on Create image pipeline.
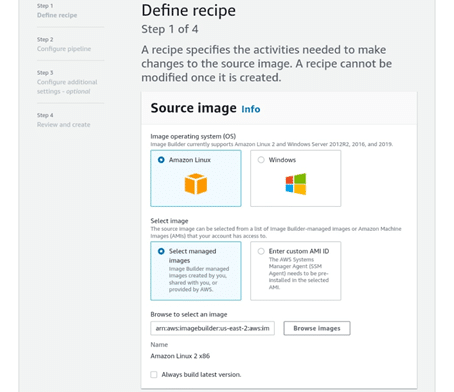
- Upon reaching the Define Recipe page, start creating an image recipe with your source image and components.
aws ec2 image builder
- First, select your source image, which includes the image OS and the image to be configured. After you choose your image OS, three options are offered for selecting an image to get it configured:
- Choose a specific image from the managed images. To do so, you need to enter the image ARN into the text box, or you have to select Browse images so that you get to view managed images.
- Use custom AMI by typing in the AMI ID.
- Choose Build components. Components are:
- Installation packages
- Security hardening steps
- Tests consumed by the recipe as you build your image
After the creation of an image recipe, there is no way to modify or replace its components. In order to do so, you will need to go and create a new image recipe or image recipe version.
- First, select your source image, which includes the image OS and the image to be configured. After you choose your image OS, three options are offered for selecting an image to get it configured:

Components come in 2 types:

amazon ec2 image builder
Builds:
- Installation packages and hardening security steps.
- Enter a component ARN or simply browse through and select from a list of Image Builder components. For creating a new component, choose Create Component. Type in or choose the components the way you want them to start running in the pipeline.
Tests:
- Tests for being performed on the output image, which is built by the image pipeline.
- Enter a test component ARN or go browsing through and selecting Image Builder test components to start with.
- If you wish to create a new component, choose Create Component. Type in or start selecting from the components in the way you want to run them in the image build pipeline.
Upon entering the source image and components, click on Next.
- When you reach the Configure Pipeline page, start on setting the image pipeline infrastructure and build the schedule.
- Fill in the required specifications for Pipeline details:

amazon aws ec2 image builder
- Set a unique Name for your image pipeline.
- Fill in a Description for the image deployment pipeline. (optional)
- Choose which IAM role you want to associate your instance profile with or simply Create a new role. To create a new role, Image Builder leads you to the IAM console. You can simply use the following IAM role policy: EC2InstanceProfileForImageBuilder
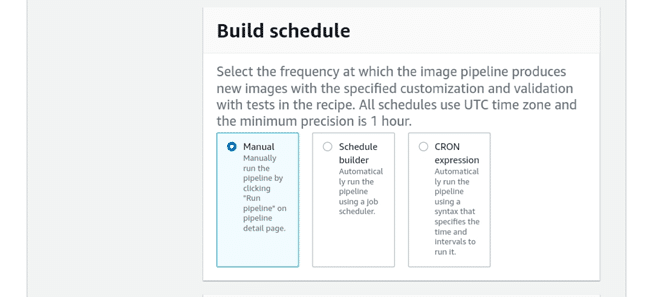
- Choose which Build schedule you want to run your image pipeline:
ec2 image builder – schedule
- Manual: Select when to run the pipeline. When you want to do so, click on Run pipeline from the Pipeline details page.
- Schedule builder: Set the build pipeline so that it runs automatically using the job scheduler. Fill in the cadence(time) after “Run pipeline every”. Either choose to run the pipeline daily, weekly or monthly.
- CRON expression: Set the build pipeline for running with a syntax specifying which time and intervals are used to run it. Fill in the expression inside the text box.
- You can optionally choose to fill in the Infrastructure specifications in order to define the infrastructure you want for your image. The EC2 Instance which gets launched will be associated with those settings so as to build the image.
- Choose an Instance Type, which adheres to the needs of the software running your instance.
- To have the option of receiving notifications and alerts for steps performed in your image pipeline, fill in an SNS topic ARN to be notified.
- For Troubleshooting settings, fill in the required information: Useful to perform troubleshooting on your instance in case of failure.
- For the Key pair name, choose the existing key pair or create a new one instead. To create a new key pair, you will be taken to the Amazon EC2 console. Select Create a new key pair and fill in the name for the key pair, then select Download Key Pair. Important.
- It’s the only chance you get to save the private key file, so download it and make sure to save it in the safest place possible. Give the name of your key pair upon the launching of an instance, and fill in the required private key every time you choose to connect to this instance.
- Go back to the Image Builder console, then select Refresh (next to the Key pair name dropdown). The new key pair will show up now in the dropdown list.
- Choose the option if you want to terminate your instance upon failure or not by clicking the check box. In case you need to troubleshoot the instance upon the failure of the image build, be sure to leave the check box unchecked.
- For S3 Logs, choose the S3 bucket to that you’ll send your instance log files. If you want to browse and choose your Amazon S3 bucket locations, click on Browse S3.
- For Advanced Settings, fill in this information to select a VPC for launching your instance:
- Choose a Virtual Private Cloud (VPC) for launching your instance. Also, it’s possible for you to Create a new VPC and you’ll go to the VPC console. For starting communication between your VPC and the internet: Enable this connectivity by selecting an internet gateway. For adding a new internet gateway to your VPC, go by the steps found in Creating and Attaching an Internet Gateway in the Amazon VPC User Guide.
- In case you choose a VPC, select the Public subnet ID to which your chosen VPC is or simply click on Create a new subnet to make a new one.
- In case you choose a VPC, click on the Security groups with which your VPC is associated, or simply click on Create a new security group to create a new one.
Upon entering all infrastructure specifications, click on Next.
- Fill in the required specifications for Pipeline details:
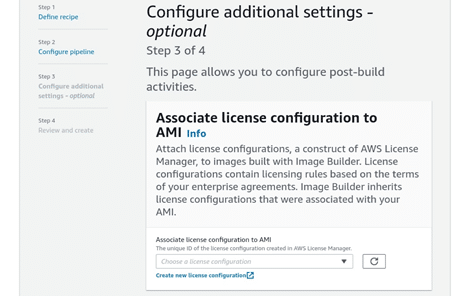
- From the Configure additional settings page, you can optionally start defining the test and distribution settings and also other optional configuration parameters performed when the image is built. To get those configurations defined, fill in this information:
ec2 image builder – additional settings
- For Associate license configuration to AMI, select to associate the output AMI with an already existing license configuration. Choose as many as you want unique license configuration IDs from the dropdown. To create a new license configuration, click on Create new License Configuration and you will go to the License Manager console.
- Fill in those required specifications for Output AMI.
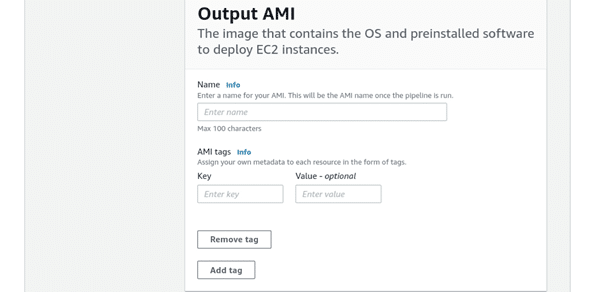
- Give a Name to your output AMI, and it will be the new name of your created AMI upon the completion of the image pipeline.
- For AMI tags, go ahead and add a Key and an optional Value tag.
- In the AMI distribution settings, choose other AWS Regions to copy your AMI to.-Also, you can configure permissions for outbound AMI. Either allow all AWS accounts, or chosen accounts, to launch the created AMI. Choosing to give all AWS accounts permission to launch AMI makes the output AMI public.
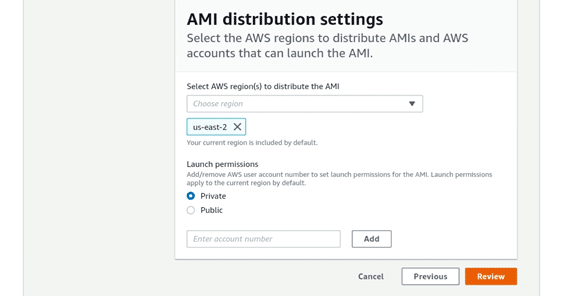
ec2 image builder – AMI distribution settings
- Choose Regions where you want to distribute the AMI. (By default, the current Region is added)
- In Launch permissions, choose the AMI to be either Private or Public. By default, it will be placed as Private. Private Mode: Only specific accounts get permission to launchPublic Mode: All users will be granted access to the output AMI.
- Choose it to be Public or Private.
- For choosing Private: enter the account numbers you wish to give them launch permissions to and select Add.
- From the Review and create the page, you will get to check out all of your settings before creating the image pipeline.
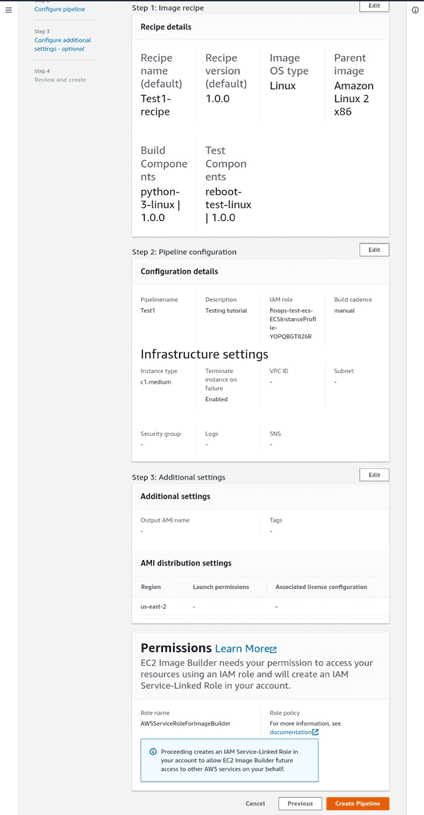
ec2 image builder recipe details
Go Over
- Recipe details
- Pipeline configuration details
- Additional settings
If you want to make changes, select Edit to return to the specification settings that you want to change or update. When the settings reflect your desired configuration, select Create Pipeline.
- If the creation fails, a message will show you the returned errors. Go fix these errors and try once again to create a pipeline.
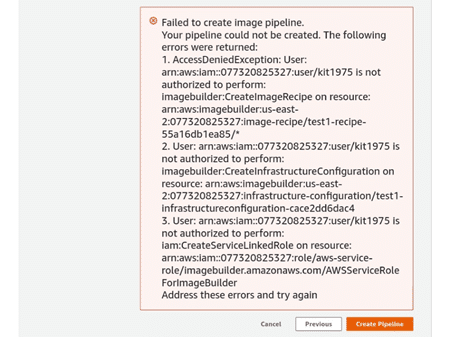
ec2 image builder – error
- When you succeed in creating your image pipeline, you will be then sent to the Image pipelines page. Here, you get to do the following with your image pipeline: -Manage -Delete -Disable -View details -Run


See Also